(This was originally a thread posted on Twitter on June 30, 2022)
June 30, 2022
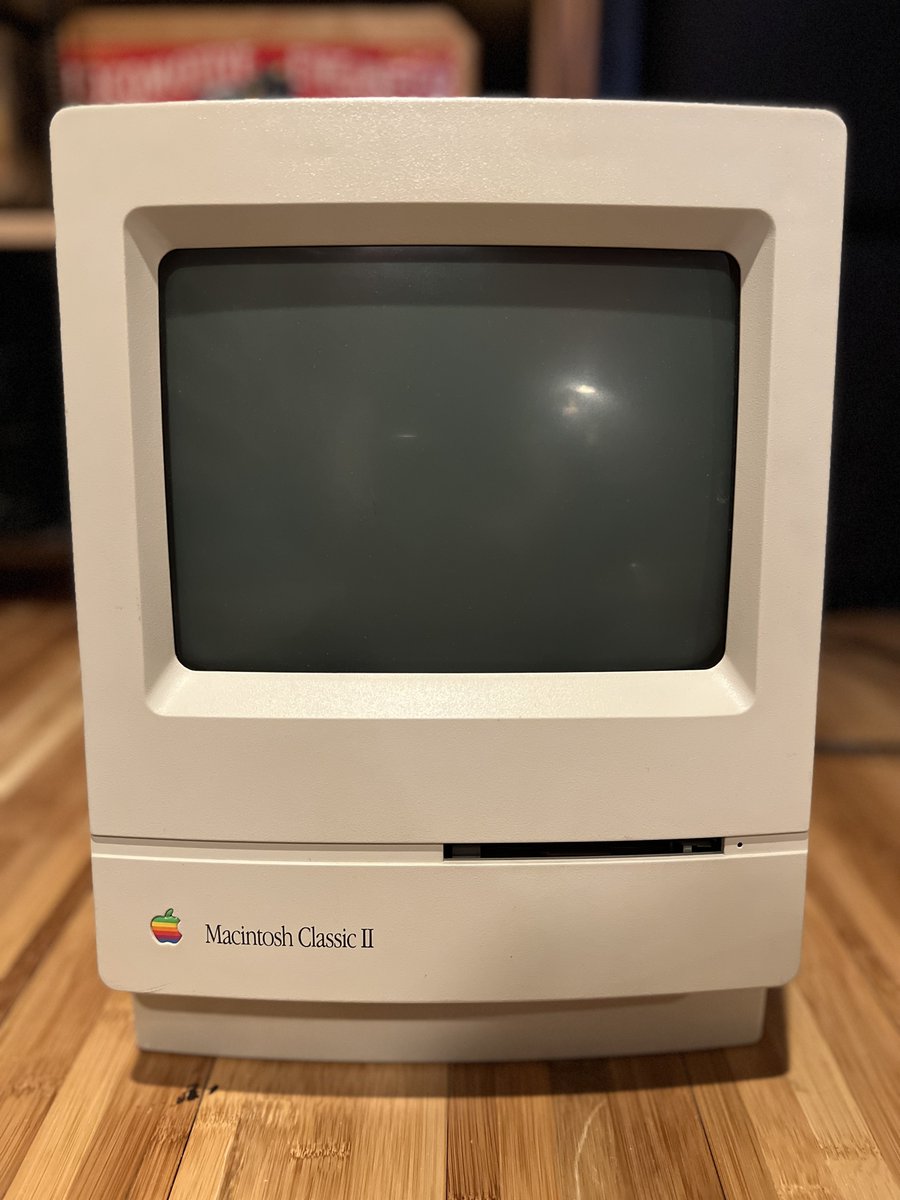
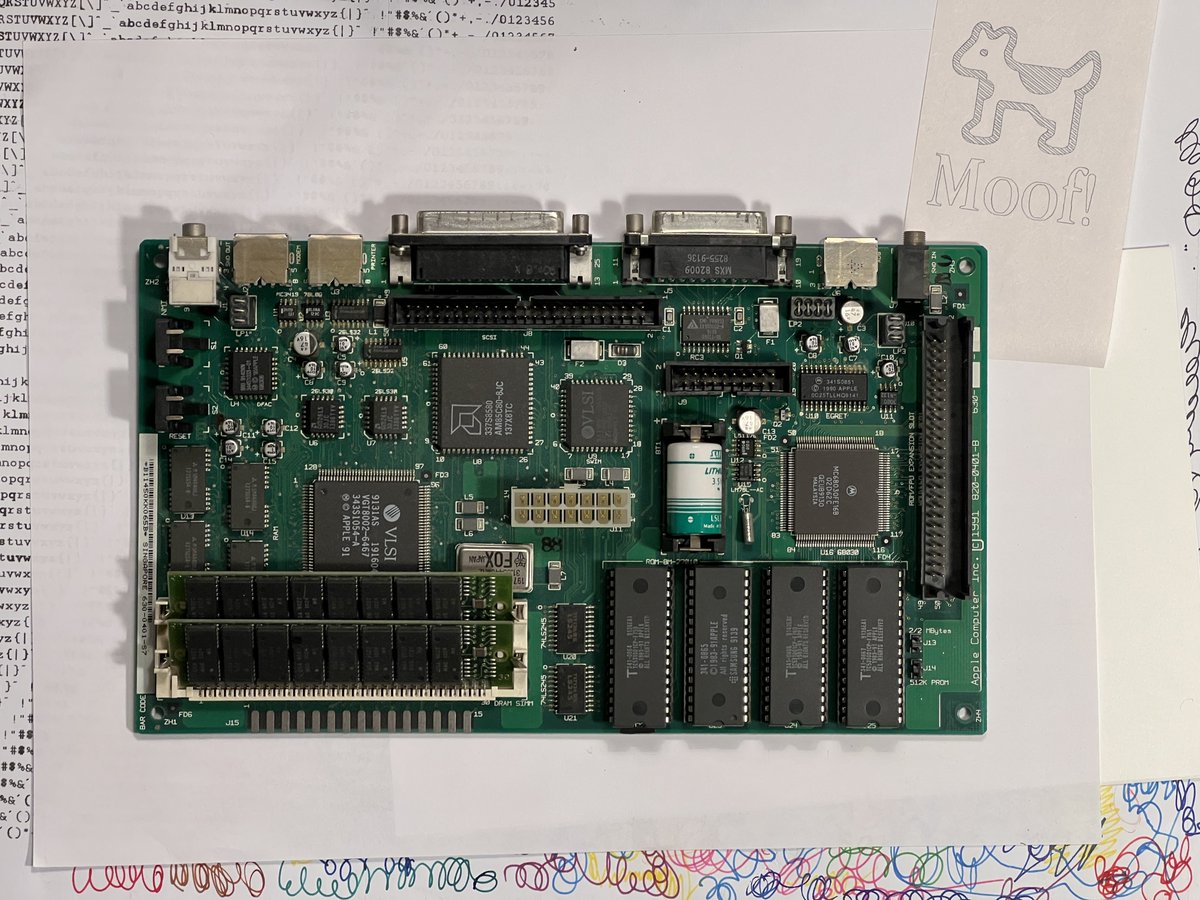
On the bench for recapping today is a Mac Classic II, the last of the b&w compact Macs (1991). I forgot how small the motherboard was.
(This was originally a thread posted on Twitter on June 30, 2022)
June 30, 2022
On the bench for recapping today is a Mac Classic II, the last of the b&w compact Macs (1991). I forgot how small the motherboard was.
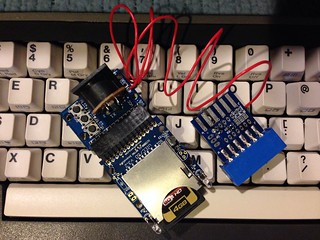
I’ve had this cartridge expander for a few years and always assumed it was commonly known about and that the ROM inside had been dumped. It seems that may not be the case, so this page is to provide the information I have about it.
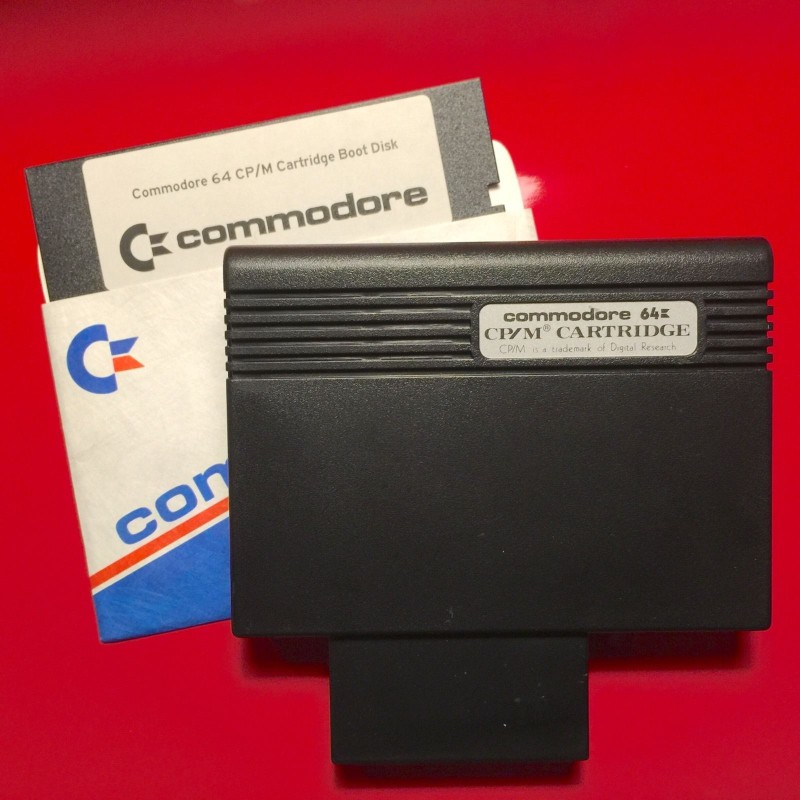
The Commodore 64 CP/M cartridge was released sometime in the early 1980’s, shortly after the introduction of the C64 itself. The cartridge contained the necessary Z80 chip inside to run CP/M software natively. While a novel idea, it was a bit too late with the popularity of CP/M waning which itself had been released almost a decade earlier. To make matters worse, it seems to only work on very early revisions of the Commodore 64. I personally am only able to get it to work reliably on a Rev A motherboard (1982, with no s-video output).
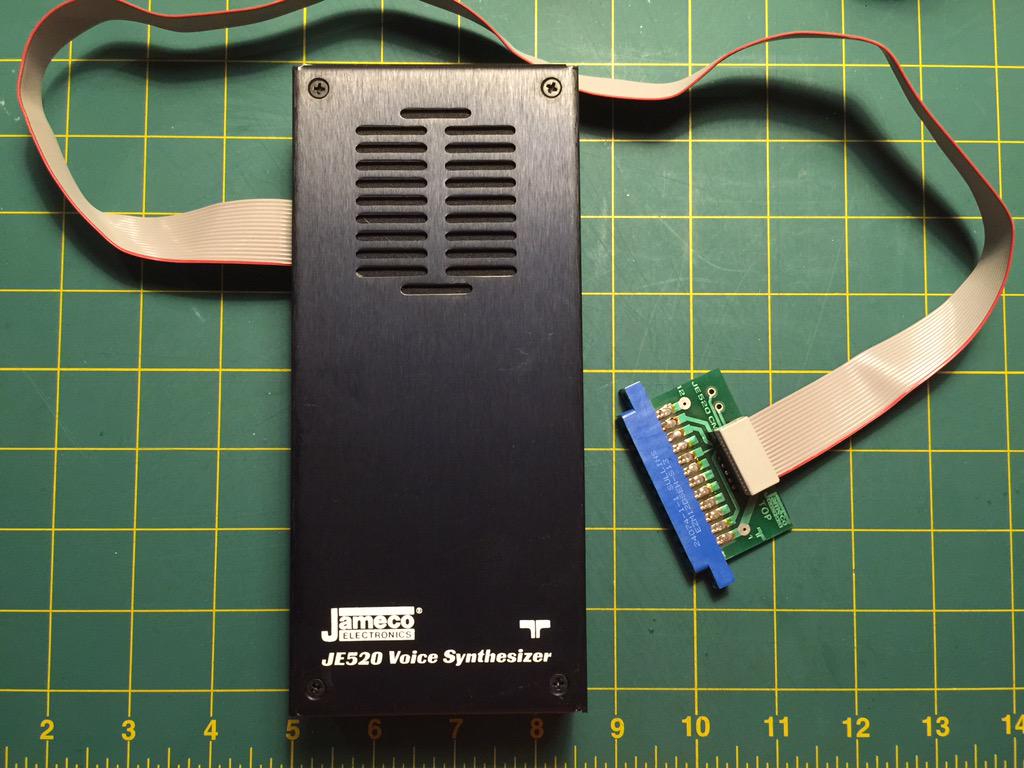 The latest acquisition is the JE520 by Jameco. This external voice synthesizer came in two variants: the JE520-CM for Commodore and JE520-AP for Apple II. The only difference was the interface connection to the computer. The Commodore version, the one I have, connects to the user port while the Apple II version connects via an interface slot card. Otherwise, I believe the rest of the hardware to be the same. I found an advertisement for it in RUN issue 7 1984— it retailed for $115-$150.
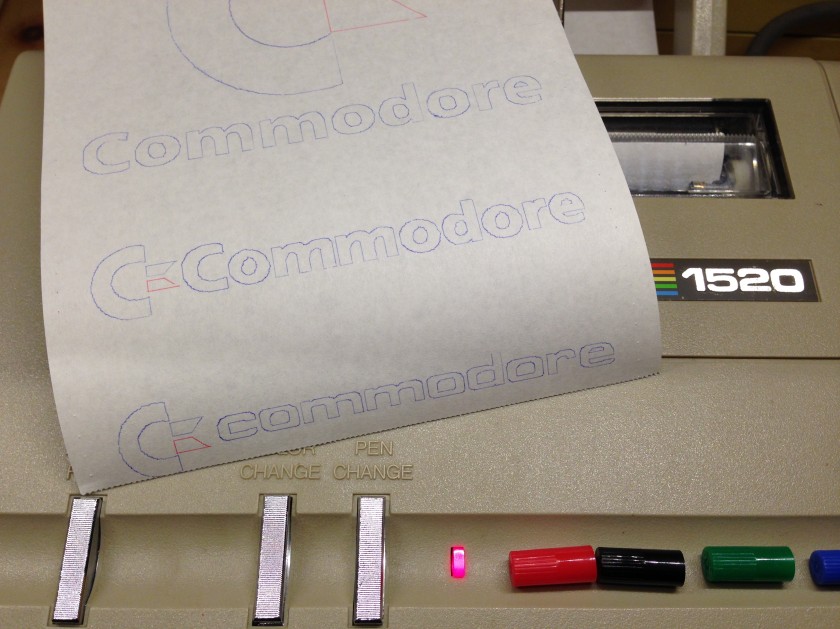
I’ve put together a quick program that can convert an .SVG file into data statements that can be used to plot it on a Commodore 1520 Printer/Plotter. The program doesn’t run on the Commodore 64 (yet) but instead runs in the browser. It’s not ready to release yet as it’s fair picky about the types of .SVG files you feed it.
To whet your appetite, I’ve prepared a .D64 disk image that has four BASIC programs that will plot four different Commodore logos.
And if you need plotter pens for your Commodore 1520 printer, you can get new old-stock pens from @futurewas8bit!
 It’s BASIC Week on Reddit/r/RetroBattlestations and I ported the BASIC Week program “Under the Sea” to the Commodore 64. The original code was written by FozzTexx for the IBM PC which allows for variable names longer than two characters. The Commodore 64 BASIC version 2 would probably still work using the longer names, it would just ignore everything after the first two characters. Doing this though would run the risk of overwriting variables so it was best to convert them. You can find a list of the variable name conversions at the end of the post.
If you’re keen to type the program in yourself, you can do so here. There’s a few special characters used the code. “CBM-” means hold the Commodore key (lower left) and hit the character after.
If you want to simply run the program from a disc image or to make a floppy, you can download a D64 disk image of Under The Sea here.
The BASIC version is quite slow and there’s room for optimization of the display code. Instead, I ran the code through the BLITZ! BASIC compiler and it runs much faster. This version is on the disc as “c/underthesea”
There’s three keys used the game. ‘A’ makes the turtle (you) go up, ‘Z’ goes down and ‘Q’ will quit the game.
Variable name conversion
Turtle$ 		=	t$

TurtleWidth 	=	tw

TurtleHeight	=	th

TurtleErase$	=	te$

TrutleDead$	=	td$

Enemy$()		=	nm$()

EnemyErase$	=	ee$

EnemyW		=	ew

GameOver$		=	go$

GOWidth		=	gw

GOHeight		=	gh

AirMax		=	am

Sea$			=	se$

TurtleY		=	ty

Surface		=	sf

Score			=	sc

LastY			=	ly

TurtleX		=	tx

NumEnemies	=	ne

BubbleX		=	bx

BubbleY		=	by

Enemy X		=	ex

Enemy Y		=	ey

EnemyHit		=	eh

Food$			=	f$

FoodX			=	fx

FoodY			=	fy

NewX			=	nx

NewY			=	ny

EnemyC		=	ec

NumBubbles	=	nb

NumFood		=	nf

exV			=	xv

eyV			=	yv

rows			=	rw

cols			=	cl
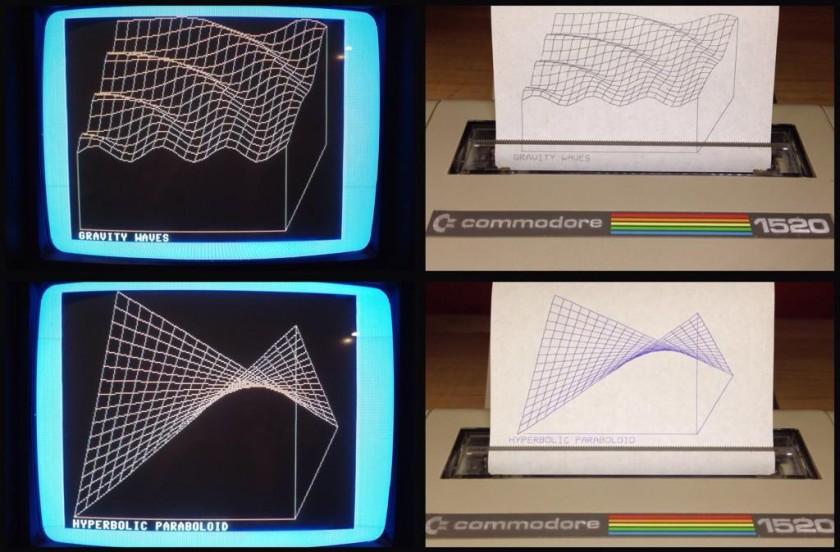
Recently on the Lemon64 forum, user Rizthomas posted some excellent scans of some plots that he did on a Commodore 1520 Printer/Plotter back in 1986. The plots were well executed and very intricate. Some were 2D “string art” and some were 3D functional models. Unfortunately, Rizthomas was unable to locate the original disks for his plots (still hopeful they’ll turn up!) but was generous enough to point everyone in the direction of where he began.
One route was Transactor Magazine Volume 6, Issue 4 which contained a program called The Projector by Ian Adam of Vancouver, B.C. The program was of combination BASIC that built on top of a series of machine language routines (from Transactor Volume 5, Issue 6) that made it easy to draw lines, circles, and text on a hires screen. The routines were called with a SYS command from BASIC and were passed coordinates as variables. This made it incredibly easy to patch the program to also send those coordinates to the Commodore 1520 Printer/Plotter with a few modifications.
You can download the program (and required ML program) here.
The nice thing about the program is that it will draw a line on the screen while drawing it on the printer simultaneously so you can see both evolve together. Enjoy and a big thanks to Rizthomas for the pointers to the code! If you’re able to get it working, let me know in the comments (and let’s see what you plotted).
Here’s a quick Vine of the plotter working:
If you have a Commodore 64, chances are you’ll eventually need to connect a modem or other serial device to it. You’ll find that’s not quite that easy since the C64 doesn’t have a standard RS-232 serial port. What it does have is called the “user port” and it can do serial over this port but it needs to be changed from TTL levels (0 to +5v) to RS-232 levels (-15v to +15v).
If you’ve ever attempted to purchase a VIC-1011a terminal type, SwiftLink or Turbo232 from eBay you’ll quickly find out that the price gets out of hand. Expect to pay upwards of $100 or more for these adapters.
Luckily, there’s an inexpensive way to get a RS-232 port on your C64 and it’ll cost you less than $15. Ready?
You’ll need these parts for the project.
Connect the RS232-TTL module directly to the C64 user port edge connector using the table below.
| RS232-TTL Module | C64 User Port |
|---|---|
| GND | A & N |
| TXD | M |
| RXD | B & C |
| VCC | 2 |
Update! Alwyz from 1200baud suggested that connecting VCC isn’t necessary and potentially dangerous. I’ve had zero problems with mine as listed here. I’m providing this warning so you can make your own decision!
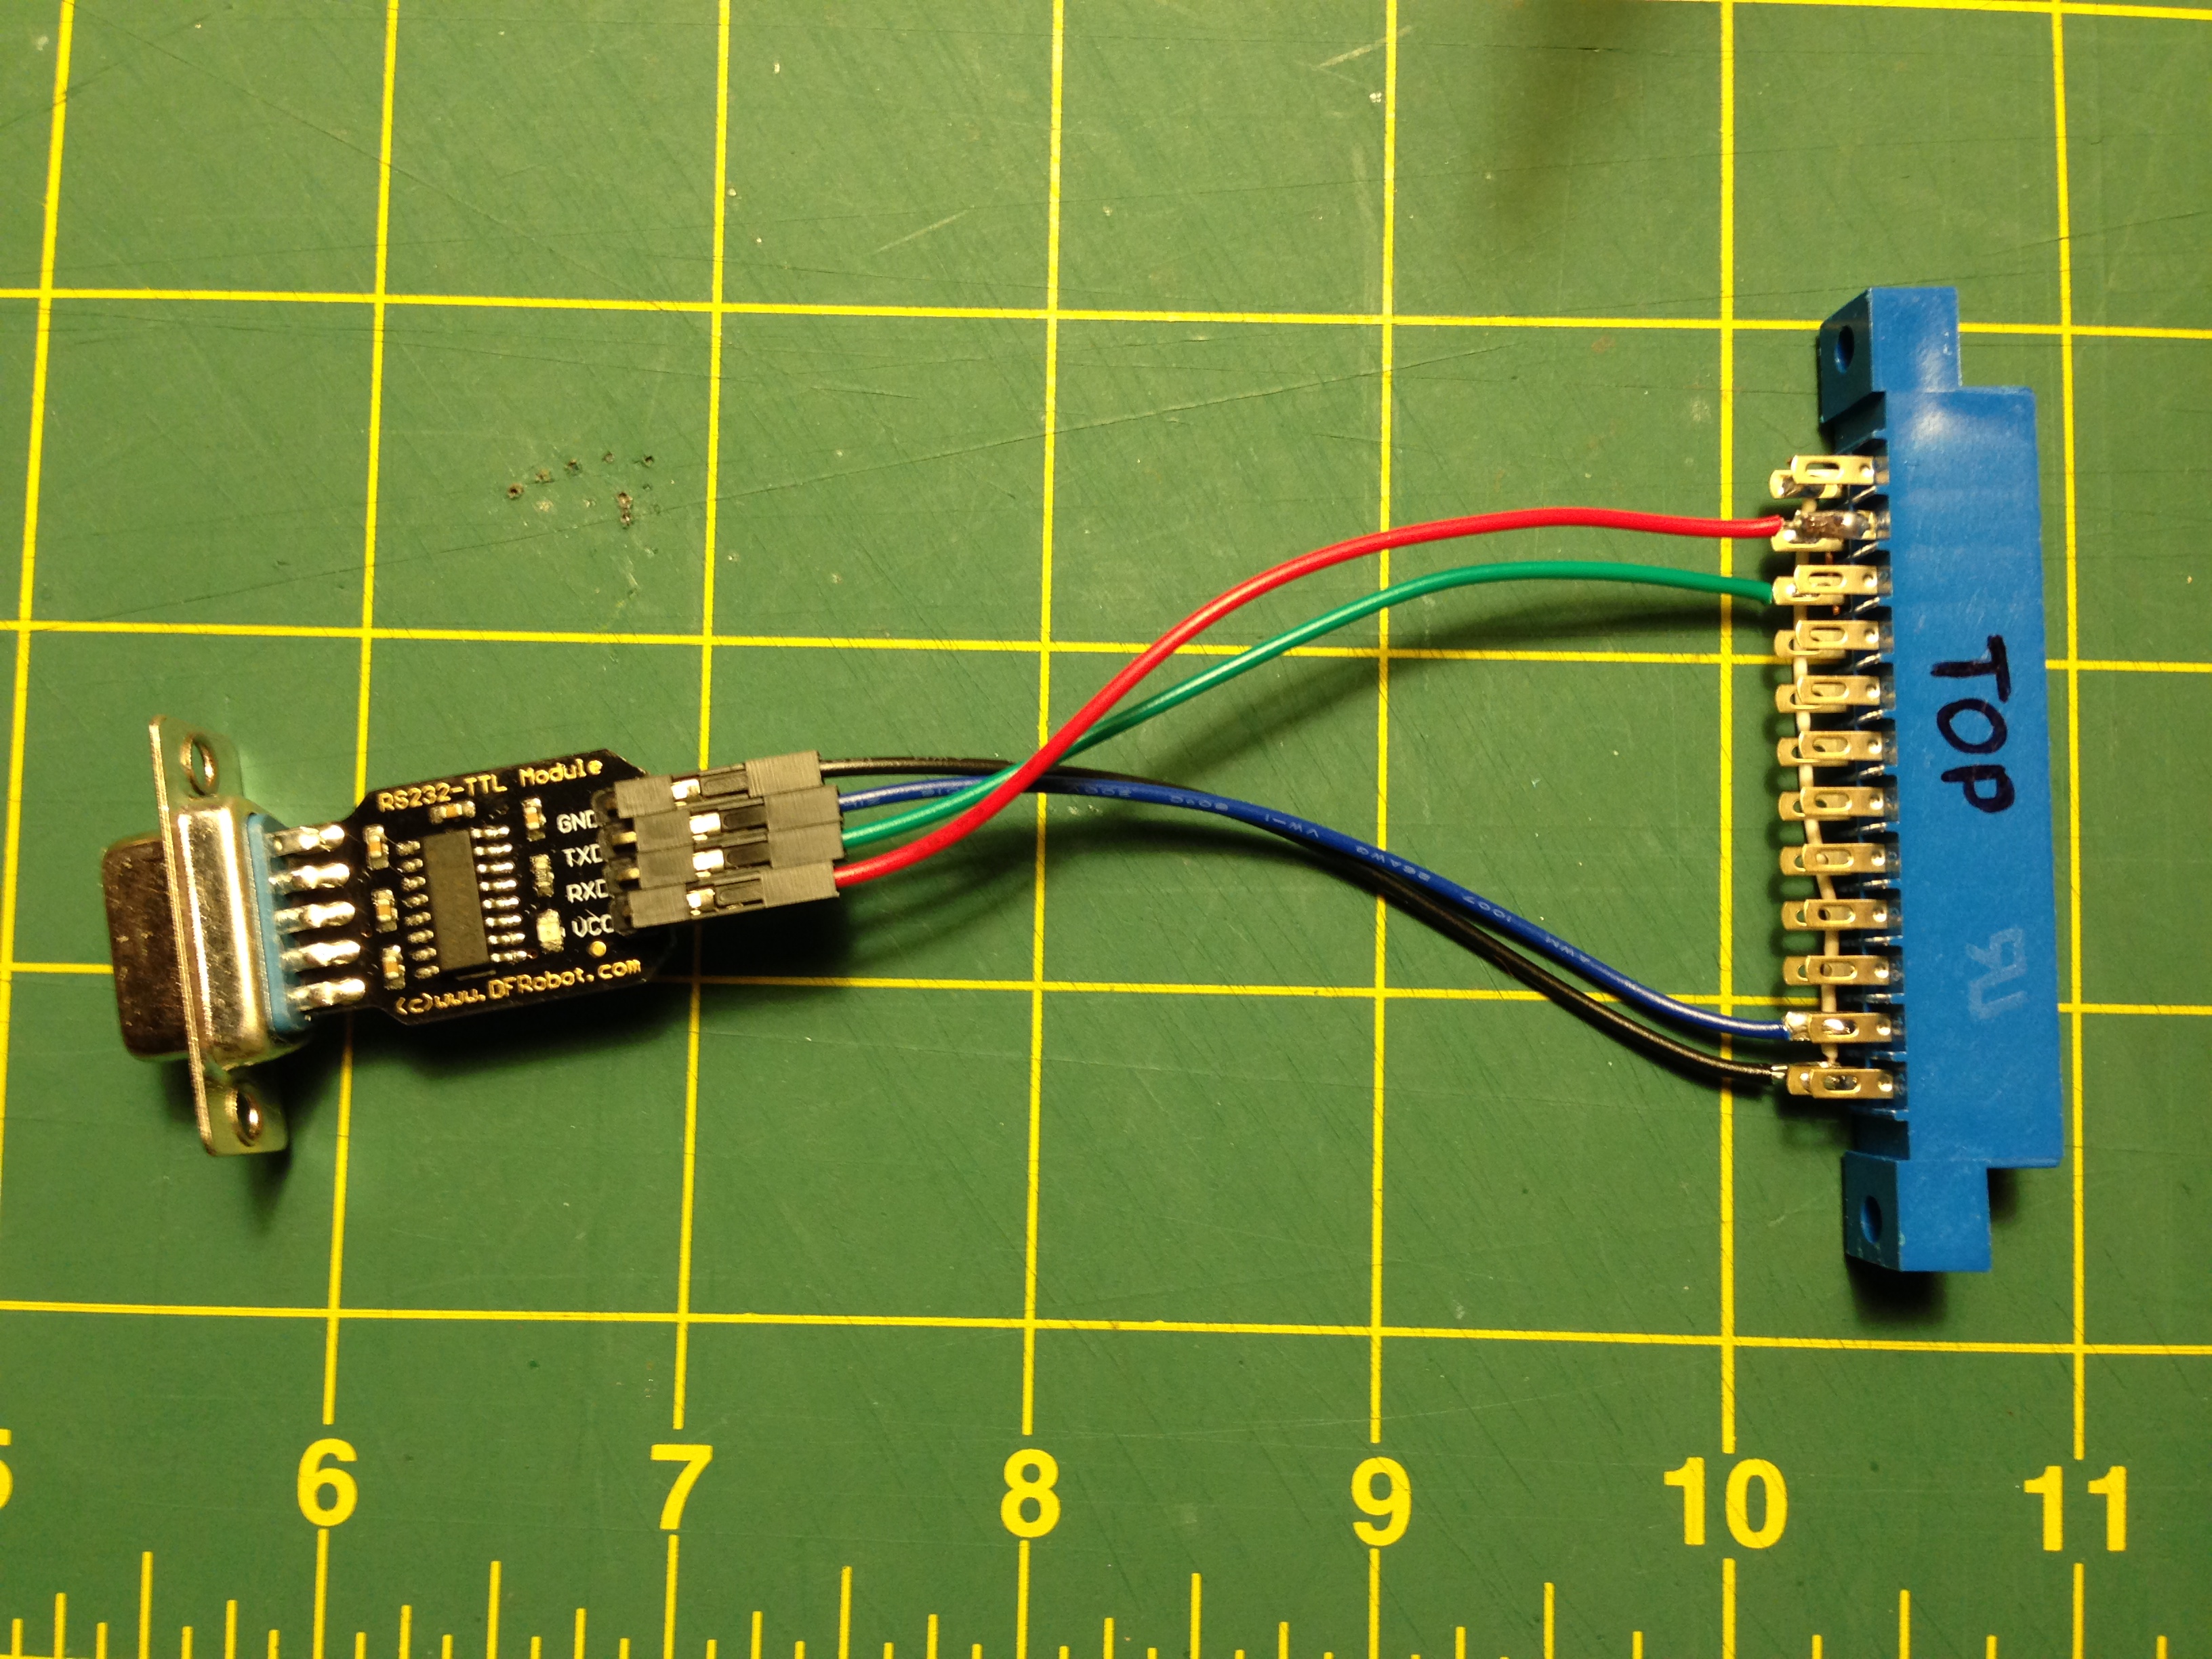
Observe which side of the user port connector is the top (it’s the one with numbers– letters are on the bottom). It’s helpful to write on it with marker. For wire I used female jumper wire that I cut one end off. For GND and RXD you’ll need to jumper two of the pins together on the user port connector. I used a small bit of CAT5 solid core wire.
Once you’ve got it connected, add the null modem adapter and connect your modem. You may need to also use a gender changer and/or a 9 pin to 25 pin adapter depending on your modem.
Fire up CCGMS, Novaterm or Striketerm, set the baud rate to 2400, set the port to the user port and give it a few “AT” commands. You should see “OK” being returned. If it doesn’t, make sure you have a null modem adapter (test it on another machine to confirm) and double check your connections.
As with any tutorial you find online, be responsible and double check my work and your work before proceeding.
 It’s a question that pops up from time to time on forums from Lemon64 to Reddit C64.
“Yes! I just got a Commodore 64!! Now how do I get disk images onto disk so I can do something?”
It’s not straight forward. Folks in the Apple II world have a fantastic program called ADTPro that can work over a simple audio cable connected to your laptop headphone and microphone jack (or serial). Doesn’t get any easier than that.
On the Commodore, disc images are stored in .D64 format which is an image of a standard 1541 floppy. Most software you find is available this way. You may also find .D71 and .D81 which are for 1571 and 1581 formats but these are less common. A great place to find C64 software is the CBM8BIT.com Search. Once you have your disk images, you’re ready to make some floppies. Below are some of the options to “burn” disk images for your Commodore 64.
 uIEC/SD2IEC ($50-60) is probably the easiest overall solution. With this small device, you can load .D64 images from your Mac or PC onto a SD card. Inserting into the uIEC, it will show up to the C64 as an extremely large volume. But merely having a .D64 image doesn’t get you very far– you need to “burn” the image to a real floppy. Fortunately, there’s D64it which can do just that. It’s a little slow as the author admits, but it gets the job done. Things are sped up considerably if you have the JiffyDOS ROM ($20) installed in your C64 since the uIEC is JD compatible. Don’t forget a 6-pin IEC cable!
 64NIC+ ($50-59) adds Ethernet capability to your Commodore 64 as well as a ROM socket that can accommodate up to 256kB ROMs. With networking capability, now you’re able to use WarpCopy64 which can upload and download entire disc images to your PC. There’s a bit of a chicken and egg problem here since you’re going to need WarpCopy64 on disk first before you can create new disks.
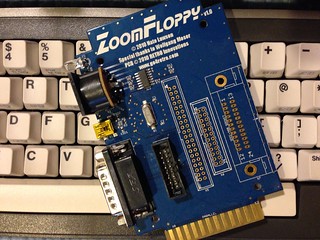 ZoomFloppy ($35) is a great solution to connect your Commodore 1541 to your Mac or PC via USB. ZoomFloppy is a modern version of the “X” series cables which required an old PC with a parallel port plus knowledge of IRQ and ports (see below). After installing OpenCBM software on your Mac or PC, you can read and write D64 images quickly and easily– no fuss. Hands down, this is my preferred way to read and write floppies.
If you’re lucky to have a terminal program already on floppy on your C64, you can do the serial route. Of course, you’ll also need an adapter that plugs into the C64 user port to give you standard RS-232 signals. These can be difficult to come by if you don’t have one, like the Commodore made VIC-1011a. One could also build this USB to RS-232 interface for your C64 for $15.
If you have a PC that’s old enough to have a parallel port on the motherboard, you might have good luck with “X” series parallel cables. These cables connect your parallel port to the IEC port of a 1541. From there, you can run Star Commander in DOS mode to read and write files and images. I started using this method years ago but abandoned it for the ZoomFloppy.
So there you have it. There’s no shortage of solutions and every solution is most likely going to cost you something. But each is a great investment and keeps the scene going with folks creating new methods. This list isn’t exhaustive– if you know of one or have experience with any of these, leave a comment!
For the next two weeks, it’s BASIC Week 2 at Reddit r/retrobattlestations. You can participate with your Commodore 64 or at least play along with your favorite emulator. I’ve ported the code to the C64 and you can get the code from the thread on Reddit. Or you can download the D64 image here to make your own disk or to use with an emulator like VICE.
Have fun!