Code for DIY NES Game Pad to Arduino to iPad Adapter

As promised, here’s the code to connect your NES game pad to an Arduino via USB to an iPad emulating an iCade controller (whew!).

// NES to USB iCade emulation to iPad
// Paul Rickards
// rickards@gmail.com
// January 15, 2012
// Tested with Arduino 1.0 IDE
// Add V-USB for Arduino to your Libraries folder
// http://code.google.com/p/vusb-for-arduino/
//
// Changes I made to the library (usbconfig.h):
// * changed USB_CFG_DMINUS_BIT to 3
// * commented out defintions of USB_CFG_PULLUP_IOPORTNAME and USB_CFG_PULLUP_BIT
//
// Arduino pin 2 = USB+
// Arduino pin 3 = USB-
// Don't forget the small circuit (3 resistors and 2 diodes) needed to connect
// USB to the Arduino. See the library for more info.
//
// Other controllers are possible. I first designed it for use with an Atari/C64 joystick
// The pins needed to be debounced (the bounce.h library will not work with the V-USB stack)
// and I needed more buttons on the joystick so I scrapped the idea.

#include "UsbKeyboard.h"

// Define NES pins
int latch=8;
int clock=9;
int datin=10;

bool t = 1, prev_nes[8] = { 1,1,1,1,1,1,1,1 };

// iCade key mapping http://www.ionaudio.com/downloads/iCade_Dev_Resource_v1.3.pdf
// NES controller mapping      A      B    select start   up    down   left   right
const int key_press[8]   = { KEY_O, KEY_L, KEY_Y, KEY_H, KEY_W, KEY_X, KEY_A, KEY_D };
const int key_release[8] = { KEY_G, KEY_V, KEY_T, KEY_R, KEY_E, KEY_Z, KEY_Q, KEY_C };

void setup() {
  // Setup NES controller
  pinMode(latch,OUTPUT);
  pinMode(clock,OUTPUT);
  pinMode(datin,INPUT);
  digitalWrite(latch,HIGH);
  digitalWrite(clock,HIGH);
}

void loop() {
  UsbKeyboard.update();

  digitalWrite(latch,LOW);
  digitalWrite(clock,LOW);
  digitalWrite(latch,HIGH);
  delayMicroseconds(2);
  digitalWrite(latch,LOW);

  for (int i=0; i<8; i++) {
    t = digitalRead(datin);
    if (prev_nes[i] != t) { // button changed
      if (t) UsbKeyboard.sendKeyStroke(key_release[i]);
      else   UsbKeyboard.sendKeyStroke(key_press[i]);
      prev_nes[i] = t;
    }
    digitalWrite(clock,LOW);
    delayMicroseconds(2);
    digitalWrite(clock,HIGH);
    delayMicroseconds(2);
  } 
}

DIY NES Gamepad to iPad Adapter

In my last post, I showed that I could use my homebrew C64 USB keyboard with the iPad using the Camera Connection Kit. What was interesting was when I opened iMAME (you were lucky enough to snag it, right?) and accidentally pressed keys on the keyboard. iMAME said it was enabling iCade mode. I thought this was interesting and looked it up.

iCade connects via Bluetooth and acts as a Bluetooth keyboard. My keyboard was connected via USB. Could a USB keyboard work to control games on the iPad? Maybe the connection type didn’t matter? Could I create an adapter that connects via USB and lets you use standard game controllers in iMAME?

iCade sends key strokes when a button is pressed and once again when it’s released. The keys are documented for developers. I launched iMAME again with the USB keyboard plugged in to confirm and as expected the keys worked to control the games.

The next part was pretty straight forward. Make a USB keyboard with an Arduino (see previous post on how this was done) but instead of an actual keyboard matrix, use a game pad. I chose to use my trusty original NES game pad since they’re so easy to interface with.


I threw together a quick case from LEGO and hot glued in two jacks, one for the NES controller and one for USB. The iPad powers the Arduino and the NES controller so no power supply is needed.

And there you have it, a DIY NES Gamepad to iPad via USB adapter. I’ll post the code later when it’s been cleaned up a bit. The only other game I’ve tested was Atari’s Greatest Hits and it seemed to work fine. In theory, any game that supports the iCade should work.

C64 USB Keyboard works with iPad


Just a follow up to the C64 USB keyboard Arduino project that I made last week. I was curious if it would work on the iPad using the iPad Camera Connection kit. So I tried it out and was greeted with the error “Cannot Use Device” and “The connected USB device is not supported.” I dismissed the window and tried anyway and it worked! I was able to type in any application.

Any application that is except the Manomio C64 emulator on the iPad/iPhone. I doubt that any USB keyboard would work there, not just mine. Maybe support for USB keyboards could be added?

Commodore 64 Keyboard Gets The USB Treatment Thanks to Arduino

Recently I’ve been repairing a batch of broken Commodore 64’s that I scored on eBay for cheap. Out of the repairs, two boards were beyond hope but still had some usable parts on them so motherboards became donor boards. That left me with a couple empty cases and keyboards so I decided to make a Commodore 64 USB keyboard.

There’s already a nice product called Keyrah that does just this (plus a lot more) and I recommend you checking it out as it adds Amiga keyboard and joystick support.

But if you’re like me and want the challenge, I decided to go the maker route.

First, I searched for any such projects– no sense in re-inventing the wheel. I found a project by Mikkel Holm Olsen called C64 USB Keyboard. It used an Atmel ATMega-8 chip which I’ve learned is very similar to Arduino’s 168/328P chip. It might work but with some modifications– beyond my skill set today. I shelved this project and continued.

The keyboard is basically an 8×8 matrix keypad. There’s already a keypad library for Arduino. A couple of things that I discovered while using this library. One, don’t use pin 13 with the C64 keyboard. It’s probably because of the built in resister and LED that causes the pull ups to not work. An outside pull up might fix this. Two, the library only supports single keypresses. This is a bummer since you often will press two keys (i.e. the shift key, control, etc). But I worked around it. I put together a quick harness that will connect the Commodore 64 keyboard to the Arduino, aligning the rows and columns to the right pins. I like to make my projects the least destructive way so I use a lot of tape, jumpers and breadboards.

Getting the Arduino to talk USB makes use of the V-USB library which has been ported to Arduino. I really like this implementation because it’s all handled by the Arduino and needs very little passive glue on the outside to make it work. Below is a diagram of how to hook up USB to the Arduino. The values on the diodes are pretty strict and must be 3.6V 500mW zener diodes (although I hear 250mW is better). More information can be found in the V-USB documentation.

I made a small change to the V-USB code and moved the USB data (-) from Arduino pin 4 to pin 3– just edit usbconfig.h inside the UsbKeyboard library. I also commented out the optional connect/disconnect on pin 5 because I simply don’t have the pins to spare! Connected, the inside looks like this.

Commodore 64 USB Keyboard Inside

Commodore 64 USB Keyboard Arduino

Arduino V-USB Glue

The pin mapping goes like this:
C64 Pin Arduino Pin
Column 0 = 13 -> 4
Column 1 = 19 -> 5
Column 2 = 18 -> 6
Column 3 = 17 -> 7
Column 4 = 16 -> 8
Column 5 = 15 -> 9
Column 6 = 14 -> 10
Column 7 = 20 -> 11
Row 0 = 12 -> 12
Row 1 = 11 -> 0 (This was pin 13 if you’re wondering why the break in continuity)
Row 2 = 10 -> 14 (Analog 0)
Row 3 = 5 -> 15 (Analog 1)
Row 4 = 8 -> 16 (Analog 2)
Row 5 = 7 -> 17 (Analog 3)
Row 6 = 6 -> 18 (Analog 4)
Row 7 = 9 -> 19 (Analog 5)

I power the Arduino via the incoming USB. To get it to be recognized properly by your computer, unplug the USB programming cable from the Arduino and then plug in the USB cable to the V-USB side. Otherwise it will not be recognized. It makes for a lot of cable swapping unfortunately while coding. I also powered the C64 power LED for nostalgia (this may be a good use for pin 13).

Speaking of code, I needed to define some key codes that were missing from the UsbKeyboard library. This was fairly straight-forward by looking them up on the USB HID guide (chapter 10). I also defined “bogus” key codes that I could intercept and do something else with. Most keys on the keyboard can be passed straight through. Others, like the arrow keys, F-keys, quote, asterisk, etc need a little more help since their locations are different than a standard keyboard. I also hacked together to ability to detect a modifier key (shift, control, etc) along with another key (from the keypad library). The resulting code isn’t pretty but I think it’s easy enough to follow. It’s included below for your amusement.

This project is far from perfect but it’s a start.


#include <Keypad.h>
#include <UsbKeyboard.h>

// Define keys that are missing from UsbKeyboard.h
#define KEY_ESCAPE  41
#define KEY_DELETE 42
#define KEY_TAB 43
#define KEY_MINUS 45
#define KEY_EQUAL   46
#define KEY_LEFTBRACKET 47
#define KEY_RIGHTBRACKET 48
#define KEY_BACKSLASH 49
#define KEY_SEMICOLON 51
#define KEY_SINGLE_QUOTE 52
#define KEY_BACKTICK 53
#define KEY_COMMA   54
#define KEY_PERIOD  55
#define KEY_SLASH   56
#define KEY_INSERT  73
#define KEY_HOME    74
#define KEY_PAGEUP 75
#define KEY_PAGEDOWN 78
#define KEY_RIGHTARROW 79
#define KEY_LEFTARROW 80
#define KEY_DOWNARROW 81
#define KEY_UPARROW 82
#define KEY_AT      206

// Bogus key codes, intercepted in code below
#define KEY_PLUS 249
#define LEFT_SHIFT 250
#define RIGHT_SHIFT 251
#define COMMODORE 252
#define CONTROL 253
#define KEY_COLON 254
#define KEY_STAR 255

const byte ROWS = 8;
const byte COLS = 8;
byte mod = 0;

// Define the Keymap
char keys[ROWS][COLS] = {
 {KEY_DELETE, KEY_ENTER, KEY_RIGHTARROW, KEY_F7, KEY_F1, KEY_F3, KEY_F5, KEY_DOWNARROW},
 {KEY_3, KEY_W, KEY_A, KEY_4, KEY_Z, KEY_S, KEY_E, LEFT_SHIFT},
 {KEY_5, KEY_R, KEY_D, KEY_6, KEY_C, KEY_F, KEY_T, KEY_X},
 {KEY_7, KEY_Y, KEY_G, KEY_8, KEY_B, KEY_H, KEY_U, KEY_V},
 {KEY_9, KEY_I, KEY_J, KEY_0, KEY_M, KEY_K, KEY_O, KEY_N},
 {KEY_PLUS, KEY_P, KEY_L, KEY_MINUS, KEY_PERIOD, KEY_COLON, KEY_TAB, KEY_COMMA},
 {KEY_PAGEDOWN, KEY_STAR, KEY_SEMICOLON, KEY_HOME, RIGHT_SHIFT, KEY_EQUAL, KEY_BACKSLASH, KEY_SLASH},
 {KEY_1, KEY_BACKTICK, CONTROL, KEY_2, KEY_SPACE, COMMODORE, KEY_Q, KEY_ESCAPE}
};
byte colPins[COLS] = {4,5,6,7,8,9,10,11};
byte rowPins[ROWS] = {12,0,14,15,16,17,18,19};

// Create the Keypad
Keypad kpd = Keypad( makeKeymap(keys), rowPins, colPins, ROWS, COLS );

void setup()
{
}

void loop()
{
  UsbKeyboard.update();
  mod = 0;

  // Kludge, find activate modifiers
  // control   [7][2]
  // commodore [7][5]
  pinMode(rowPins[7], OUTPUT);
  digitalWrite(rowPins[7], LOW);
  if (digitalRead(colPins[2]) == LOW) { mod = mod | MOD_CONTROL_LEFT; }
  if (digitalRead(colPins[5]) == LOW) { mod = mod | MOD_ALT_LEFT; }
  pinMode(rowPins[7], INPUT);
  digitalWrite(rowPins[7], HIGH);

  // left shift[1][7]
  pinMode(rowPins[1], OUTPUT);
  digitalWrite(rowPins[1], LOW);
  if (digitalRead(colPins[7]) == LOW) { mod = mod | MOD_SHIFT_LEFT; }
  pinMode(rowPins[1], INPUT);
  digitalWrite(rowPins[1], HIGH);
  
  // right shift[6][4]
  pinMode(rowPins[6], OUTPUT);
  digitalWrite(rowPins[6], LOW);
  if (digitalRead(colPins[4]) == LOW) { mod = mod | MOD_SHIFT_RIGHT; }
  pinMode(rowPins[6], INPUT);
  digitalWrite(rowPins[6], HIGH);
  
  if (mod == 6) {
    UsbKeyboard.sendKeyStroke(0, mod); // This works, but sends 3-4 times. :(
    return;
  }

  char key = kpd.getKey();
  if (key) {
    switch (key) {
      case KEY_STAR:
        UsbKeyboard.sendKeyStroke(KEY_8, MOD_SHIFT_LEFT);
        break;
      case KEY_AT:
        UsbKeyboard.sendKeyStroke(KEY_2, MOD_SHIFT_LEFT);
        break;
      case KEY_PLUS:
        UsbKeyboard.sendKeyStroke(KEY_EQUAL, MOD_SHIFT_LEFT);
        break;
      case KEY_COLON:
        UsbKeyboard.sendKeyStroke(KEY_SEMICOLON, MOD_SHIFT_LEFT);
        break;
      default:
        if (mod == MOD_SHIFT_LEFT || mod == MOD_SHIFT_RIGHT) {
          if (key == KEY_2) { key = KEY_SINGLE_QUOTE; } // "
          if (key == KEY_7) { key = KEY_SINGLE_QUOTE; mod = 0; } // '
          if (key == KEY_6) { key = KEY_7; } // &
          if (key == KEY_9) { key = KEY_0; } // )
          if (key == KEY_8) { key = KEY_9; } // (
          if (key == KEY_DOWNARROW) { key = KEY_UPARROW; mod = 0; }
          if (key == KEY_RIGHTARROW) { key = KEY_LEFTARROW; mod = 0; }
          if (key == KEY_F1) { key = KEY_F2; mod = 0; }
          if (key == KEY_F3) { key = KEY_F4; mod = 0; }
          if (key == KEY_F5) { key = KEY_F6; mod = 0; }
          if (key == KEY_F7) { key = KEY_F8; mod = 0; }
        }
        UsbKeyboard.sendKeyStroke(key, mod);
        break;
    }
  }
}

Converting standard joysticks to wireless infrared for Amiga CDTV and Chameleon 64

The Chameleon 64 is a great cartridge. With each release of the firmware, new features are being unlocked. Recently, the Minimig core was ported to the Chameleon 64 which means you can now have a fully emulated Amiga that fits in the palm of your hand.

To play games using a joystick, you need a CDTV infrared (IR) remote. They are still available for purchase here and here but it would take a few weeks for it to arrive.

I wanted to see if it’s possible to convert a standard joystick to wireless IR communications. I know it can be done– I’ve had some experience using Arduino’s to communicate over IR with a vintage LED sign I have. I reverse engineered the original protocol by using the original remote to the sign. That project taught me a lot.

In this case, I don’t have the remote. So I asked on the forum and got a response from the programmer of the Chameleon IR code with all the info I needed (Thanks Peter!).

This version uses an original Nintendo NES game pad for the joystick but this could be easily changed to support a standard 9-pin Commodore/Amiga/Atari style joystick. The gamepad is connected to the Arduino and decoded into button presses. It then transmits it via infrared signals to the Chameleon. The code uses the Arduino-IRremote library with additions (included) for the CDTV remote type added.

Download CDTV IR Remote

Talking to an old PTZ camera

arduino-picturetel-ptz1I recently obtained an old Polycom PTZ-1 camera. This camera went to an old video conferencing system, long past it’s usefulness in today’s era of instant desktop video conferencing ala Skype. The camera was inside a large plastic housing to keep it secure– I removed it from the housing to get a closer look.

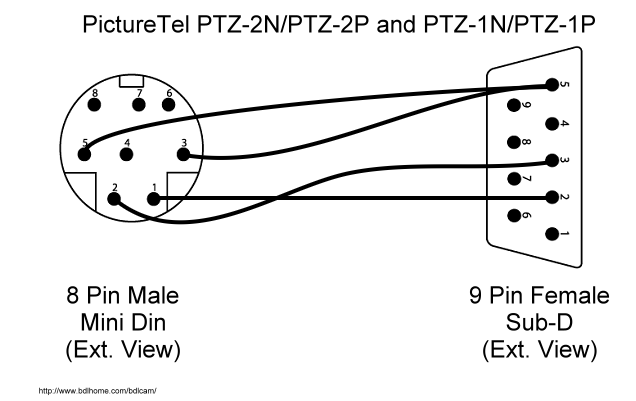
I know most cameras are controlled via RS-232 so I searched around and found a site that listed the control codes necessary to talk with this camera. I also found how to build the cable to go from a serial DB-9 to a mini-din 8 here. That’s where the Arduino comes in.

Previously, I figured out how to interface an NES joy-pad to the Arduino (even purchasing the proper female jacks so I wouldn’t need to cut the original cables). So I thought about marrying the camera with the controller. Behold, the the Picture PTZ-1 being controlled by the Arduino via an NES joypad.

The first problem I encountered was that the PTel PTZ-1 liked to talk serial using ODD parity. Yikes, I didn’t think the Arduino could do that. Well, it can actually. I found a forum posting that listed an extension to the serial protocol of the Arduino.

Although the Arduino has on board serial, it needs help to speak RS-232 serial (because of voltage differences). That’s where the MAX232 chip comes in and it’s cast of supporting capacitors.

Below is the Arduino sketch that I’m using. The code will pan and tilt the camera using the plus-pad. The A and B buttons control zoom in and out. Select and Start are for presets. The camera has 8 hardware presets. Press select the number of times equal to the preset you want and press start. To set a preset, press select the number of times equal to the preset, holding on the last preset and press start.

#include <SerialExtension.h>

# NES Controller Pin Setup
int latch = 8; // set the latch pin
int clock = 9; // set the clock pin
int datin = 10; // set the data in pin

# A Status LED To Light When Receiving input from NES
int ledpin = 13; // set the led status pin

# Zero Counters
int selects = 0;
int starts = 0;

unsigned char report[6];
unsigned char prev_report[6];

void setup() {
// Setup NES controller
pinMode(latch, OUTPUT);
pinMode(clock, OUTPUT);
pinMode(datin, INPUT);
pinMode(ledpin, OUTPUT);

digitalWrite(latch, HIGH);
digitalWrite(clock, HIGH);

Serial.begin(9600);
SetSerial(9600,’O’, 8, 1);
delay(500);
init_camera();
report[0]=0x80;
report[1]=0x80;
report[2] = report[3] = report[4] = report[5] = 0;
prev_report[0]=0x80;
prev_report[1]=0x80;
prev_report[2] = prev_report[3] = prev_report[4] = prev_report[5] = 0;
}

void loop () {
NEScontrollerRead();

// Tilt up begin
if ((report[1] == 0) && (prev_report[1] == 0x80)) { motion_begin(‘t’, ‘u’); }
// Tilt up stop
if ((report[1] == 0x80) && (prev_report[1] == 0)) { motion_stop(‘t’, ‘u’); }
// Tilt up cont
if ((report[1] == 0) && (prev_report[1] == 0)) { motion_cont(‘t’, ‘u’); }

// Tilt down begin
if ((report[1] == 0xFF) && (prev_report[1] == 0x80)) { motion_begin(‘t’, ‘d’); }
// Tilt down stop
if ((report[1] == 0x80) && (prev_report[1] == 0xFF)) { motion_stop(‘t’, ‘d’); }
// Titlt down cont
if ((report[1] == 0xFF) && (prev_report[1] == 0xFF)) { motion_cont(‘t’, ‘d’); }

// Pan left begin
if ((report[0] == 0) && (prev_report[0] == 0x80)) { motion_begin(‘p’, ‘l’); }
// Pan left stop
if ((report[0] == 0x80) && (prev_report[0] == 0)) { motion_stop(‘p’, ‘l’); }
// Pan left cont
if ((report[0] == 0) && (prev_report[0] == 0)) { motion_cont(‘p’, ‘l’); }

// Pan right begin
if ((report[0] == 0xFF) && (prev_report[0] == 0x80)) { motion_begin(‘p’, ‘r’); }
// Pan right stop
if ((report[0] == 0x80) && (prev_report[0] == 0xFF)) { motion_stop(‘p’, ‘r’); }
// Pan right cont
if ((report[0] == 0xFF) && (prev_report[0] == 0xFF)) { motion_cont(‘p’, ‘r’); }

// Zoom in begin
if ((report[2] == 1) && (prev_report[2] == 0)) { motion_begin(‘z’, ‘i’); }
// Zoom in stop
if ((report[2] == 0) && (prev_report[2] == 1)) { motion_stop(‘z’, ‘i’); }
// Zoom in cont
if ((report[2] == 1) && (prev_report[2] == 1)) { motion_cont(‘z’, ‘i’); }

// Zoom out begin
if ((report[3] == 1) && (prev_report[3] == 0)) { motion_begin(‘z’, ‘o’); }
// Zoom out stop
if ((report[3] == 0) && (prev_report[3] == 1)) { motion_stop(‘z’, ‘o’); }
// Zoom out cont
if ((report[3] == 1) && (prev_report[3] == 1)) { motion_cont(‘z’, ‘o’); }

// Select button function
if ((report[4] == 1) && (prev_report[4] == 0)) {
selects++;
if (selects > 8) { selects = 0; }
}

// Select and Start functions
// Goto preset
// Press “Select” times to equal the number of the preset
// then press “Start” to go to that preset.
if ((report[5] == 1) && (prev_report[5] == 0) && (report[4] == 0)) {
if (selects > 0) {
command_begin();
Serial.print(“g0”);
selects–;
Serial.print(selects);
Serial.print(“n”);
command_end();
selects = 0;
}
}

// Store preset
// Press “Select” times MINUS 1 equal to the numer of the preset to SET
// Press and HOLD “Select” on the last number and press “Start” to set the preset
if ((report[4] == 1) && (report[5] == 1) && (prev_report[5] == 0)) {
if (selects > 0) {
command_begin();
Serial.print(“s00”);
selects–;
Serial.print(selects);
command_end();
selects = 0;
}
}

prev_report[0] = report[0];
prev_report[1] = report[1];
prev_report[2] = report[2];
prev_report[3] = report[3];
prev_report[4] = report[4];
prev_report[5] = report[5];

delay(100);
}

void NEScontrollerRead() {

int x = 0x80, y = 0x80; // 0x80 = 128 = axis centered (nothing pressed)
int a, b, select, start, led = 0;
report[0] = report[1] = report[2] = report[3] = report[4] = report[5] = 0;
unsigned char tmp = 0;

digitalWrite(latch, LOW);
digitalWrite(clock, LOW);

digitalWrite(latch, HIGH);
delayMicroseconds(2);
digitalWrite(latch, LOW);

// button A
a = !digitalRead(datin);
NESCycleClock();

// button B
b = !digitalRead(datin);
NESCycleClock();

// button Select
select = !digitalRead(datin);
NESCycleClock();

// button Start
start = !digitalRead(datin);
NESCycleClock();

// button Up
if (!digitalRead(datin)) { y = 0; led = 1;}
NESCycleClock();

// button Down
if (!digitalRead(datin)) { y = 0xff; led = 1; }
NESCycleClock();

// button Left
if (!digitalRead(datin)) { x = 0; led = 1; }
NESCycleClock();

// button Right
if (!digitalRead(datin)) { x = 0xff; led = 1; }
NESCycleClock();

report[0] = x;
report[1] = y;
report[2] = a;
report[3] = b;
report[4] = select;
report[5] = start;
//report[2] = (a << 0) + (b << 1) + (select << 2) + (start << 3);
if (a || b || select || start || led) { digitalWrite(ledpin, 1); }
else { digitalWrite(ledpin, 0); }
}

void NESCycleClock() {
delayMicroseconds(4);
digitalWrite(clock, LOW);
digitalWrite(clock, HIGH);
delayMicroseconds(2);
}

void command_begin() {
Serial.print(0x02, BYTE);
Serial.print(“ck”);
}

void command_end() {
Serial.print(0x04, BYTE);
}

void init_camera() {
command_begin();
Serial.print(“k”);
command_end();

command_begin();
Serial.print(“i0n”);
command_end();

// Wait for an ACK from camera
while(Serial.read() != 0x04) {}

command_begin();
Serial.print(“d0”);
Serial.print(0xF2, BYTE);
command_end();
delay(100);

// Wait for an ACK from camera
while(Serial.read() != 0x04) {}

command_begin();
Serial.print(“z0m”);
command_end();

// Wait for an ACK from camera
while(Serial.read() != 0x04) {}
}

void motion_begin(char axis, char dir) {
command_begin();
Serial.print(“r0k”);
Serial.print(axis, BYTE);
Serial.print(dir, BYTE);
if (dir == ‘u’) { Serial.print(“099”); }
if (dir == ‘d’) { Serial.print(“097”); }
if (dir == ‘l’) { Serial.print(“100”); }
if (dir == ‘r’) { Serial.print(“101”); }
command_end();
}

void motion_cont(char axis, char dir) {
command_begin();
Serial.print(“c0k”);
Serial.print(axis, BYTE);
Serial.print(dir, BYTE);
command_end();
}

void motion_stop(char axis, char dir) {
command_begin();
Serial.print(“p0k”);
Serial.print(axis, BYTE);
Serial.print(dir, BYTE);
command_end();
}

IR interfacing with a LED messgage sign, part 3


Code finished, uploaded, time to take it out for a test. I wired up everything, confirmed that the IR LEDs were in fact lighting with my digital camera (FYI, IR LEDs will glow with a purple tint to them when viewed through most cameras). The first test was unsuccessful. The sign taunted me with it's “STOP MODE” message. The sign will beep on IR received but I heard nothing. So I spent some time adjusting the pulse times. Still nothing. I spent a few more hours adjusting the code without success.

Then, as a last ditch effort, I wondered what would happen if I flipped the pulses around. That is to say, instead of pulsing the IR LED at the top of the graph (1), pulse it only at the bottom of the graph (0). I made the change, uploaded the code and was rewarded with “BEEP BEEP BEEP” coming from the sign. I then tried to remember all of the other changes I made and reverted back to them.

Like any good programmer, the first thing to write is “HELLO WORLD.” It's not without it's problems, however. The key strokes aren't always received 100% which is frustrating. Double key presses (for instance, the two LL's in HELLO) need to have a long pause inserted into them or it believes the key was held down by accident. The sign is fairly old so it may not have the best equipment inside. Or I may have gotten something wrong. Anything's possible!

IR interfacing with a LED messgage sign, part 2


To make the Arduino transmit IR signals, you need an IR LED. I found a couple from an old Sun optical mouse and an old TV remote control. I used two emitters because that's what the original Pro-Lite remote has inside and it also gains distance (I hoped). I should probably be connecting these LEDs through a resistor and at various stages I did. But I figured the pulses were so short that it _may_ be ok. Besides, there's more where that came from.

I started the IR emitter sketch from this Arduino forum post. Actually, the part that was most interesting, was how to modulate the LED at a certain frequency.

// this will write an oscillation at 38KHz for a certain time in useconds
void oscillationWrite(int pin, int time) {
for(int i = 0; i <= time/26; i++) {
digitalWrite(pin, HIGH);
delayMicroseconds(13);
digitalWrite(pin, LOW);
delayMicroseconds(13);
}
}

This was to be the key to making it all work. I have no way of knowing if the actual modulation of the Pro-Lite IR remote is 38KHz but it seemed to work.

The next step was to pack the pulse widths into the five known types to put it into code. Perl to the rescue again.

A: S001011110110SRS001011110110SRS00100000
B: S001010001011SRS001010001011SRS00101000
C: S001010100011SRS001010100011SRS00100000
..
M: S001001000010SRS001001000010SRS00100100
..
X: S001011101011SRS001011101011SRS00101110
Y: S001010001110SRS001010001110SRS00101000
Z: S001011111010SRS001011111010SRS00101111

You'll notice I said five types yet there are only four represented above. That's because the five pulse (which I've called null) is between every pulse (the dip down to 0 on the graph). You'll also notice that the bitstreams always begin with “S0010” which I've hard coded since every pulse begins with it. You'll also notice the bitstream repeats a few times. So, when you reduce and remove repeats, you're left with this.

A: 11110110
B: 10001011
C: 10100011
..

Which reduces further into decimal, saving valuable memory space on the Arduino.

int A = 246;
int B = 139;
int C = 163;
int D = 170;
int E = 166;
int F = 202;
int G = 135;
int H = 10;
int I = 78;
..

Next up, finish up the code and give it a test drive.

IR interfacing with a LED messgage sign, part 1


We've had this ancient LED message signs made by Pro-Lite at work ever since I started. They were controlled by an equally ancient IBM PC that has since vanished along with the software and much hope of being able to use them again. There is a seemingly RS-232-ish port on the back with pins 2 and 7 wired which intuitively tells you, yes, serial! Pin 2 is TX which would be convenient because you wouldn't need a null modem cable to talk with it. But alas, I've tried many many ways and have come up empty.

The signs do also have remote controls. Clunky with a smooth surface membrane which proves to be frustrating at best. Besides, I'd like to the sign to display something useful, current and timely. Say, scrape some RSS feeds and display them.

So I figured that IR was going to be my best way in (at least at the moment). Plus, it's just fun.

Plus it gives me a project to use with the Arduino. The first step was to capture and decode the IR signals coming from the remote and translate that into code. I connected a Radio Shack 38Khz IR receiver to the Arduino and used the example sketch on the Arduino playground as a “scope” of sorts to record the pulses coming from the remote.

Analyze IR Remote
Waiting...
Bit stream detected!
0 0
284 0
284 1
6888 1
6888 0
7140 0
7140 1
8576 1
8576 0
8872 0
8872 1
10292 1
10292 0
10596 0
10596 1
15440 1
15440 0
15724 0
15724 1
17152 1
17152 0
17424 0
17424 1
22300 1
22300 0
22576 0
22576 1
....

It all comes down to timing. The left column is the time in microseconds and the right column is the state. If you use Excel and graph this, it looks like this.

This makes things a bit more clear as to what is going on but doesn't yet translate this into code at all. So, I next wrote a Perl script to parse through this output and produce something that was more useful. I compute the delta between each pulse to determine the pulse width in microseconds.

Pulse time: 6604 (1)
Pulse time: 296 (0)
Pulse time: 1440 (1)
Pulse time: 232 (0)
Pulse time: 1484 (1)
Pulse time: 244 (0)
Pulse time: 4880 (1)
Pulse time: 300 (0)
Pulse time: 1440 (1)
Pulse time: 280 (0)
Pulse time: 4840 (1)
Pulse time: 284 (0)
Pulse time: 3168 (1)
Pulse time: 280 (0)
Pulse time: 4844 (1)
Pulse time: 292 (0)
Pulse time: 3140 (1)
Pulse time: 272 (0)
Pulse time: 1468 (1)

Now you can see a pattern emerge. Most of the pulse widths cluster around five types. I've called them null, 0, 1, start, and repeat, based on their location in the bitstream and how the repeat in the bit stream. Also, since the Arduino IR receiver sketch has a resolution of 4 microseconds, there are going to be some discrepancies. So, I additionally calculate the average pulse widths within a certain amount of confidence.

Avg null pulse time: 282.732673267327 (101 samples)
Avg start pulse time: 6582.66666666667 (15 samples)
Avg zero pulse time: 1435.82978723404 (47 samples)
Avg one pulse time: 4171.59183673469 (49 samples)
Avg repeat pulse time: 54277.6 (5 samples)

So now I have most of the information needed to built an IR emitter. But first I needed to learn about IR modulation.