Recently I’ve been repairing a batch of broken Commodore 64’s that I scored on eBay for cheap. Out of the repairs, two boards were beyond hope but still had some usable parts on them so motherboards became donor boards. That left me with a couple empty cases and keyboards so I decided to make a Commodore 64 USB keyboard.
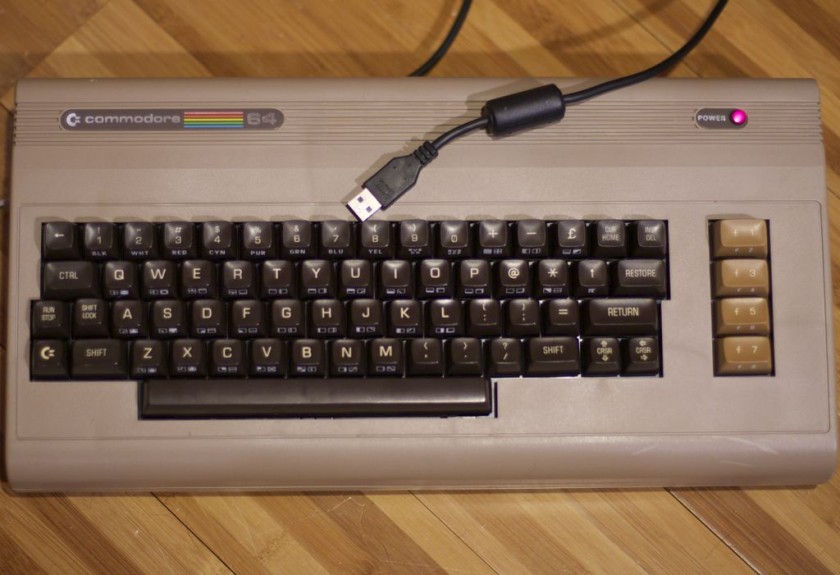
There’s already a nice product called Keyrah that does just this (plus a lot more) and I recommend you checking it out as it adds Amiga keyboard and joystick support.
But if you’re like me and want the challenge, I decided to go the maker route.
First, I searched for any such projects– no sense in re-inventing the wheel. I found a project by Mikkel Holm Olsen called C64 USB Keyboard. It used an Atmel ATMega-8 chip which I’ve learned is very similar to Arduino’s 168/328P chip. It might work but with some modifications– beyond my skill set today. I shelved this project and continued.
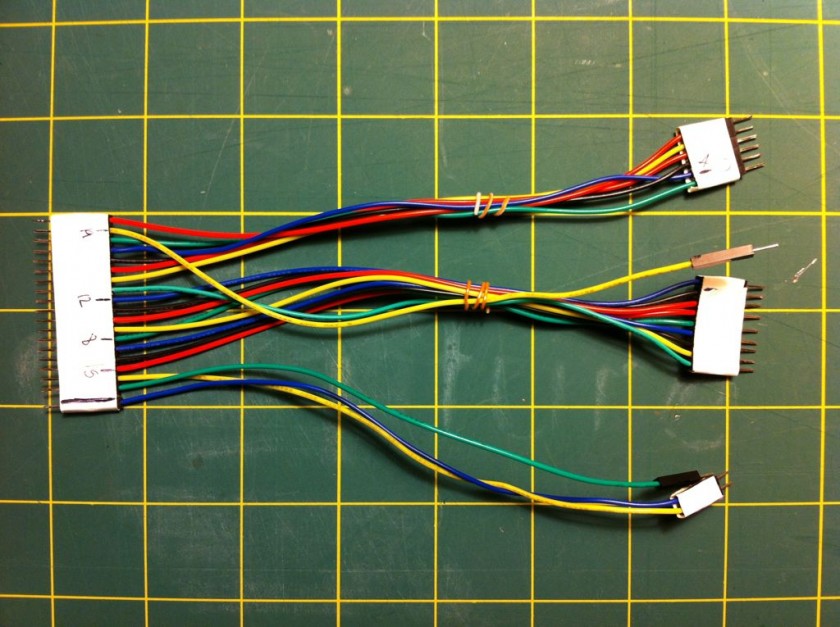
The keyboard is basically an 8×8 matrix keypad. There’s already a keypad library for Arduino. A couple of things that I discovered while using this library. One, don’t use pin 13 with the C64 keyboard. It’s probably because of the built in resister and LED that causes the pull ups to not work. An outside pull up might fix this. Two, the library only supports single keypresses. This is a bummer since you often will press two keys (i.e. the shift key, control, etc). But I worked around it. I put together a quick harness that will connect the Commodore 64 keyboard to the Arduino, aligning the rows and columns to the right pins. I like to make my projects the least destructive way so I use a lot of tape, jumpers and breadboards.
Getting the Arduino to talk USB makes use of the V-USB library which has been ported to Arduino. I really like this implementation because it’s all handled by the Arduino and needs very little passive glue on the outside to make it work. Below is a diagram of how to hook up USB to the Arduino. The values on the diodes are pretty strict and must be 3.6V 500mW zener diodes (although I hear 250mW is better). More information can be found in the V-USB documentation.

I made a small change to the V-USB code and moved the USB data (-) from Arduino pin 4 to pin 3– just edit usbconfig.h inside the UsbKeyboard library. I also commented out the optional connect/disconnect on pin 5 because I simply don’t have the pins to spare! Connected, the inside looks like this.
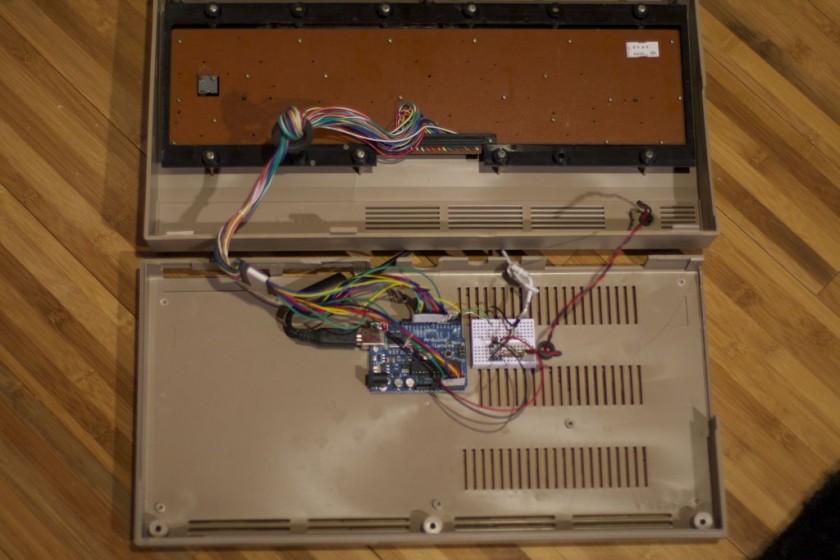
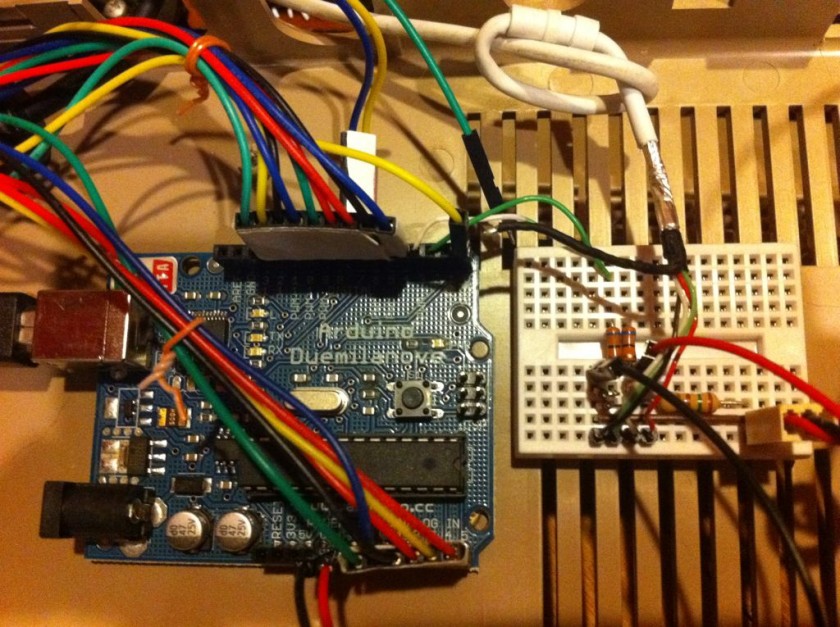
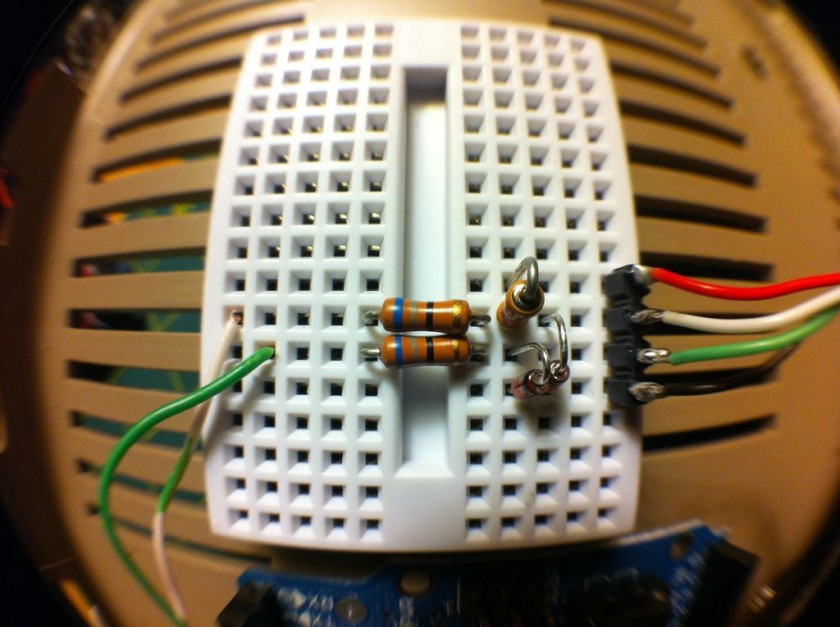
The pin mapping goes like this:
C64 Pin Arduino Pin
Column 0 = 13 -> 4
Column 1 = 19 -> 5
Column 2 = 18 -> 6
Column 3 = 17 -> 7
Column 4 = 16 -> 8
Column 5 = 15 -> 9
Column 6 = 14 -> 10
Column 7 = 20 -> 11
Row 0 = 12 -> 12
Row 1 = 11 -> 0 (This was pin 13 if you’re wondering why the break in continuity)
Row 2 = 10 -> 14 (Analog 0)
Row 3 = 5 -> 15 (Analog 1)
Row 4 = 8 -> 16 (Analog 2)
Row 5 = 7 -> 17 (Analog 3)
Row 6 = 6 -> 18 (Analog 4)
Row 7 = 9 -> 19 (Analog 5)
I power the Arduino via the incoming USB. To get it to be recognized properly by your computer, unplug the USB programming cable from the Arduino and then plug in the USB cable to the V-USB side. Otherwise it will not be recognized. It makes for a lot of cable swapping unfortunately while coding. I also powered the C64 power LED for nostalgia (this may be a good use for pin 13).
Speaking of code, I needed to define some key codes that were missing from the UsbKeyboard library. This was fairly straight-forward by looking them up on the USB HID guide (chapter 10). I also defined “bogus” key codes that I could intercept and do something else with. Most keys on the keyboard can be passed straight through. Others, like the arrow keys, F-keys, quote, asterisk, etc need a little more help since their locations are different than a standard keyboard. I also hacked together to ability to detect a modifier key (shift, control, etc) along with another key (from the keypad library). The resulting code isn’t pretty but I think it’s easy enough to follow. It’s included below for your amusement.
This project is far from perfect but it’s a start.
#include <Keypad.h>
#include <UsbKeyboard.h>

// Define keys that are missing from UsbKeyboard.h
#define KEY_ESCAPE  41
#define KEY_DELETE 42
#define KEY_TAB 43
#define KEY_MINUS 45
#define KEY_EQUAL   46
#define KEY_LEFTBRACKET 47
#define KEY_RIGHTBRACKET 48
#define KEY_BACKSLASH 49
#define KEY_SEMICOLON 51
#define KEY_SINGLE_QUOTE 52
#define KEY_BACKTICK 53
#define KEY_COMMA   54
#define KEY_PERIOD  55
#define KEY_SLASH   56
#define KEY_INSERT  73
#define KEY_HOME    74
#define KEY_PAGEUP 75
#define KEY_PAGEDOWN 78
#define KEY_RIGHTARROW 79
#define KEY_LEFTARROW 80
#define KEY_DOWNARROW 81
#define KEY_UPARROW 82
#define KEY_AT      206

// Bogus key codes, intercepted in code below
#define KEY_PLUS 249
#define LEFT_SHIFT 250
#define RIGHT_SHIFT 251
#define COMMODORE 252
#define CONTROL 253
#define KEY_COLON 254
#define KEY_STAR 255

const byte ROWS = 8;
const byte COLS = 8;
byte mod = 0;

// Define the Keymap
char keys[ROWS][COLS] = {
 {KEY_DELETE, KEY_ENTER, KEY_RIGHTARROW, KEY_F7, KEY_F1, KEY_F3, KEY_F5, KEY_DOWNARROW},
 {KEY_3, KEY_W, KEY_A, KEY_4, KEY_Z, KEY_S, KEY_E, LEFT_SHIFT},
 {KEY_5, KEY_R, KEY_D, KEY_6, KEY_C, KEY_F, KEY_T, KEY_X},
 {KEY_7, KEY_Y, KEY_G, KEY_8, KEY_B, KEY_H, KEY_U, KEY_V},
 {KEY_9, KEY_I, KEY_J, KEY_0, KEY_M, KEY_K, KEY_O, KEY_N},
 {KEY_PLUS, KEY_P, KEY_L, KEY_MINUS, KEY_PERIOD, KEY_COLON, KEY_TAB, KEY_COMMA},
 {KEY_PAGEDOWN, KEY_STAR, KEY_SEMICOLON, KEY_HOME, RIGHT_SHIFT, KEY_EQUAL, KEY_BACKSLASH, KEY_SLASH},
 {KEY_1, KEY_BACKTICK, CONTROL, KEY_2, KEY_SPACE, COMMODORE, KEY_Q, KEY_ESCAPE}
};
byte colPins[COLS] = {4,5,6,7,8,9,10,11};
byte rowPins[ROWS] = {12,0,14,15,16,17,18,19};

// Create the Keypad
Keypad kpd = Keypad( makeKeymap(keys), rowPins, colPins, ROWS, COLS );

void setup()
{
}

void loop()
{
  UsbKeyboard.update();
  mod = 0;

  // Kludge, find activate modifiers
  // control   [7][2]
  // commodore [7][5]
  pinMode(rowPins[7], OUTPUT);
  digitalWrite(rowPins[7], LOW);
  if (digitalRead(colPins[2]) == LOW) { mod = mod | MOD_CONTROL_LEFT; }
  if (digitalRead(colPins[5]) == LOW) { mod = mod | MOD_ALT_LEFT; }
  pinMode(rowPins[7], INPUT);
  digitalWrite(rowPins[7], HIGH);

  // left shift[1][7]
  pinMode(rowPins[1], OUTPUT);
  digitalWrite(rowPins[1], LOW);
  if (digitalRead(colPins[7]) == LOW) { mod = mod | MOD_SHIFT_LEFT; }
  pinMode(rowPins[1], INPUT);
  digitalWrite(rowPins[1], HIGH);

  // right shift[6][4]
  pinMode(rowPins[6], OUTPUT);
  digitalWrite(rowPins[6], LOW);
  if (digitalRead(colPins[4]) == LOW) { mod = mod | MOD_SHIFT_RIGHT; }
  pinMode(rowPins[6], INPUT);
  digitalWrite(rowPins[6], HIGH);

  if (mod == 6) {
    UsbKeyboard.sendKeyStroke(0, mod); // This works, but sends 3-4 times. :(
    return;
  }

  char key = kpd.getKey();
  if (key) {
    switch (key) {
      case KEY_STAR:
        UsbKeyboard.sendKeyStroke(KEY_8, MOD_SHIFT_LEFT);
        break;
      case KEY_AT:
        UsbKeyboard.sendKeyStroke(KEY_2, MOD_SHIFT_LEFT);
        break;
      case KEY_PLUS:
        UsbKeyboard.sendKeyStroke(KEY_EQUAL, MOD_SHIFT_LEFT);
        break;
      case KEY_COLON:
        UsbKeyboard.sendKeyStroke(KEY_SEMICOLON, MOD_SHIFT_LEFT);
        break;
      default:
        if (mod == MOD_SHIFT_LEFT || mod == MOD_SHIFT_RIGHT) {
          if (key == KEY_2) { key = KEY_SINGLE_QUOTE; } // "
          if (key == KEY_7) { key = KEY_SINGLE_QUOTE; mod = 0; } // '
          if (key == KEY_6) { key = KEY_7; } // &
          if (key == KEY_9) { key = KEY_0; } // )
          if (key == KEY_8) { key = KEY_9; } // (
          if (key == KEY_DOWNARROW) { key = KEY_UPARROW; mod = 0; }
          if (key == KEY_RIGHTARROW) { key = KEY_LEFTARROW; mod = 0; }
          if (key == KEY_F1) { key = KEY_F2; mod = 0; }
          if (key == KEY_F3) { key = KEY_F4; mod = 0; }
          if (key == KEY_F5) { key = KEY_F6; mod = 0; }
          if (key == KEY_F7) { key = KEY_F8; mod = 0; }
        }
        UsbKeyboard.sendKeyStroke(key, mod);
        break;
    }
  }
}
Stiggy
January 17, 2012 at 2:54amOutstanding work my friend and gives new life to a ageing breadbin. I went down the easy Keyrah route myself but then added an ITX board and PC components and made myself a C64 PC.
http://stiggyblog.wordpress.com/2010/10/30/c64-itx-pc-slideshow/
With the NES controller you’ve just opened up a world of exciting projects for us retro gaming iPad owners.
Kind regards
StiGGy
admin
January 29, 2012 at 11:15pmVery nice build– well done!
Reg
January 18, 2012 at 7:41pmTwo Questions: 1 – is there a way to make the C64 keyboard bluetooth compatible (slap a bluetooth dongle in it)?
and 2 – even with the USB mod, are you selling it? I would love to buy it – it’s the perfect tactile keyboard to use with my desktop or iPad
chess613@yahoo.com
admin
January 29, 2012 at 11:11pmI looked into making this Bluetooth but I couldn’t find an appropriate module for the Arudino that would speak as a keyboard. If such a Bluetooth module existed, in theory it’s possible.
Not currently for sale but that may change.
Waderx
January 19, 2012 at 2:56pmJust to clarify…. This works only on the original C=64 ? Right ?
admin
January 29, 2012 at 11:08pmThis mod works with the C64 keyboard. I think the C64C (light beige model) uses the same keyboard connector so it would probably also work. You don’t need the insides of the C64 at all for this mod– just the keyboard.
In theory this can be changed to work with any keyboard that uses a matrix– you just need to change the code appropriately.
Micky
October 6, 2014 at 12:01pmI have a c-64 (not working but keyboaed and everything is intact.) Have some tape recorders as well and a disc 1541.. if interested
Atfer
November 8, 2012 at 12:21amReally nice project! I am trying to reproduce what you did there, but I am getting an error! I know that it’s not from my setup, because with the VirtualKeyboard project example it is recognized as an USB HID device, but when I am trying with your code, it gives me an error : Unknown device or three fast beep. Some help would be appreciated ;).
Thank you and well done!
admin
November 8, 2012 at 12:29pmI’ve noticed that when a new version of the Arduino IDE is released, a lot of code I use (especially the USB code) breaks. You might have to roll back to a previous version of the IDE to compile it.
antoniotrkdz
April 13, 2013 at 6:59pmHi!
This work is superb !
I made one myself using arduino nano v 3.0. I redesigned the pin outline to suit a small I/O board I built. Everything gone pretty much straight but I am having problems with the SHIFT & co. Keys…would you like to help?
What resistor are you using for the led?
Thank you for all your work.
admin
April 13, 2013 at 8:49pmThat’s great to hear that you built one. What sort of problem are you having with the keys? I honestly don’t remember the value for the resistor on the LED– a160 Ohm might work well. Share pictures of your final project, I’d love to see.
Carl
April 26, 2013 at 2:57amHi Great Project, I want to make a start on this, however when I look in the readme of the USBkeyboard library it says that the sketch will ot work with the stripboard circuit ( like yours ) only with the PCB one that is on the wiki.
Any ideas?
admin
April 26, 2013 at 3:00pmHi Carl, I’ve used the circuit in a proto-board many times so I’m pretty sure it will work. Give it a try. Just use the right parts, I think there’s no tolerance for the values.
Carl
April 28, 2013 at 3:33amThanks for your reply, I have built mine, the USB works with a circuit, I used the same Zdiodes as you too.
However my problem is that none of the keys map correctly, if at all. I checked and double checked the connections, I have even traced each wire back to the Matrix to verify my pinouts. When I single test each combination ‘Q’ is always ‘3’ no matter what wire is inserted into the arduino!
The only clear difference to your method was that I can’t uncomment out the optional connect/disconnect on pin 5 in config without breaking the code, it wont compile. is this where the fault lies?
antoniotrkdz
April 28, 2013 at 3:42pmHi!
Here is a picture of my project:
[IMG]http://i40.tinypic.com/5bskdk.jpg[/IMG]
antoniotrkdz
April 28, 2013 at 3:48pmhttp://tinypic.com/r/29771f/5
antoniotrkdz
April 28, 2013 at 8:23pmand last…
http://tinypic.com/r/2j515ac/5
Sorry for multiple posts…
Hope you like it!
The problem I have is that my device is not recognizing the shift keys and maybe any of the mod keys!
I will soon(ish) post my sketch.
Any suggestion will be much appreciated.
Carl
April 30, 2013 at 7:08amI have managed to get my key board working, but the connections seem to be different to the ones you have listed here!
here is what I found, I have used Cols alpha, Rows numeric, it ties in with the data online.
ard pin colour cbm pin Desc
0 Red/W 19 ColB
4 Brown 12 Row0
5 Red 11 Row1
6 Orange 10 Row2
7 Grey 5 Row7
8 Green 8 Row4
9 Blue 7 Row5
10 Purple 6 Row6
11 Yellow 9 Row3
12 Grey/W 13 ColB
A0 Orange/W 18 ColC
A1 Yellow/W 17 ColD
A2 Green/W 16 ColE
A3 Blue/W 15 ColF
A4 Purple/W 14 ColG
A5 Brown/W 20 ColA
The keyboard all works although slugish, except for the ‘s’ key for some strange reason and you have to ‘hit’ the space bar!
I hope the above helps, it may be my wiring, but I have two identical CBM keyboard here.
*Could anyone help me to convert this to PS/2 sketch?* please please 🙂
antoniotrkdz
April 30, 2013 at 4:02pm@Carl,
your issues look hardware to me, I had the z,x and most notably return not working. I unscrewed all the twentysomething little screws on the back of the keyboard and cleaned with alcohol all the contact surfaces, screwed back in all the twentysomething little screws and…TA DAA everything is working again!
Things were build to last back then……
antoniotrkdz
May 8, 2013 at 4:12pmI connected my arduino in this way:
ard pin cbm pin Desc
12 5 ROW3 GREY
11 6 ROW6
10 7 ROW5
9 8 ROW4
8 9 ROW7
7 10 ROW2
6 11 ROW1
5 12 ROW0
4 13 COL0(A)
3 14 COL6(G)
A0(14) 15 COL5(F)
A1(15) 16 COL4(E)
A2(16) 17 COL3(D)
A3(17) 18 COL2(C)
A4(18) 19 COL1(B)
A5(19) 20 COL7(H) W/BROWN
I used the CBM keyboard connector layout provided by Mikkel Holm Olsen.
All the keys work except for modifier keys and some keys like star, at, etc. that need shift to work.
Please let me know if you find some error in my pin layout.
Thanks!
Cristian
May 4, 2014 at 8:38pmHi, I’ve been trying to map the C64 keyboard using Arduino UNO and always have a set of keys that don’t work. I have tried all possible ways without success. I always see a missed column…sometimes is Column H…sometimes is C. I have checked all connections. It seems as if the matrix had a column less. Please if someone can help me.
Thanks!
TechC64C
October 27, 2014 at 2:36amPlease help me, i did a shield for my C64C Keyboard, it works with the USBKeyboard Example 1, but it doesn’t work with your code..
I tried also old IDE builds like 1.0.0 (2012), but it doesn’t work.. please help me! 🙁
amidar
November 16, 2014 at 1:31am@TechC64C
Did You read this part :
I made a small change to the V-USB code and moved the USB data (-) from Arduino pin 4 to pin 3– just edit usbconfig.h inside the UsbKeyboard library. I also commented out the optional connect/disconnect on pin 5 because I simply don’t have the pins to spare! Connected, the inside looks like this.
USB-Adapter für Commodore Tastaturen | 8Bit-Museum.de
April 25, 2015 at 1:41pm[…] Arduino 168/328P ebenfalls mit der V-USB Library. Auch er stellt Baupläne und Software auf seiner Website zur […]
Convert Your Commodore 64 Keyboard | The Guy Corner NYC
June 4, 2015 at 3:08pm[…] biosrhythm from what I saw did the best job in making the project as easy as possible. Check it out here if you are interested in converting an old Commodore […]
Svein Are Karlsen
March 26, 2017 at 10:15amLove these projects. Technological anachronisms created by bringing old and new together with cheap off-the-shelf prototyping hardware, open source code, tape and glue 🙂
I have a few dead old computers and consoles of my own which have become hosts for new internal hardware.
Check out the Micro Pro and the Leonardo the next time you’re doing a USB HID project. They will simplify the process alot since they can be made to act as HID devices on their built-in USB port 🙂
Leandro
October 4, 2017 at 3:19amHey, Nice project! I moved out to a old house that happens to have a sort of attic full of junk stuff left from the old family that lived here. Trying to clean out things i found 2 commodores 64 and other similar computer that appears to be a commodore 128 (not sure, covered with ages of dust..).
The question is, if the keyboards on the commodores arent stuck, this project would be suitable on the pinout of an arduino uno, since my brother has one and not really using it, or is more convenient to buy a arduino nano clone?
Thanks in advance, And keep this kind of projects up, im new to all the arduino stuff and trying to learn more about this platform!
nicola
October 27, 2017 at 1:15pmI can’t find the UsbKeyboard.h library
reliable225
December 31, 2017 at 2:32amok will someone mind explaining to me how the Commodore 64 keyboard works? All I want to know is about the cursor keys, like there’s two of them (one is up and and down, second is left and right) so how do I move around with them, do I put pressure on the specific spot of the key? Do I combine it with another key? What do I do, or are they not used for movements at all? Please explain
reliable225
December 31, 2017 at 3:09amnvm peeps I just realized the whole cursor key thing it turns out you have to combine the cursor key with shift if you want to go in a different direction (cursor up-down+shift=up,cursor up-down=down,cursor left-right+shift=left, cursor left-right=right) so yeah the shift is close to the two cursor keys so I can put three fingers there, I didn’t notice that sorry guys
Sven
January 15, 2023 at 11:36amHi, in know i´m a bit late but i have a question.
If i try to compile the code i get this error: ‘KEY_F7’ was not declared in this scope