My first iPod was the iPod 3G so I was a little late to the game. I’ve own several iPods after that but the iPod 3G I felt was a perfect distillation of the original iPod experience. Four separate buttons in a row and a touch wheel (nothing moves) seemed like peak iPod design to me (not necessarily UX as you’ll later see).
In this blog post, we’ll cover facts about the iPod 3G, which compact flash and SD adapters work (and which ones don’t), how I prepared my SD card for the iPod, and replacing the battery with a higher capacity one.
My original hard drive no longer works so an update to solid state memory seems like a perfect upgrade.
iPod 3G Facts and HOWTO
I should also note some quirks about the iPod 3G you may have forgotten which are important to remember.
- The iPod 3G is a hybrid FireWire and USB device.
- It should sync over both FireWire and USB using an appropriate 30 pin dock connector cable. However, I’ve only been able to get it to reliably sync over USB.
- The iPod 3G is still supported in Apple Music on MacOS 15 Sequoia.
- It will only charge with a FireWire 30 pin dock connector cable. It will NOT charge over USB. It never did.
- Syncing over USB means your battery needs to be functional enough to power on while syncing.
- Apple made a special cable for PC users that had both USB for syncing and FireWire for charging. These cables are now rare and expensive.
- The maximum size of hard drive is debatable. I settled on 128GB but I’ve seen folks use 512GB cards. However, this may not give you more songs because the iPod is limited in memory space where the database is stored.
- HOWTO: Reset an iPod 3G by holding down MENU and play/pause.
- HOWTO: Enter the diagnostic menu by resetting and immediately holding prev, next, and the center button until the apple logo disappears.
- HOWTO: To sleep the iPod, go to the diagnostic menu and select SLEEP.
- If your iPod shows a folder with exclamation point, it likely means the iPod didn’t find or can’t find or read the drive.
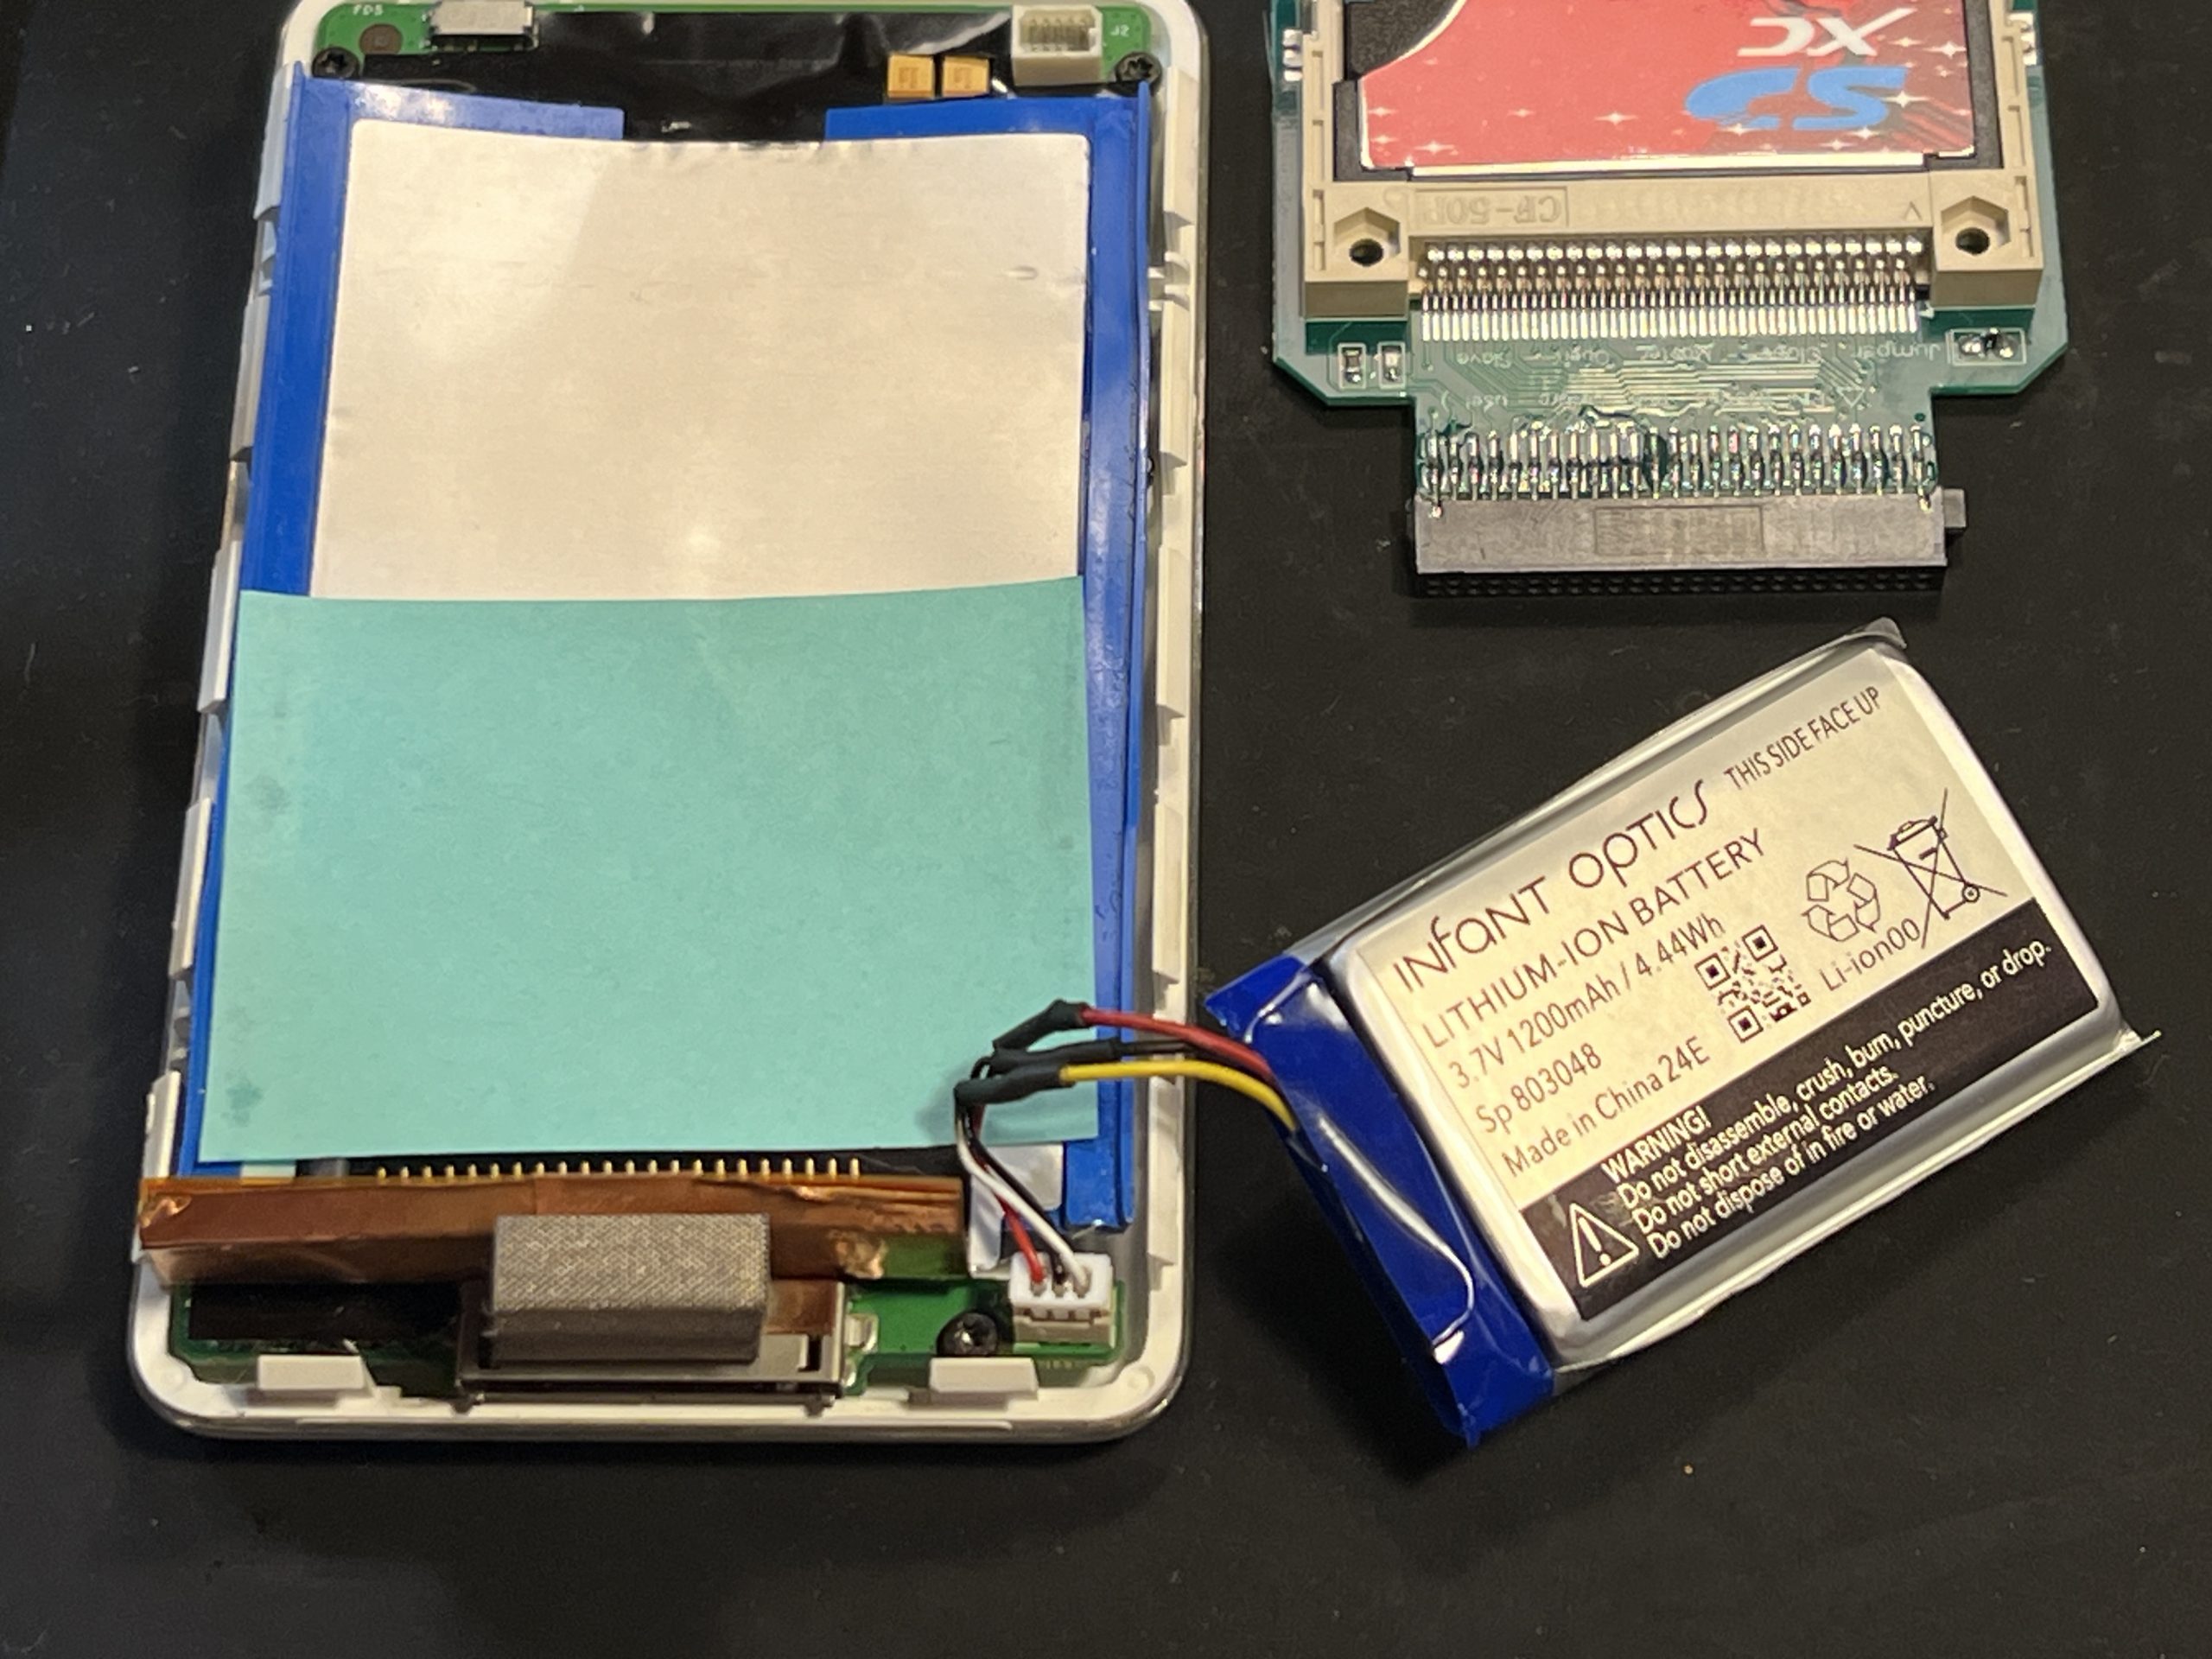
The right IDE to CF and CF to SD adapters.
I began by purchasing a 1.8″ IDE to Compact Flash card adapter. I originally planned to use a normal CF card but then discovered that you can get a CF to SD card adapter. With the cost of SD cards per GB far lower than the cost of CF cards per GB, I decided to go this route.
This is when the headaches began. I kept getting inconsistent results. Sometimes the iPod would be recognized, sometimes not. I won’t bore you with these details but I later found out that the issues I was having was with the two adapters I purchased.
@mejs@mastodon.vladovince.com on Mastodon recently accomplished an iPod 3G SD upgrade so I reached out to him to find out which parts he used. The only way I can describe the difference to you is via their color.
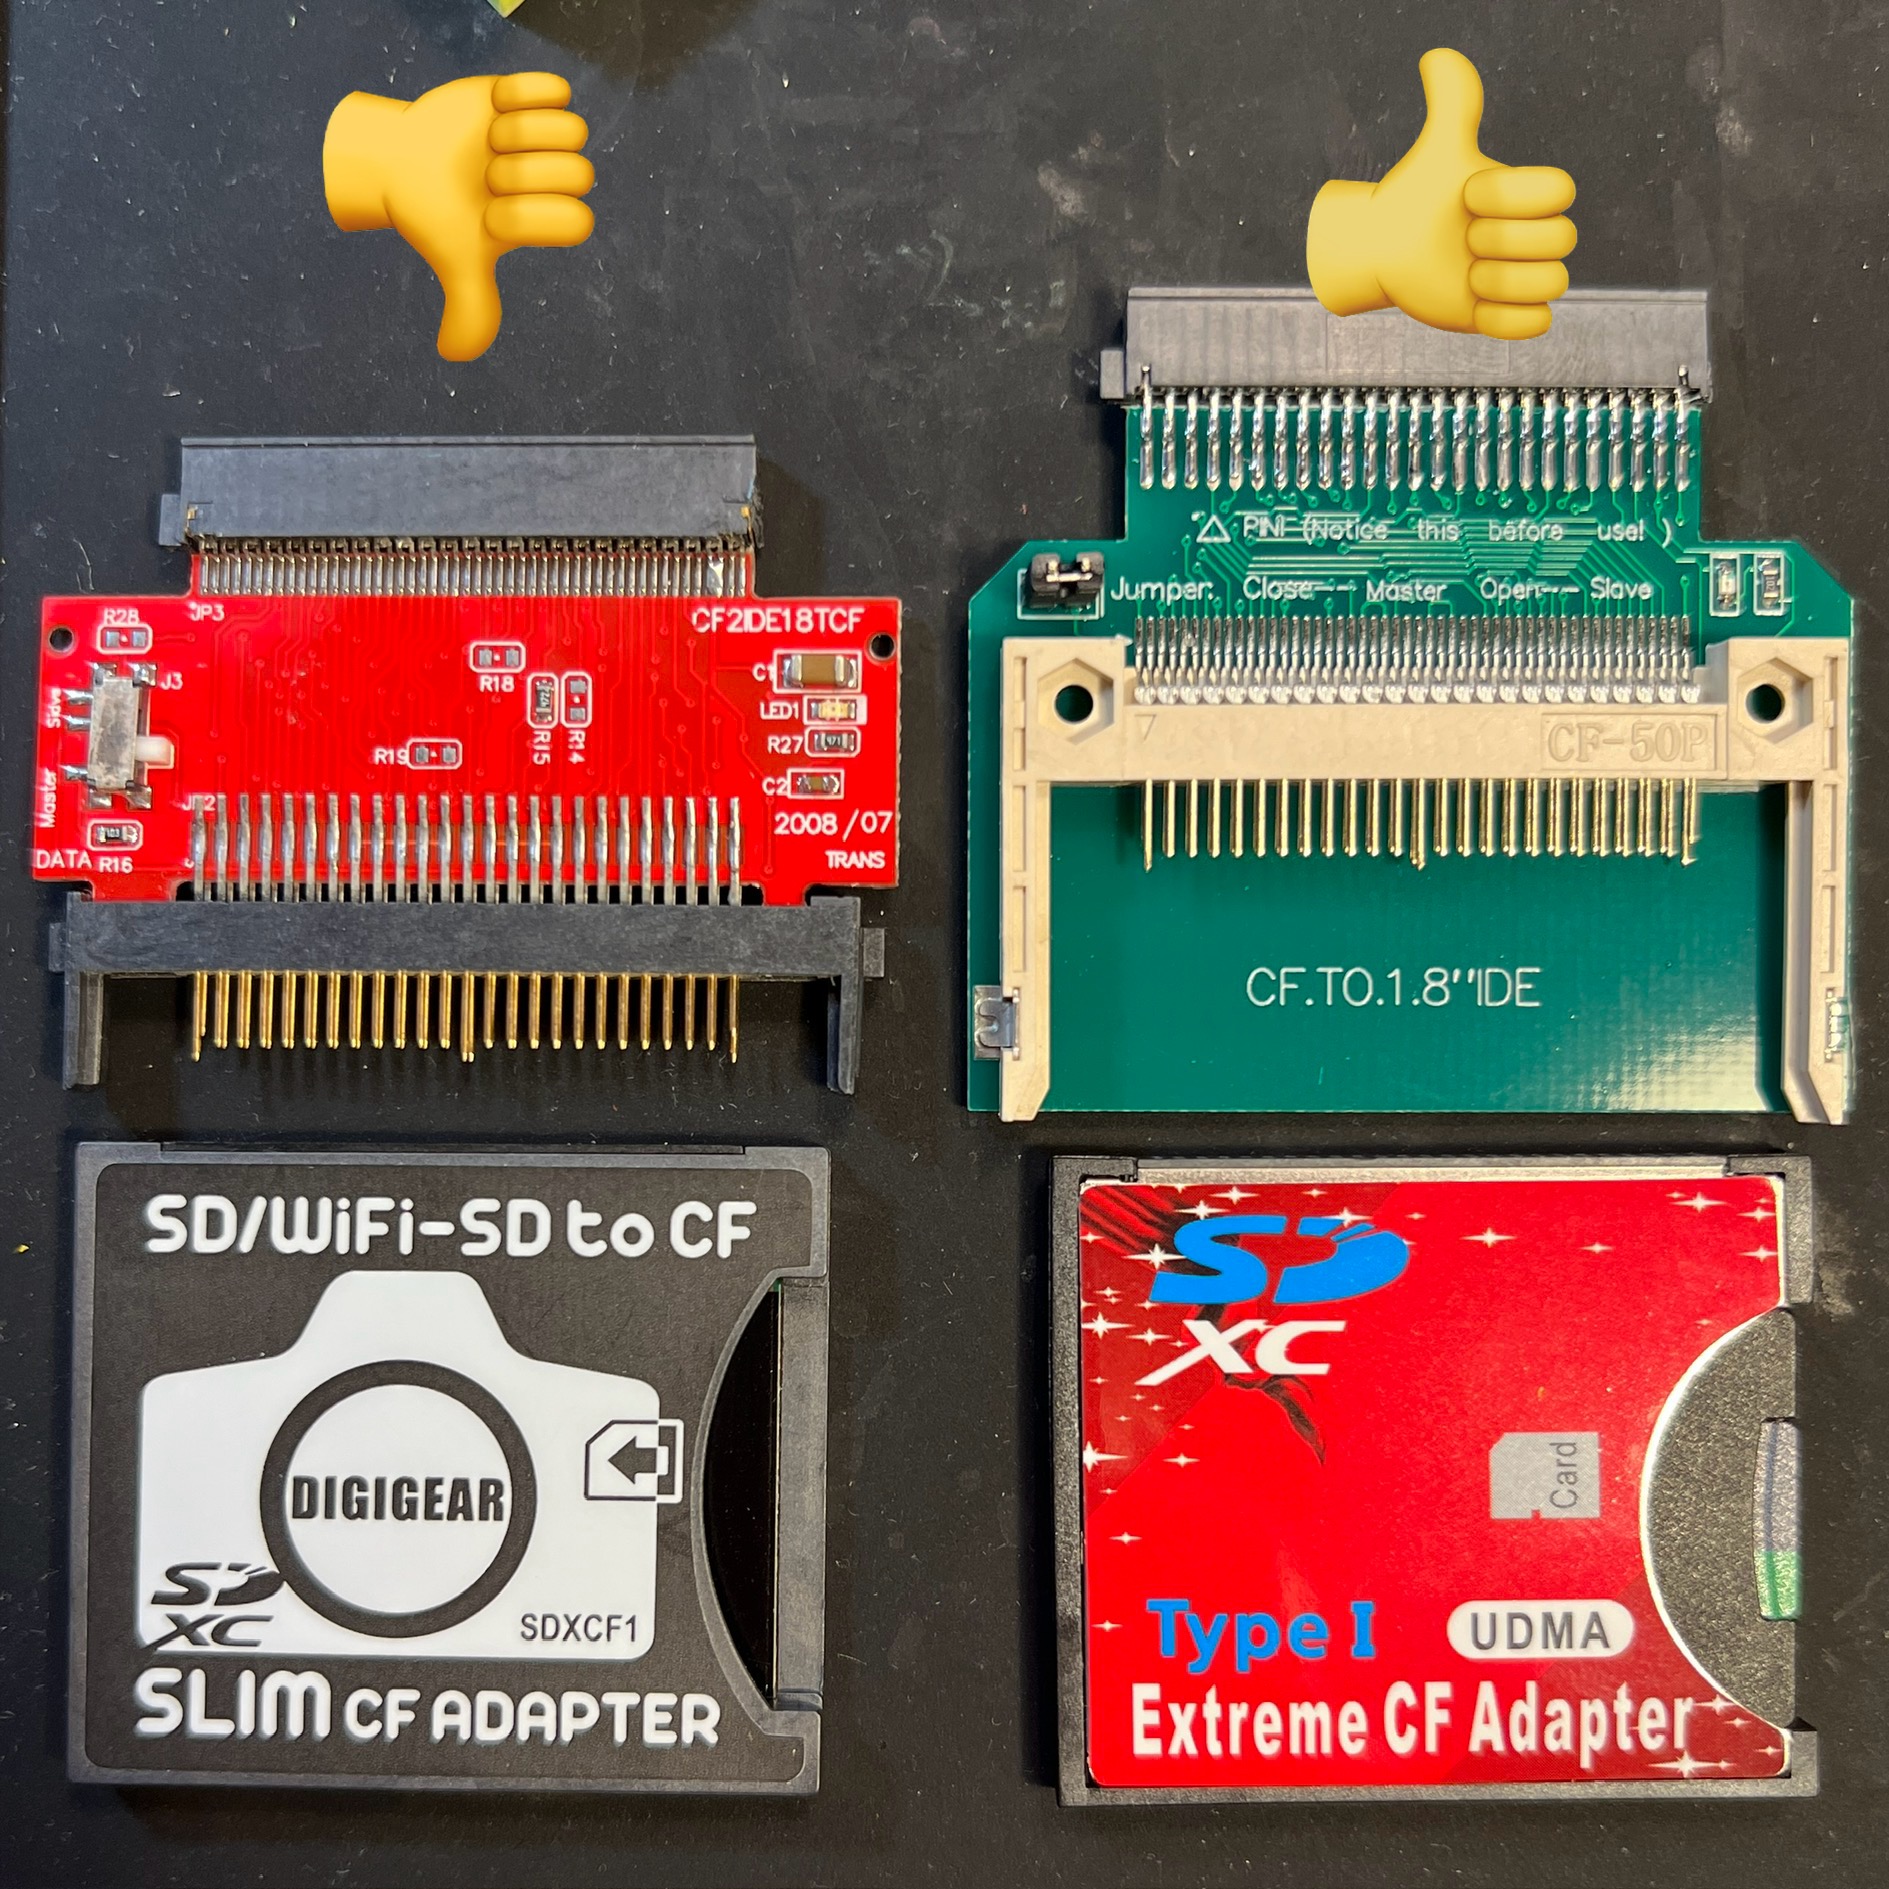
What doesn’t work is the red 1.8″ IDE to CF adapter and black CF to SD adapter (left in the picture above).
What does work is the green 1.8″ IDE to CD adapter [Amazon, $7.99] and red CF to SD adapter [Amazon, $15] (right in the picture above).
I know this is risky since these parts could easily change their products but it seemed to work for me. Caveat emptor!
Note: There’s a jumper on the side of the CF to IDE adapter that needs to be removed because it’s too tall. Desolder it and add a solder bridge or short wire jumper.
Note: There’s a small tab on the side of the IDE connector needs to be cut off. Use a pair of side cutters.
Install the chain of adapters inside your iPod 3G. Opening an iPod 3G can be tricky but here’s an excellent guide. Go slow.
Opening the case
By far, the most daunting part of this mod is opening the iPod case. Use plastic spudgers, and take your time. It will open, eventually. Follow the instructions from the iFixIt site for the iPod 3G battery replacement. It has excellent instructions and pictures.
Be sure to read the entire set of opening instructions FIRST, including all of the comments. This is especially important for step 4 where you’re told to remove the headphone jack connector. It’s incredibly fragile! You’ll see later on in this post that I broke mine (but successfully repaired it). If you’re careful, you can leave it connected and carefully manage the back case with two hands.
Preparing the SD card for the iPod 3G on a Mac
Once you’ve got the parts sorted, let’s prepare your SD card. I should note that in a perfect world, you’d be able to plug the iPod into your classic Mac and use iTunes to restore. Unfortunately, the older versions of iTunes can no longer contact Apple’s software update servers any more so it will fail.
If you are able to use a recent-ish version of iTunes, you may be prompted with an error message that you can only restore the iPod over FireWire.
Some have had success in using iTunes on Windows to restore the iPod 3G. However, you’ll have a FAT32 formatted iPod, which is fine. But I wanted mine to be Apple HFS formatted so my instructions are for the Mac.
To avoid all of this, we’re going to build the partition manually. Below are the steps I did (learned from this long lost site, viewed in Archive.org’s Wayback Machine).
WARNING: We’re about to dive into the terminal with sudo permissions. If you get this part wrong, you could destroy the data on any of the disks attached to your computer!
WARNING: Do not blindly copy and paste the commands below without reviewing them to make sure your correct drive location is used. In this example mine is disk6 so make sure to replace the ‘6’ with your disk number in each command as needed. You’ve been warned!
- Download the firmware for the iPod 3G. Rename the .ipsw extension to .zip and unzip. Firmware file is named
Firmware-2.2.3. Despite the version saying 2.2.3 it is in fact only version 2.3 (the latest). Note: If you want to use your iPod 3G with MacOS 9 and iTunes 2, the last supported iPod 3G firmware was 2.0.1. Use this version instead. - Insert SD card into your Mac. Locate where the SD card has been mounted with
diskutil list. In this example, it’s/dev/disk6for me. - Erase the disk with Apple Partition Map (APM):
diskutil partitionDisk /dev/disk6 APM HFS+ Blank 0b - Start pdisk with
sudo pdisk. Type an ‘e’ and enter your disk location (again, for me it’s/dev/disk6). Type a ‘p’ to see the current partition map. - Delete all of the partitions except 1 with the ‘d’ command, (ex:
d2). - You should be left with something that looks like this, by using the ‘p’ command.
Partition map (with 512 byte blocks) on '/dev/disk6'
#: type name length base ( size )
1: Apple_partition_map Apple 63 @ 1
2: Apple_Free Extra 250347456 @ 64 (119.4G) - Create the firmware partition and data partition. I called my iPod 3G Apollo but you can use any name you want. Note case sensitivity in the ‘C’ command below.
C 2p 32m firmware Apple_MDFW
C 3p 3p Apollo Apple_HFS - Verify those partitions with the ‘p’ command. It should look like this.
Partition map (with 512 byte blocks) on '/dev/disk6'
#: type name length base ( size )
1: Apple_partition_map Apple 63 @ 1
2: Apple_MDFW firmware 65536 @ 64 ( 32.0M)
3: Apple_HFS Apollo 250281920 @ 65600 (119.3G) - Save with ‘w’ and ‘q’ to quit twice.
- Unmount the disk in Disk Util GUI if it auto remounts.
- Format the data partition.
sudo newfs_hfs -v Apollo /dev/disk6s3 - Zero the firmware partition and write iPod firmware to disk.
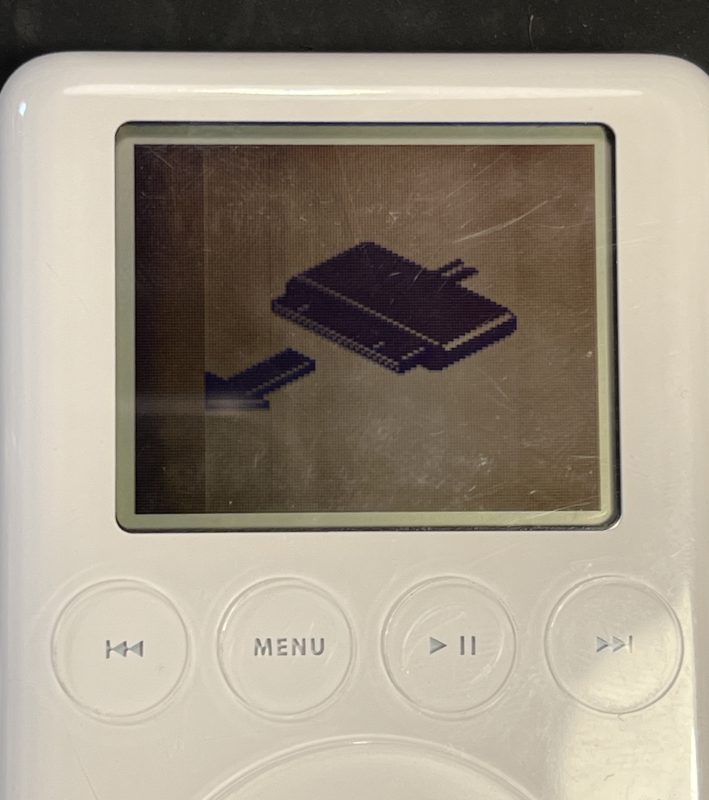
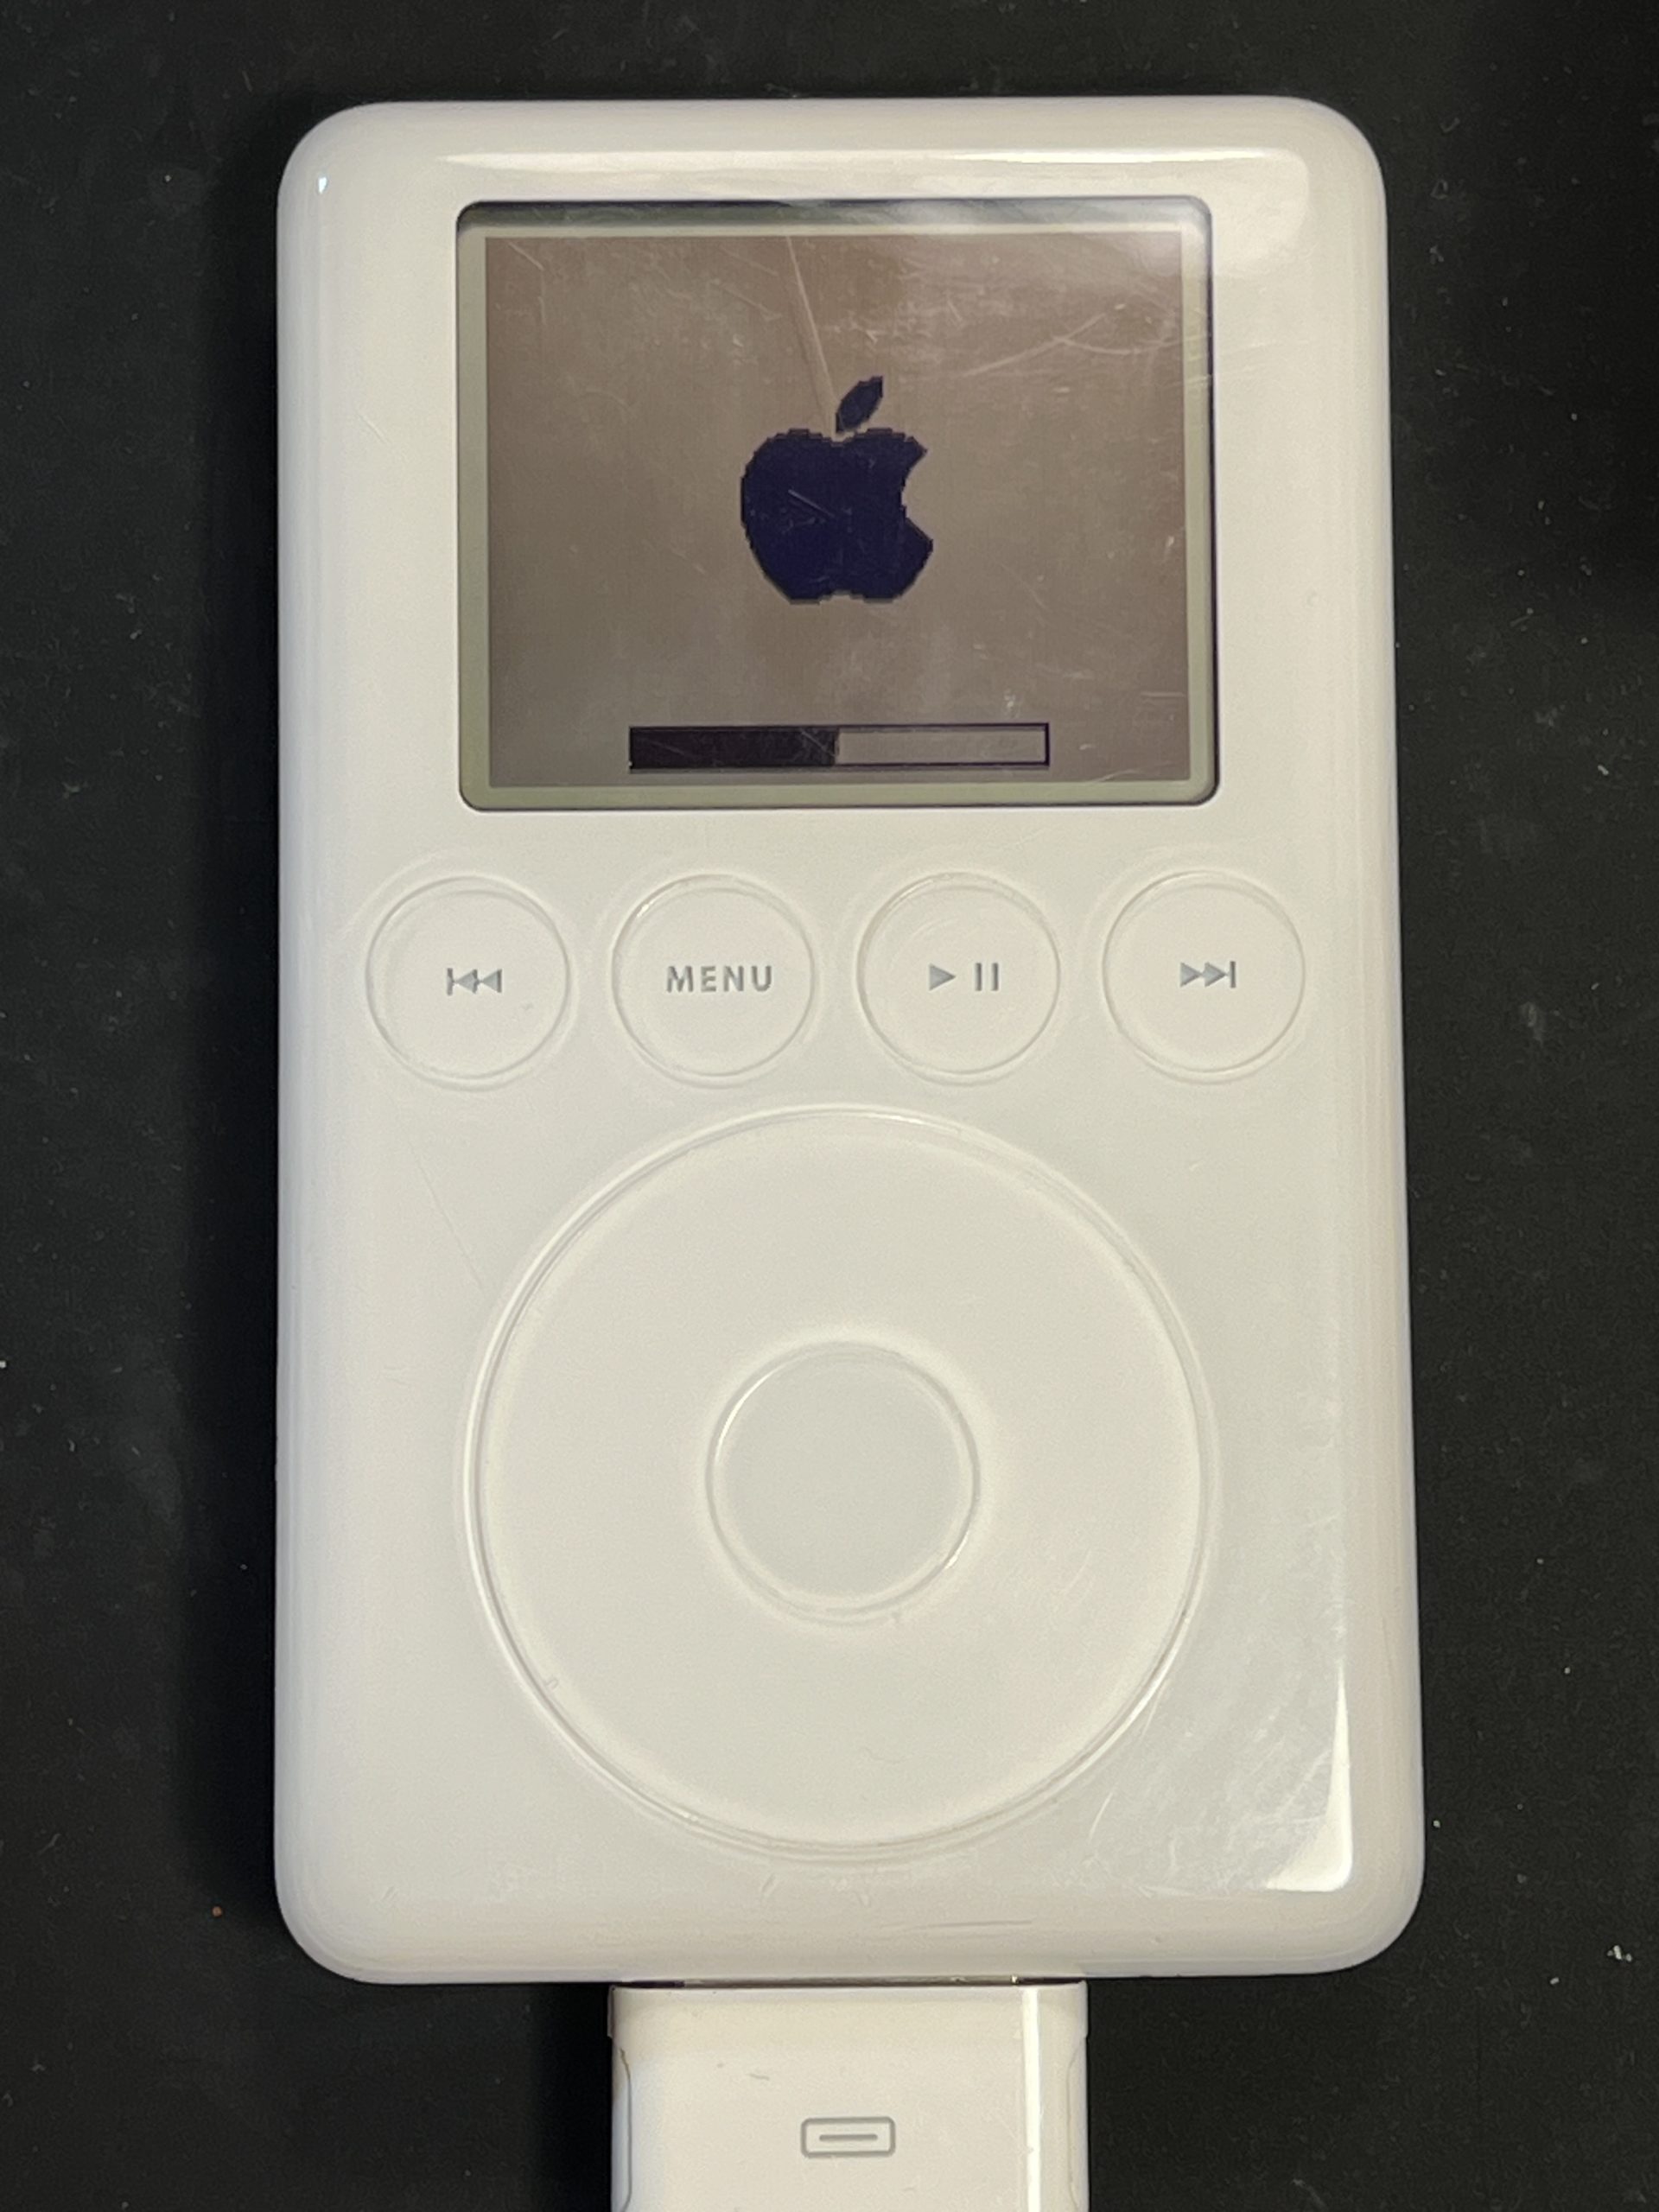
sudo dd if=/dev/zero of=/dev/disk6s2sudo dd if=Firmware-2.2.3 of=/dev/disk6s2 - Eject the SD card. Make sure your iPod 3G is in sleep mode (see facts section above). Insert into iPod. Connect your iPod to a FireWire cable for power (otherwise you’ll get a screen saying to plug in a docking cable, see picture below).
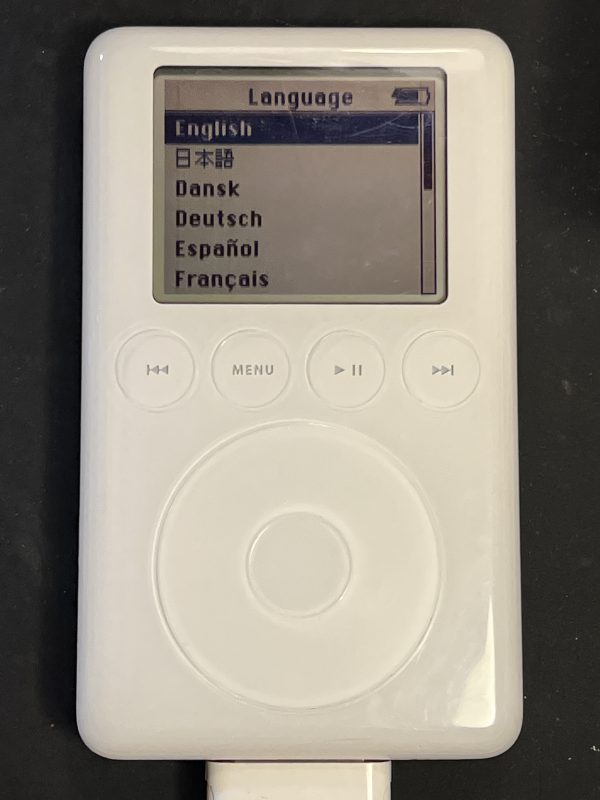
- Press any button to power on the iPod. You should see the Apple logo with a progress bar (see picture below) as the firmware is unpacked. After a short period, you should be greeted with the language selector (see picture below).
New Battery
New batteries for the iPod 3G are readily available on eBay, most in the same capacity as the original (about 800mAh). However, I found that someone figured out how to use a higher capacity battery (1200 mAh) [Amazon, $11.99] which should give me a longer run time.
The new battery has two issues that need to be sorted before it can be used. First, the pinout of the JST connector is wrong for the iPod. Second, there’s a blob of glue on the top of the connector.
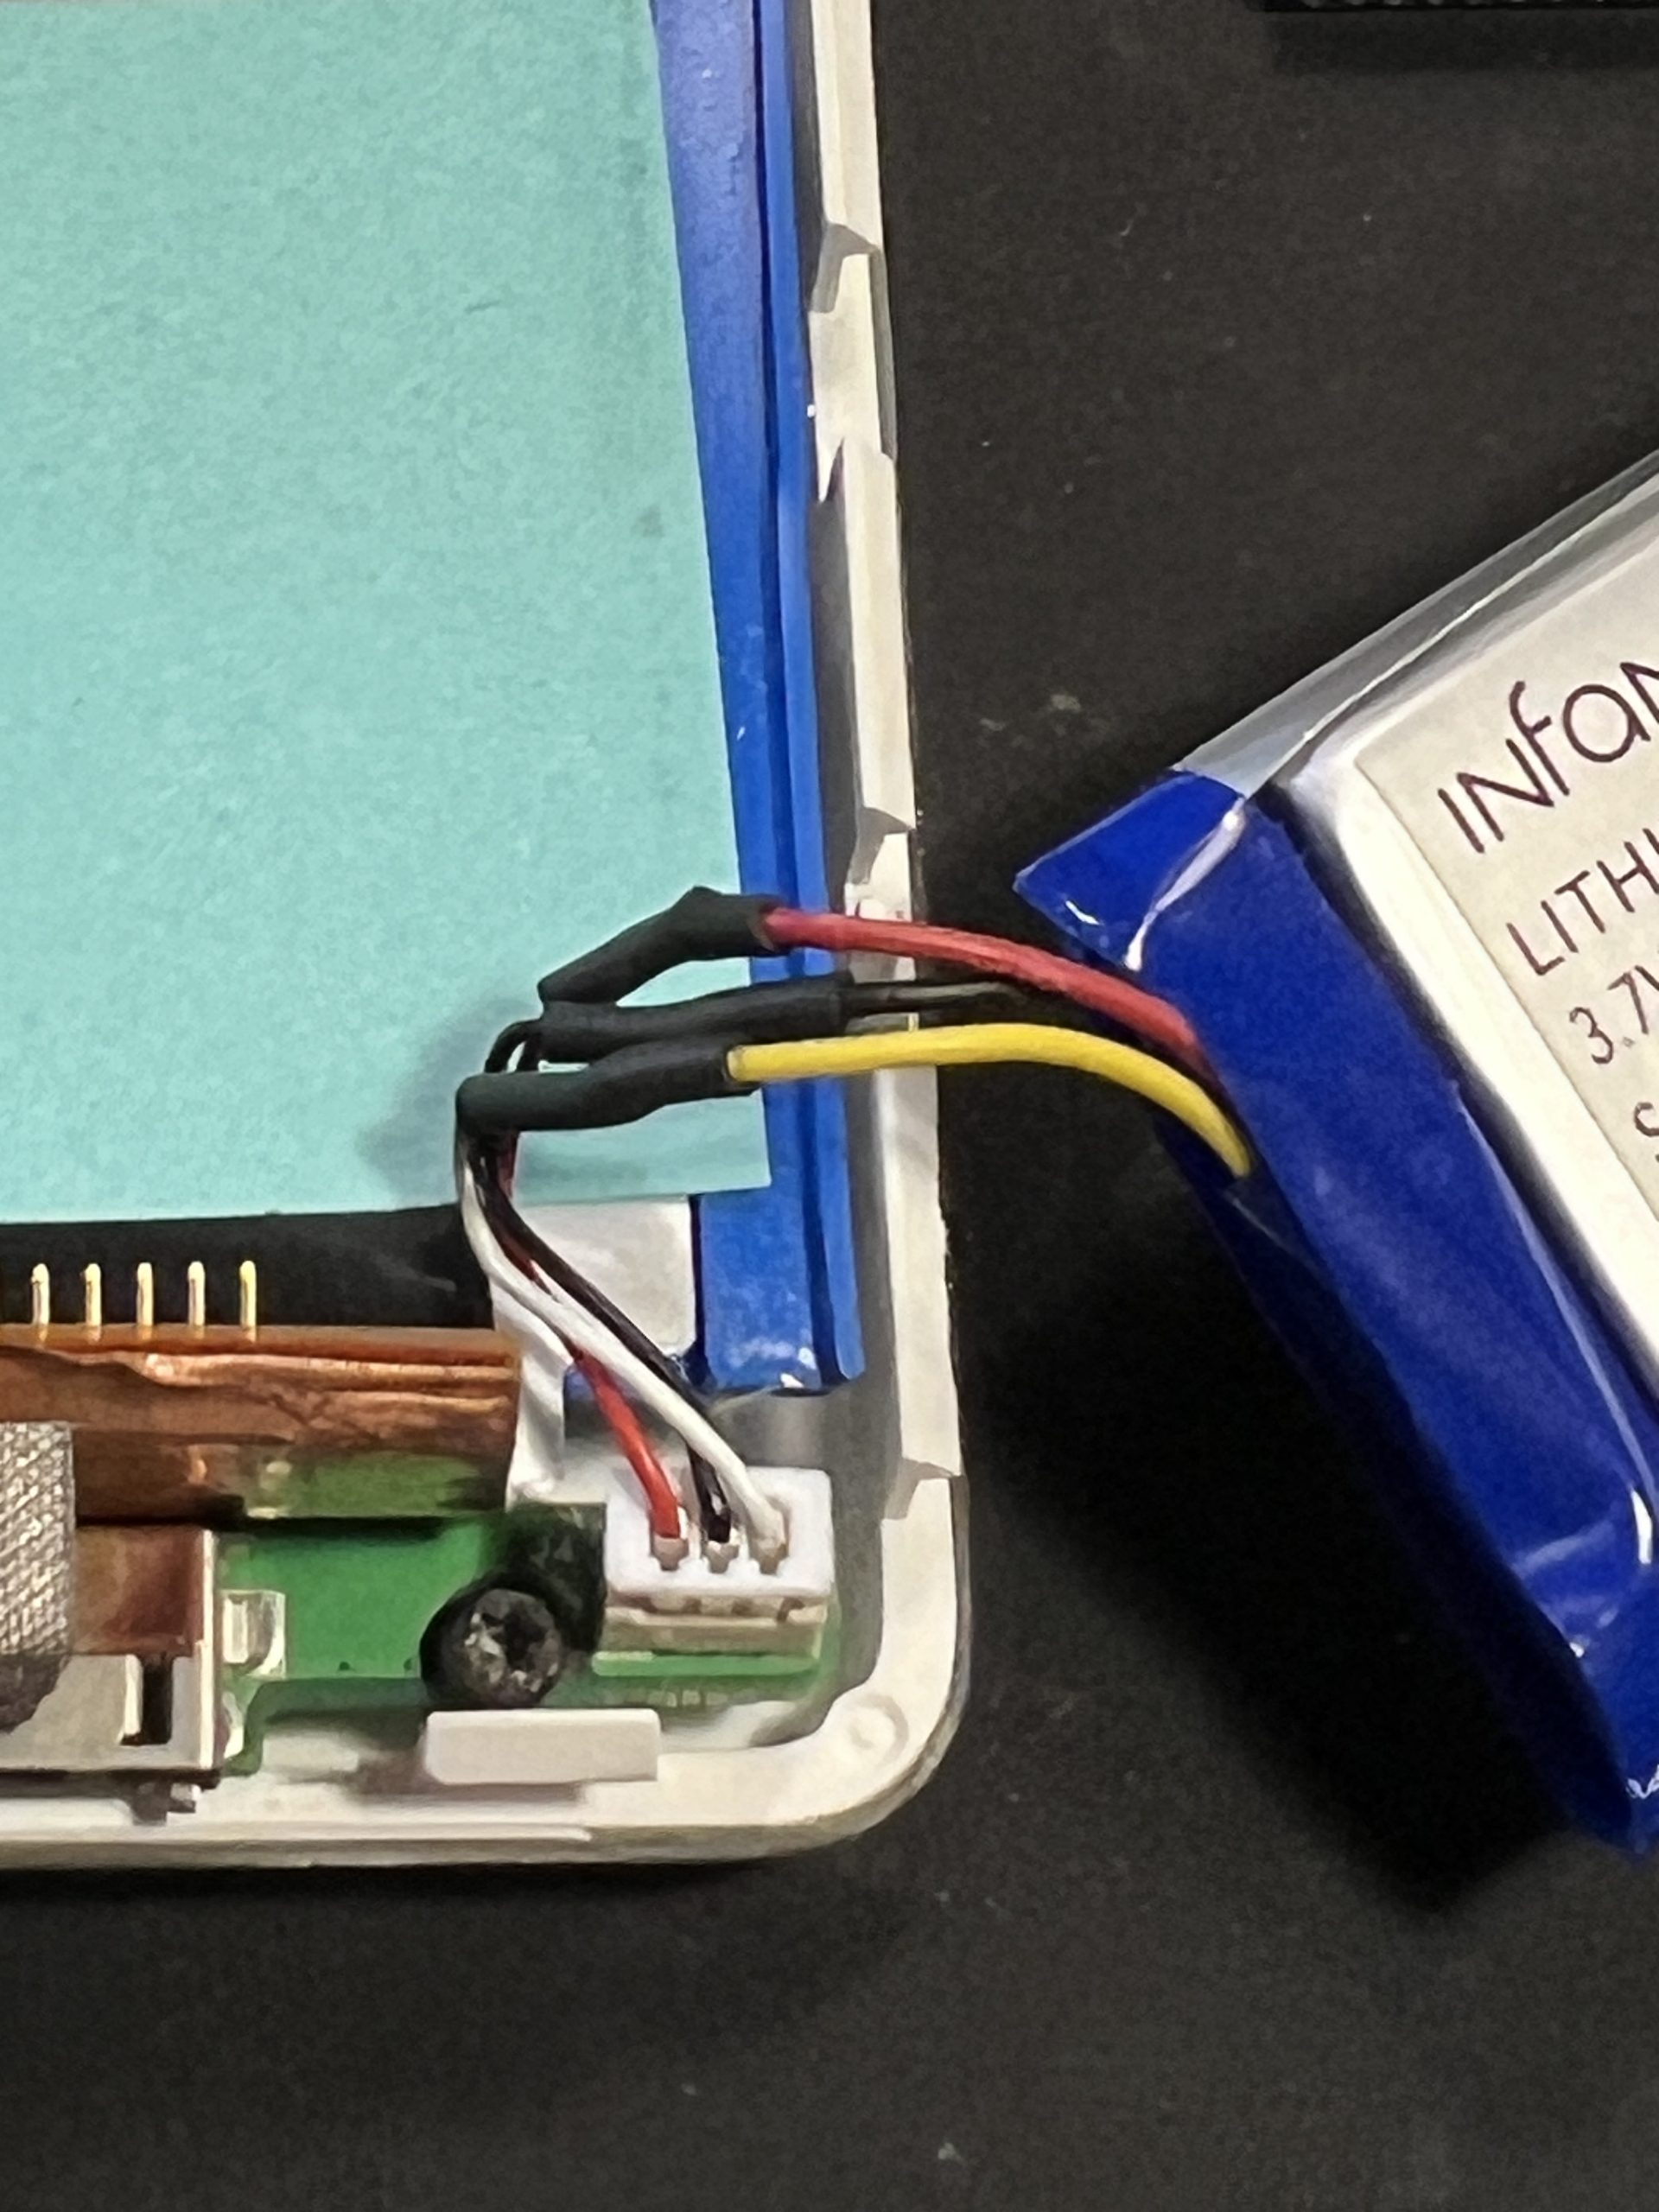
Some have had success in heating the glue up and swapping the pins. This did not work for me so I cut the connector off of the old cable and soldered it on the new battery (red to red, black to black, white to yellow).
I found the battery needs to be conditioned before use so go through several charge and drain cycles. Each time, the run time should improve. I did this 3 times.
I later performed the battery mod on an iPod 3G 10GB using the same battery. However, given the 10GB model has a smaller case, I had to flip the battery around so the wires and blue plastic bit is at the top of the case. This means adding slightly longer wires. But if you do this, it will fit in a 10GB case perfectly.
Update: After 5 charge cycles, the battery has settled on a little over 9 hours of total run time, including powering the iTrip FM transmitter!
Flex Cable Repair
While using the iPod 3G I noticed that I was getting sound out of only the right channel. I verified this with headphones. I noticed that if I opened the case slightly, the left channel would suddenly work. Slow closing the case, the left channel stopped again. I narrowed the problem down to the flex cable connector from the back shell. This provides headphone and accessory lines to the top of the case.
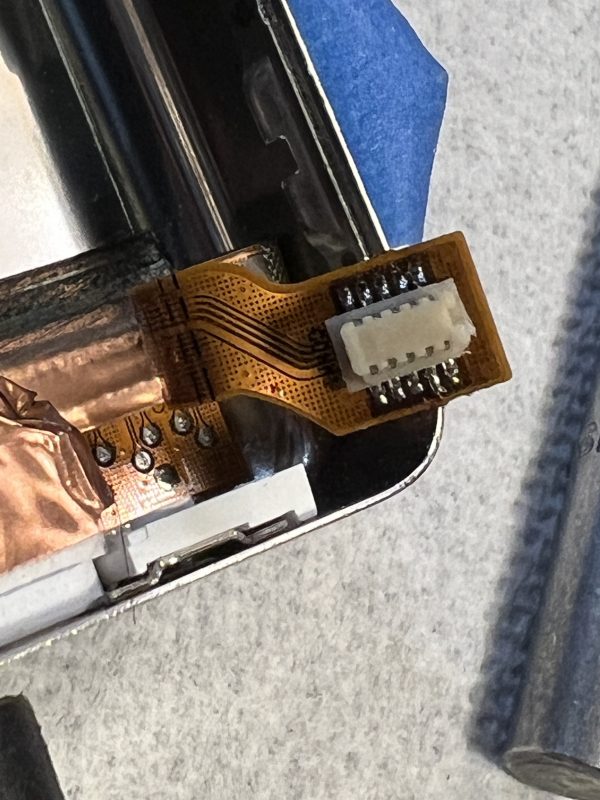
I used QuikChip to desolder the 10 pin connector and found that two of the flex cable pads lifted. They were likely broken from repeated removal cycles. Tip: Only remove the flex cable connector with a sharp flat head to separate the connector itself and not the flex cable backing (like I did!).
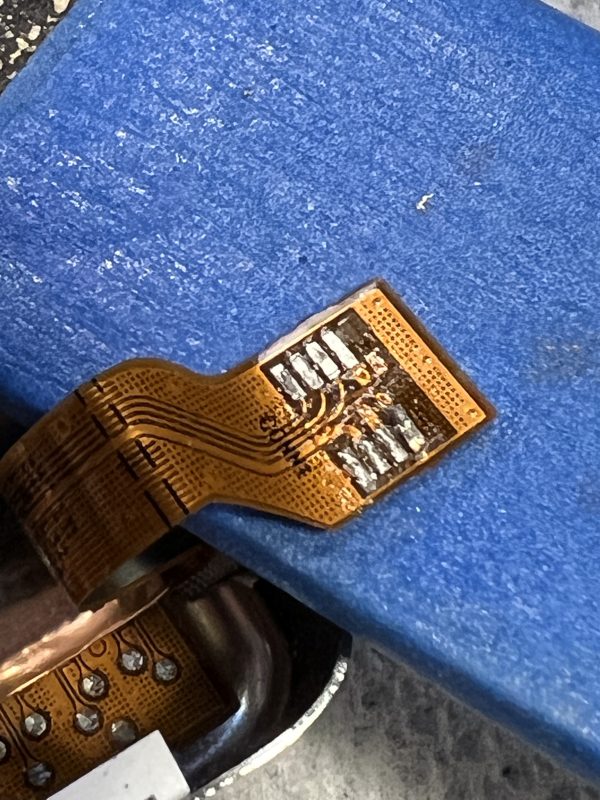
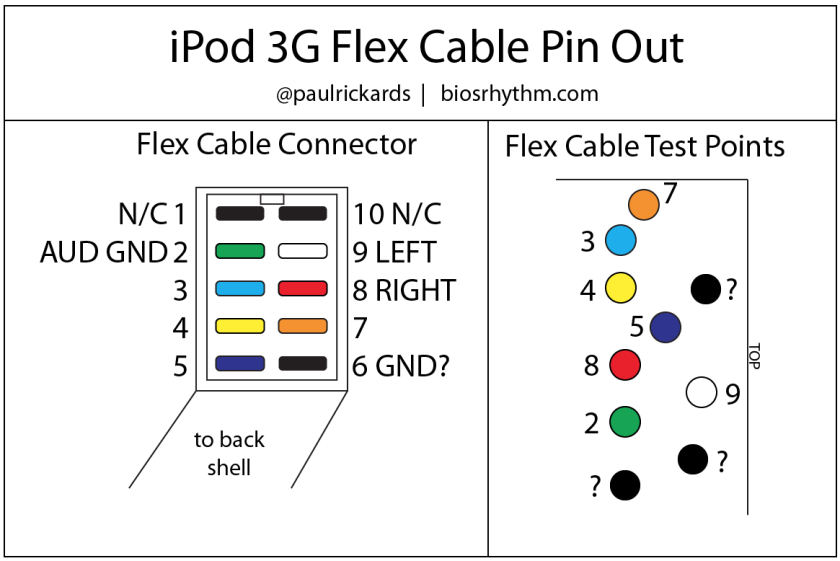
I scrapped back the remaining copper from the two VIAs and toned them out. It seems the top two are no connection so I didn’t need to worry about that. The remaining pin was verified as the left channel. Below is a diagram of the pin outs that I found. Inside the case, there’s also test points further down the flex cable to verify continuity.
I fashioned a small copper pad with adhesive backed copper. Something this small is challenging as the adhesive is no match for the soldering iron. But it was already broken so I’m not out anything if I have to other a replacement.
I re-attached the 10-pin connector to the flex cable (this was difficult!) and tested continuity again. All seemed well so I reassembled it and I was amazed that the left channel was working again!
Solid State Survivor
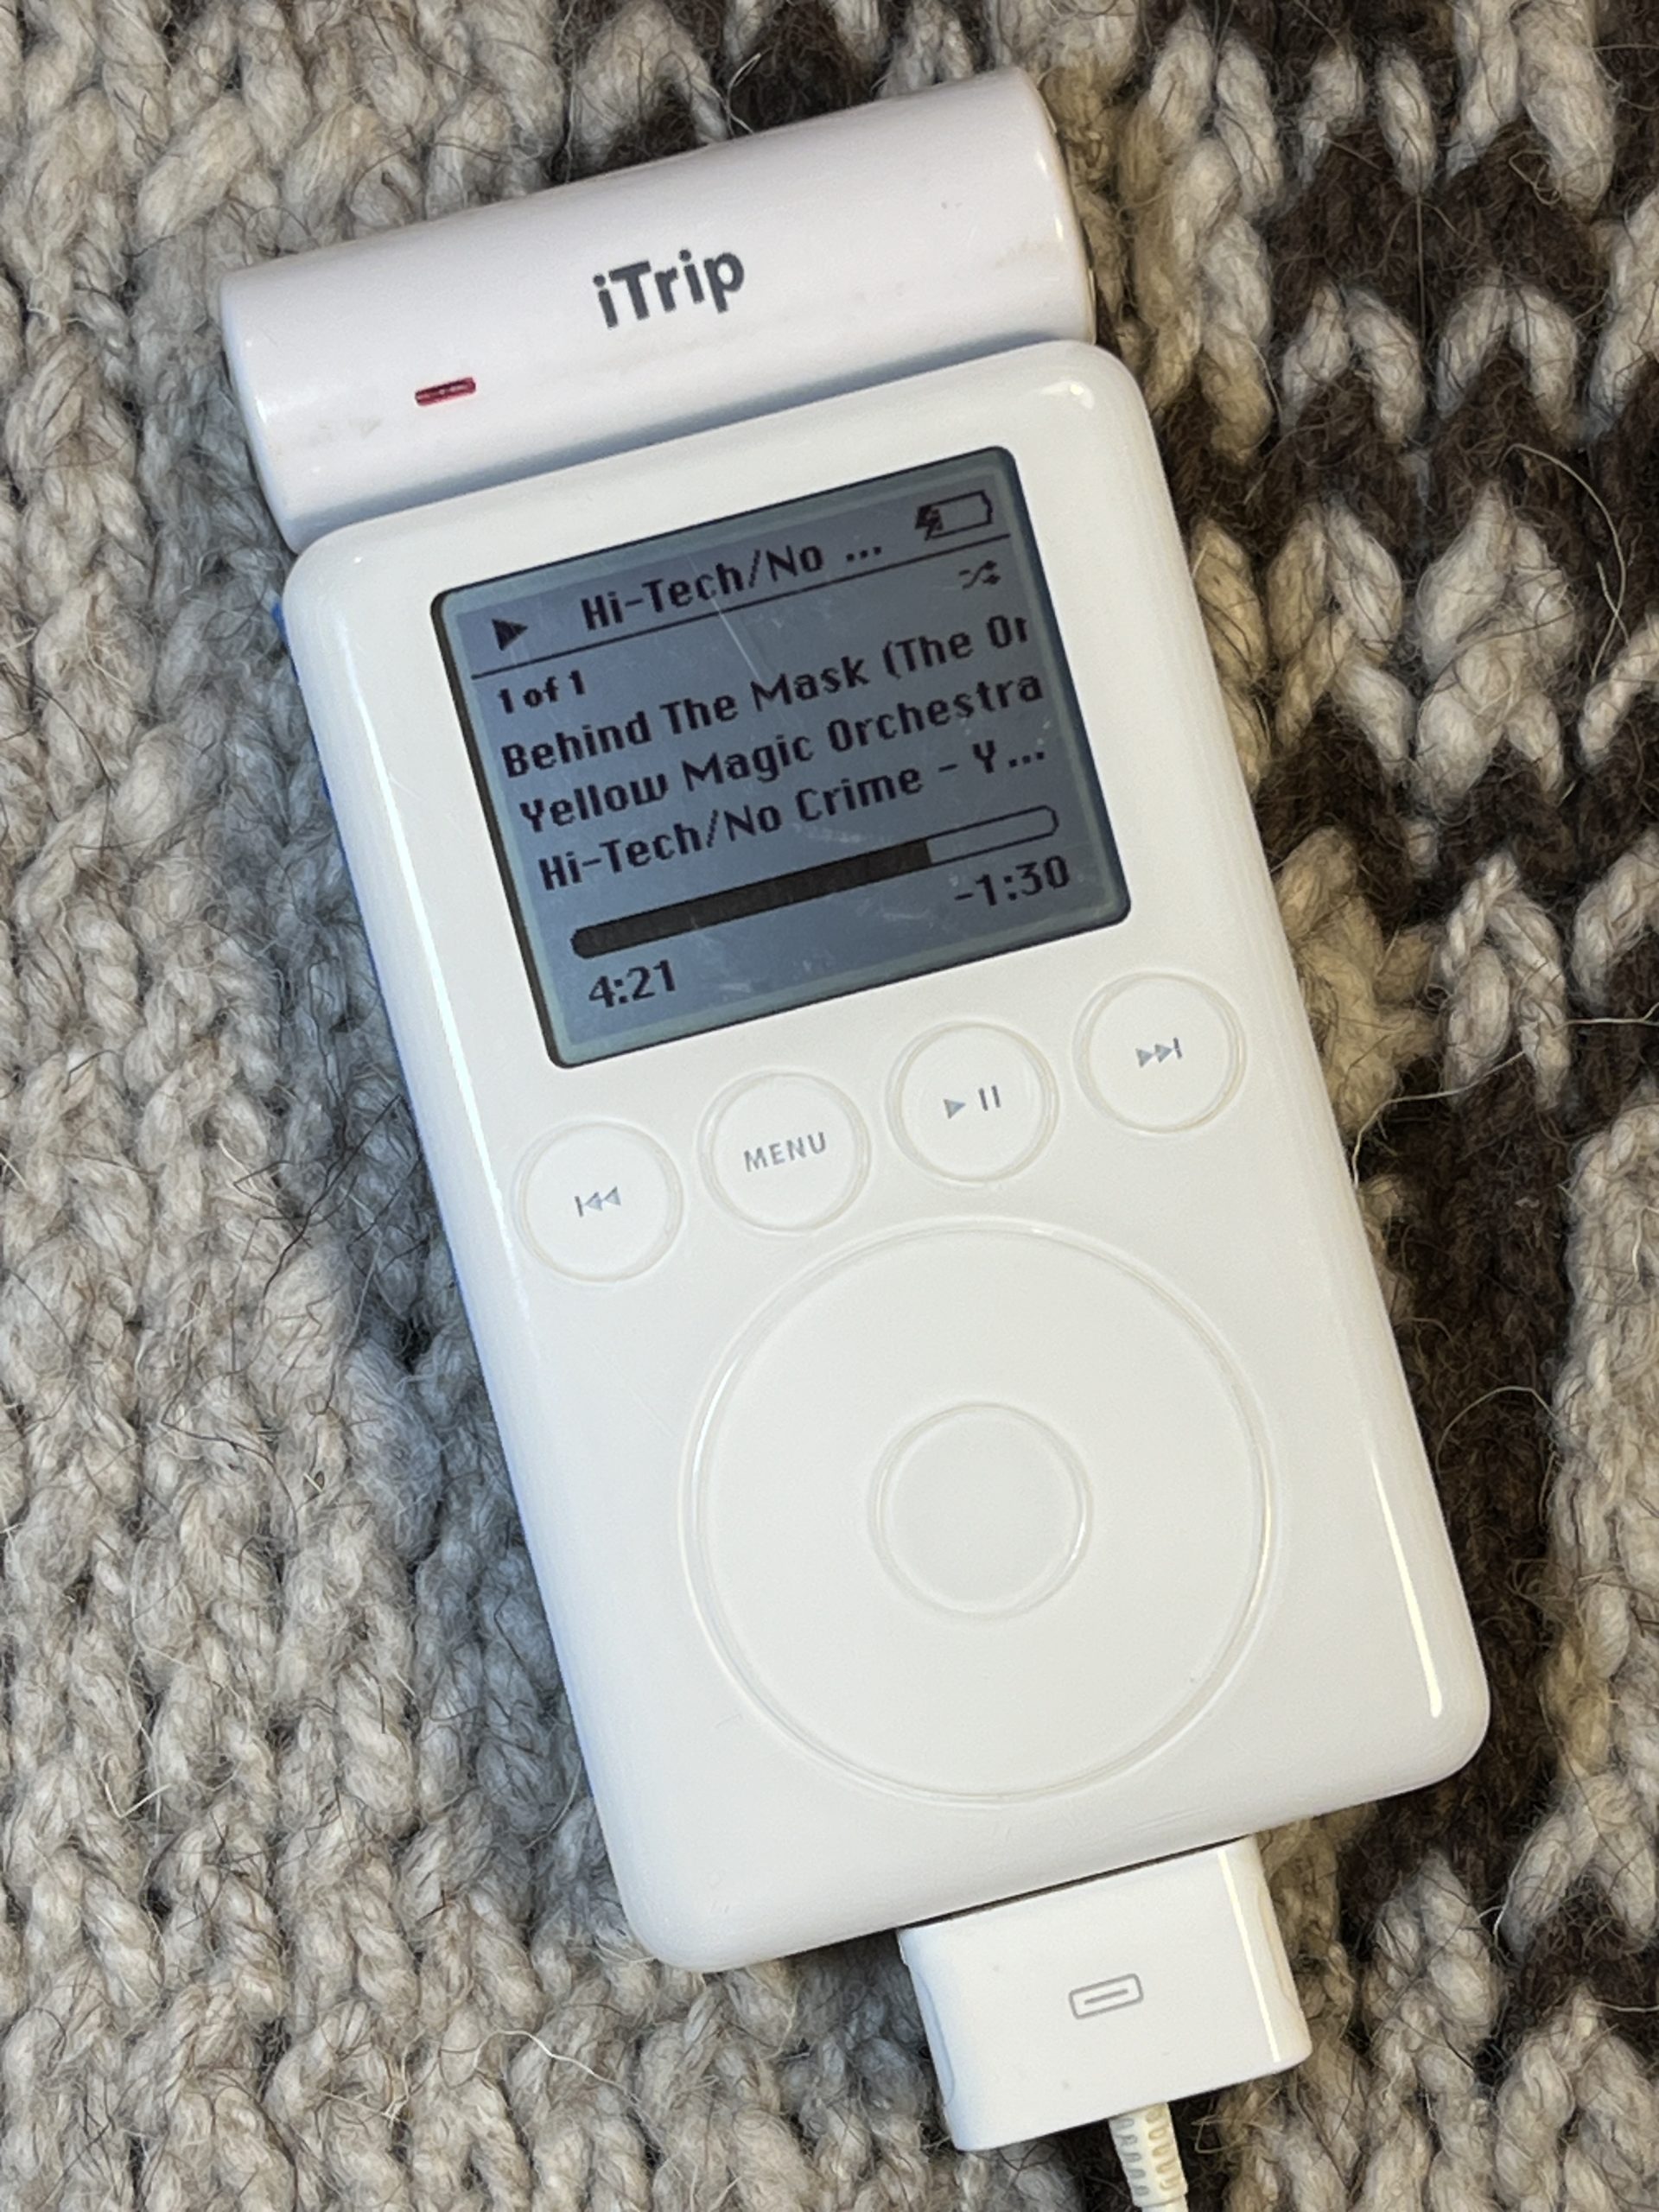
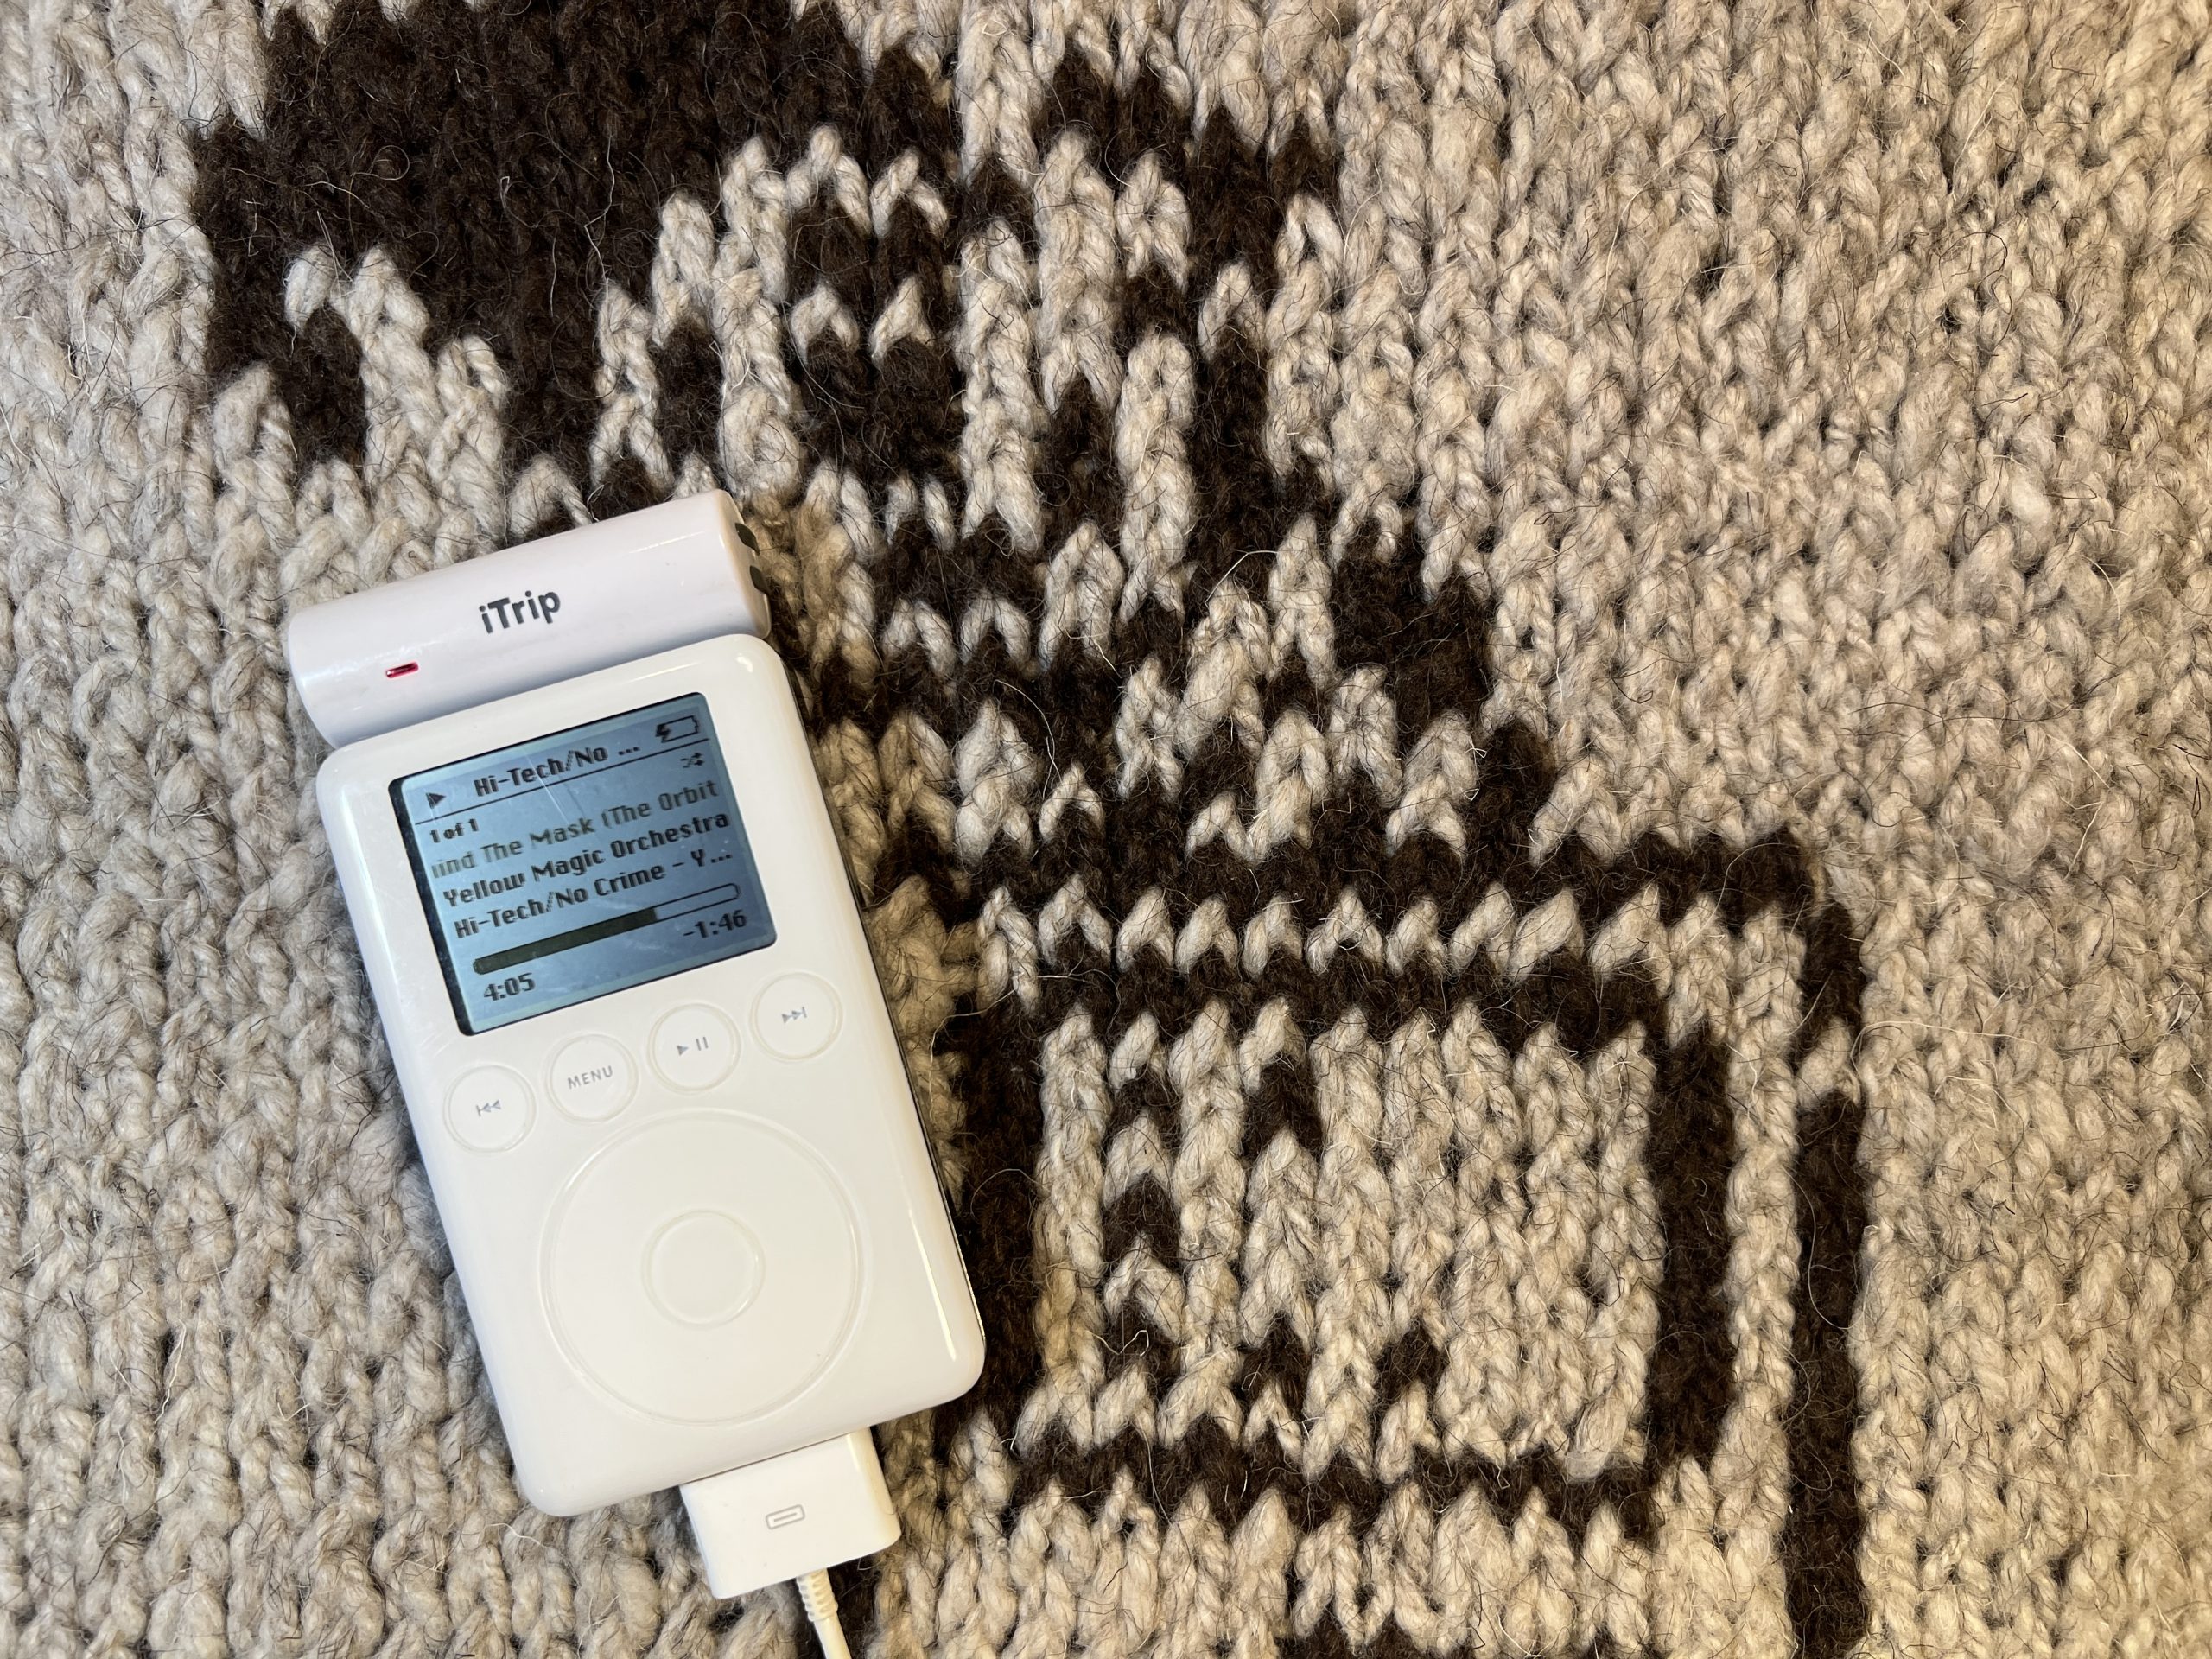
With a fully functioning iPod 3G, upgraded to 128GB (up from the original 30GB) and new battery, I found my trusty iTrip FM transmitter which plugs into the top and now I’m ready for a road trip! If you have an iTrip and are missing the frequency files, you can get it from Archive.org.
Extra Credit: Boost the iTrip Range
If you’re in the US, you can use this site to locate the best un-used FM frequency for your iTrip.
I also found a couple of lost-in-time sites that detailed a method for boosting the iTrip FM transmitter range and I thought I’d link them from here.
Let me know in the comments if you performed the upgrade(s)!
Flash modding a third gen iPod in 2024 - Vlado Vince
November 22, 2024 at 6:21pm[…] then recreating the storage permission was a very brute force way of getting around this problem. Paul Rickards recently did a much more elegant iPod 3rd gen restoration where he recreated those partitions manually, and then copied over iPod firmware with […]
Eric
May 6, 2025 at 11:42amWow! Bets article I’ve found on resurecting a dead iPod 3G! One question: Doe you have any recommendations/guidelines regarding SD card selection? Thanks!