 If you use your Raspberry Pi without a keyboard and monitor, you know how frustrating it can be to use it without knowing it’s IP address. By default, the Raspberry Pi is configured to use DHCP to obtain an IP address. This is great for moving the unit around to different networks but can be annoying when you want SSH to the unit. Typically you can use the zero-config/Bonjour “raspberrypi.local” address but this doesn’t always work. I’ve instead come up with a way to use Prowl to notify me of the current IP address after it boots. As a bonus it works with either an Ethernet or WiFi (or both) connection.
Prowl is a Growl push notification service for iOS. It costs $3 and is available from the iTunes App Store.
1. The first step is to download and install Prowl and setup an account. Next, obtain an API key from Prowl. Copy the API key– you’ll need to insert it into a script below.
2. Next, create two files in your home directory (/home/pi/) called prowl.sh and prowlip.sh. Insert the API key into prowl.sh as shown.
File: prowl.sh from koma5 on github.
#! /bin/sh

# Usage: ./prowl.sh priority(-2 to 2) app event description

# Example: ./prowl.sh 0 "transmission" "torrent has finished" "Coen Brothers Compilation has finised downloading"

app=$2

priority=$1

event=$3

description=$4

apikey=PASTE_YOUR_HEXADECIMAL_API_KEY_HERE
if [ $# -ne 4 ]; then
echo "Usage: ./prowl.sh priority(-2 to 2) app event description"
echo 'Example: ./prowl.sh 0 "transmission" "torrent has finished" "Coen Brothers Compilation has finised downloading"'
else
curl https://prowl.weks.net/publicapi/add -F apikey=$apikey -F priority=$priority -F application="$app" -F event="$event" -F description="$description"
fi
File: prowlip.sh with apologies to original author.
#!/bin/sh
eth=`ifconfig eth0 | awk -F':' '/inet addr/&&!/127.0.0.1/{split($2,_," ");print _[1]}'`
wlan=`ifconfig wlan0 | awk -F':' '/inet addr/&&!/127.0.0.1/{split($2,_," ");print _[1]}'`
if [ "x$eth" = "x" ]; then
eth=""
# Variable is empty
else
eth="eth0: $eth "
fi
if [ "x$wlan" = "x" ]; then
wlan=""
# Variable is empty
else
wlan="wlan0: $wlan"
fi
/home/pi/prowl.sh 0 "Raspberry Pi" "IP Address" "$eth$wlan"
3. Set both files to executable by typing
chmod 755 prowl.sh prowlip.sh
4. Add this line to /etc/rc.local before the “exit 0” line. This will execute the script at startup.
/home/pi/prowlip.sh
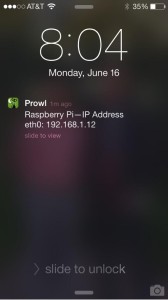
5. Reboot your Raspberry Pi and you should receive a push notification from Prowl on your iOS device with the current IP address(s).


 I’ve had the