If you’re a classic Mac enthusiast, you know that it’s sometimes difficult to enjoy if you don’t have the right tools. Things like the choosing the right system software, the right version(s) of Stuffit Expander, and so forth. Then, getting that software to the machine can be a challenge. Floppy disks are problematic for a number of reasons. Using AppleTalk to connect your classic Mac to a modern network if challenging as support was removed years ago from MacOS X.
Luckily for us, there’s a great pre-made installation called “MacIPRpi” for Raspberry Pi. It delivers a suite of tools that are already configured and ready to use. I’ve used it for a couple of years and it’s worked great. For most folks, this will serve you well!

However, recently I’ve attempted to do certain things it couldn’t handle. This is mainly due to netatalk being updated since the image was created. This blog post contains my notes as I set out to create a newly updated version of this suite of tools from scratch.
Some background
I’m using a Raspberry Pi Zero W because the HDMI output on it stopped working for unknown reasons. It’s also incredibly small and power efficient. This project seemed to be a good use for it. Drawbacks are there’s no Ethernet onboard (only WiFi) and a single USB port. To solve this, I purchased a USB hub and Ethernet hat which has stacking headers to put another hat on top.
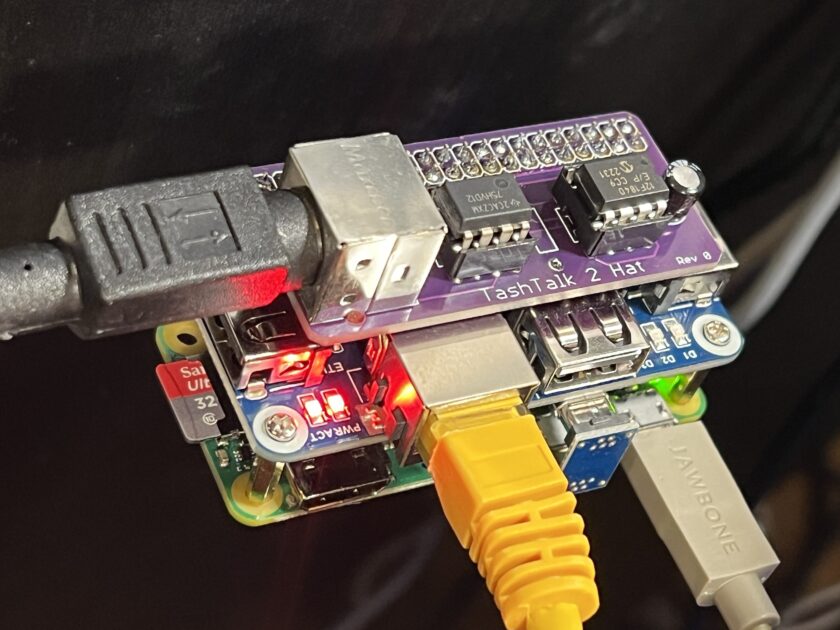
On top of that, I’m using a TashTalk 2 Hat which allows you to connect to LocalTalk devices like any Mac (pre-iMac), an ImageWriter II with LocalTalk option card installed, or a LaserWriter II. Get out your PhoneNET dongles and terminating resistor plugs!
Update (2025 Jul 21): I’ve created a 3D printable case for the Pi Zero, WaveShare Ethernet/USB Hat, and the TashTalk 2 hat.
When we’re finished, we can connect to devices over Ethernet (EtherTalk), TashTalk (LocalTalk), and LToUDP (LocalTalk over UDP, like Mini VMac).
I should mention that you can’t use netatalk over WiFi. You must have Ethernet connected to your Raspberry Pi, either via a built in port or a USB to Ethernet adapter. You can still use WiFi to configure and control if you want, but you’ll already have Ethernet so it’s not really necessary.
I’m going to assume that you’re comfortable getting into a Linux system, editing config files, using apt-get, setting permissions, etc. If you’re not, this project may be a bit much.
You might be asking yourself why didn’t I just update netatalk on the original MacIPRpi image? The reason is because I wanted to use this as a learning opportunity to build and configure a similar (almost identical) set of tools from scratch, something I’ve never done before.
If you run into issues, let me know on Mastodon or leave a comment here and I’ll see if I can assist. This document is long so work on it in small sections and take a break in between.
What’s missing?
Currently, AURP (the protocol that drives #GlobalTalk) isn’t working (or at least I can’t figure out how to get it working properly). I’ve had mixed success running an emulated Apple Internet Router on QEmu as well as on actual hardware. There’s also a work-in-progress AURP router called jrouter written in Go by Josh Deprez. There’s surely a configuration that can make these all work together and it may take someone smarter than me to figure it out.
Getting started
I’m using a 32GB SanDisk Ultra Micro SD card for storage. I used the Raspberry Pi Imager to install RaspbianOS 11 (bullseye). It’s super handy since it allows you to pre-set certain settings such as WiFi AP and password. This is important for my case since I don’t have a monitor.
On first boot, run sudo raspi-config to configure the usual things like locale, timezone, machine name, etc. I also created a new account to work in, instead of the usual “pi” account.
Note: As of this writing, RaspbianOS 12 (bookworm) is now available. I suspect everything in this document will still work but it hasn’t been tested. YMMV.
Tip: Make sure you use a good +5V USB power supply for the Raspberry Pi as they will pull more power than you’d expect. I’m using an older 1A iPad charger.
Tip: You can find out what version of Rasbian you’re using by typing:
cat /etc/os-releaseIt’s probably a good idea to assign a static IP to your Raspberry Pi’s Ethernet port. Rather than disabling DHCP client on your Raspberry Pi, it’s much easier to configure your router’s DHCP service to assign the static IP based on the Raspberry Pi’s MAC address. You can get your Ethernet MAC address by typing:
ifconfig eth0Configure serial for TashTalk 2 hat
We need to configure the built in serial port for the TashTalk 2 hat (Bluetooth uses it by default). Edit this file:
sudo nano /boot/config.txtAdd the following to the end:
Add the following to the end
# TashTalk Hat
 dtoverlay=miniuart-bt
 gpio=16-17=a3
Save and exit. Next, we need to enable the serial port in raspi-config:
sudo raspi-configChoose “Interface Options” and then “Serial Port.” Answer no to “Would you like a login shell to be accessible over serial.” Answer yes to “Would you like the serial port hardware to be enabled.”
Reboot your system.
Install netatalk
What I thought was going to be the biggest hurdle turned out to be not so bad. Installing netatalk needs to be done from source which sounds scary but there was a great set of step by step of instructions from the netatalk folks that I followed. At the time of this writing, I used netatalk 2.3.2. Follow that and come back here– it all “just worked.” Come back here when you’re done.
You should now have all of the netalk binaries, config files, and man files installed on your system. Netatalk contains several services including atalkd, timelord, afpd, papd, cnid, and a2boot. We’re going to configure some of them, so we need to stop all of these services.
sudo systemctl stop afpd.service cnid.service papd.service timelord.service a2boot.service atalkd.serviceNext, we’ll configure the netatalk services. If you reboot, remember to stop them again.
Configure atalkd
To configure atalkd, edit the following file
sudo nano /etc/netatalk/atalkd.confComment out any existing devices and add the following to the end. Note, you should change the net numbers and the zone name(s) to suit your network. Net numbers must be unique, but zone names don’t have to be.
tap0 -seed -phase 2 -net 11 -zone "Biosrhythm"
eth0 -seed -phase 2 -net 10 -zone "Biosrhythm"Tip: If you use the same zone name everywhere, your devices will all appear in the same zone regardless of how they are connected to your AppleTalk network. This will make them easier to locate.
Note: If you later view the atalkd.conf file and find it contains something different than what you remember entering, you’re not going crazy! Atalkd will modify this file while it’s running if it finds something incompatible on your network (such as a seed router that already exists). Make sure to stop the service before editing again.
Configure timelord service
The timelord service provides date and time to your classic Mac. To configure the timelord service to use the localtime of your Raspberry Pi, first stop it and then edit the systemd config file for it.
sudo nano /lib/systemd/system/timelord.serviceChange the line that starts with ExecStart to the following:
ExecStart=/usr/local/sbin/timelord -l -n LocalTimeSave, exit, and reload the systemd daemons.
sudo systemctl daemon-reloadConfigure afpd service
The afpd service provides file sharing over AppleTalk as well as TCP/IP.
Create a directory for a global AppleShare directory and set permissions. This will allow guests access to your directory.
sudo mkdir /AppleShare
sudo chown root:$USER /AppleShare
sudo chmod 775 /AppleShare
Edit the afpd configuration file.
sudo nano /etc/netatalk/afpd.confComment out any existing lines and add this single line to the end (it looks like multiple lines, but it wraps). This config came from the MacIPRpi install.
"MacIPpi" -transall -uamlist uams_guest.so,uams_clrtxt.so,uams_dhx.so -defaultvol /etc/netatalk/AppleVolumes.default -systemvol /etc/netatalk/AppleVolumes.system -nouservol -guestname "nobody" -setuplog "default log_maxdebug /var/log/afpd.log" -minicmodel "Macintosh"
This will give you a global share in /AppleShare with the name of MacIPpi as well as provide a each user’s own “home” directory on your Raspberry Pi.
Install the MacIPGW service
MacIPGW allows your classic Mac to have TCP/IP access over AppleTalk.
cd ~/Downloads
git clone “https://github.com/jasonking3/macipgw.git”
Next, we need to configure some new IP routing rules using iptables. This is also the same configuration that is found in the MacIPRpi install.
nano iptables-savePaste in the following:
# Generated by xtables-save v1.8.2 on Tue Sep 22 00:34:20 2020
*nat
:PREROUTING ACCEPT [7525:1718344]
:INPUT ACCEPT [1807:207358]
:POSTROUTING ACCEPT [1127:49840]
:OUTPUT ACCEPT [1893:105234]
-A PREROUTING -s 172.16.2.0/24 -i tun0
-A POSTROUTING -o eth0 -j MASQUERADE
COMMIT
# Completed on Tue Sep 22 00:34:20 2020
# Generated by xtables-save v1.8.2 on Tue Sep 22 00:34:20 2020
*filter
:INPUT ACCEPT [68453:59034824]
:FORWARD ACCEPT [36:2671]
:OUTPUT ACCEPT [44985:7851604]
-A INPUT -s 172.16.2.0/24 -p tcp -m tcp --dport 23 -j ACCEPT
-A INPUT -s 192.168.178.0/24 -p tcp -m tcp --dport 23 -j ACCEPT
-A INPUT -s 127.0.0.1/32 -p tcp -m tcp --dport 23 -j ACCEPT
-A INPUT -p tcp -m tcp --dport 23 -j REJECT --reject-with icmp-port-unreachable
COMMIT
# Completed on Tue Sep 22 00:34:20 2020
Next, we need to enable these new rules as well as enable forwarding.
sudo sysctl -w net.ipv4.ip_forward=1
sudo iptables-restore -c < iptables-save
Note: This will enable it now, but it will be lost after we reboot. Don’t panic, we’ll resolve that later.
To start the MacIPGW, use one of the following commands. The first runs in debug mode which echoes useful information to the terminal. The second detaches and runs in the background. Again, you probably don’t need to run this individually now, we’ll start everything with a script below.
Run MacIPGW (debug):
sudo macipgw -d0x111 -n 8.8.8.8 172.16.2.1 255.255.255.0

Run MacIPGW (detach):
sudo macipgw -n 8.8.8.8 172.16.2.1 255.255.255.0
Install samba
Samba file sharing is useful if you want to connect to it with a modern Windows or Mac machine. Install Samba then edit the config file.
sudo apt-get install samba samba-common-bin
sudo nano /etc/samba/smb.conf
Add the following to the end of the file. Again, this came from MacIPRpi.
[MacIPpi-Samba]
path = /AppleShare
comment= MacIPpi shared SAMBA (Windows) disk. Also by AFP and root dir of FTP.
read only = no
browsable = yes
public = yes
guest ok = yes
writable = yes
create mode = 0664
force create mode = 0664
directory mode = 0775
force directory mode = 0775
#tegen xattr by MACOSX
nt acl support = no
# helpt dit tegen directories die weer niet te vullen zijn met een nieuwe directory?
inherit permissions = yes
unix extensions = no
Set a SMB user password for your account.
sudo smbpasswd -a $USER
sudo systemctl restart smbd
Then restart the SMB service.
sudo service smbd reloadInstalling a web rendering proxy
A web rendering proxy (WRP) allows vintage web browsers to access the modern web by retreiving sites as an image with a clickable map overlaid on top of it.
I didn’t end up using a WRP simply because it doesn’t work on a Raspberry Pi Zero W. Chromium doesn’t run on it anymore. This took me a long time to figure out!
If you happen to be using a Raspberry Pi that can run Chromium, here’s how you get it working.
Download the appropriate release binary. I used “wrp-arm-linux” binary. The latest version 4.6.2 (at the time of writing) didn’t work for me– I had to use 4.6).
Set permissions, display, and start Chromium.
chmod 755 wrp-arm-linux
export DISPLAY=:0
chromium-browser --headless
Finally, run WRP.
./wrpIf you end up using a WRP, you’ll likely want put this into a startup script so it starts each time. See section below on starting and stopping services.
Install TashRouter
TashRouter will be the “glue” that ties together the different AppleTalk networks.
cd Downloads
git clone https://github.com/lampmerchant/tashrouter
cd tashrouter
Create a new Python file that will be used to launch TashRouter with the appropriate settings. I called mine simply router.py. You’ll need to change the seed_network numbers as well as the seed_zone_name with your own settings. This also enables lots of debugging messages but see note below about how to comment it out.
import logging
import time

import tashrouter.netlog
from tashrouter.port.ethertalk.tap import TapPort
from tashrouter.port.localtalk.ltoudp import LtoudpPort
from tashrouter.port.localtalk.tashtalk import TashTalkPort
from tashrouter.router.router import Router

logging.basicConfig(level=logging.DEBUG, format='%(asctime)s %(levelname)s: %(message)s')
tashrouter.netlog.set_log_str_func(logging.debug)  # comment this line for speed and reduced spam

router = Router('router', ports=(
  LtoudpPort(seed_network=12, seed_zone_name=b'Biosrhythm'),
  TashTalkPort(serial_port='/dev/ttyAMA0', seed_network=13, seed_zone_name=b'Biosrhythm', verify_checksums=False),
  TapPort(tap_name='tap0', hw_addr=b'\xAA\xBB\xCC\xDD\x11\x22'),
))
print('Router started!')
router.start()

try:
  while True: time.sleep(1)
except KeyboardInterrupt:
  router.stop()
We need to use a “tap” device to make this work as it allows TashRouter to “see” the AppleTalk packets from netatalk on the same machine. These settings also don’t survive a reboot (again, don’t panic– I address that below).
sudo ip tuntap add mode tap tap0
sudo ip link set dev tap0 up
echo -n " tap0"
To start TashRouter, simply call it with the following. Again, you probably don’t need to run this individually now, we’ll start everything with a script below.
sudo python3 router.pyFixing the AppleTalk kernel module
There’s a bug in the AppleTalk kernel module that appears when you run netatalk along with another service (like TashRouter). More background on the issue can be found here.
Note: It’s not absolutely critical that this is fixed. Simply listing the devices in the netatalk/atalkd.config file with tap0 first followed by eth0 (the way mentioned in this post) seems enough to make it work.
Install the Raspberry Pi Kernel source. You can follow the instructions below or see the steps here.
sudo apt install git bc bison flex libssl-dev
sudo apt install libncurses5-dev
cd ~/Downloads
sudo wget https://raw.githubusercontent.com/RPi-Distro/rpi-source/master/rpi-source -O /usr/local/bin/rpi-source && sudo chmod +x /usr/local/bin/rpi-source && /usr/local/bin/rpi-source -q --tag-update
rpi-source
Follow these instructions to compile a new AppleTalk kernel module.
Note: This patch was submitted and accepted on May 8, 2024 so look for it to be included in future distributions.
Configuring CUPS
This will install the CUPS filters for the ImageWriter II and ImageWriter LQ printers.
sudo apt-get install foomatic-filtersIf for some reason CUPS get hosed, you can reinstall it with:
sudo apt install --reinstall cupsConfigure CUPS to enable the web admin console by editing the config file.
sudo nano /etc/cups/cupsd.confMake the following changes.
Comment out “Listen localhost:631”
Add: “Port 631”

Find “<Location />”
Add: “Allow @local”

Find “<Location /admin>”
Add: “Allow @local”

Find “DefaultAuthType Basic”
Add below: "DefaultEncryption IfRequested”
Save and exit. To restart CUPS, issue the following:
sudo systemctl restart cupsConfiguring CUPS for AppleTalk printers
Download and install a new pap backend for CUPS to enable communicating to AppleTalk printers. Follow step 4 at this site https://www.emaculation.com/doku.php/appletalk_printserver_macos_and_osx
Edit the new pap backend /usr/lib/cups/backend/pap and find these two settings and change them to the following:
devicetypes="LaserWriter:ImageWriter:DeskWriter:LQ"

NetatalkBinDir=/usr/local/bin
If netatalk is running, you should now be able to list AppleTalk printers with the following.
sudo /usr/lib/cups/backend/papIf it worked, you should get something like the following:
%%[ status: busy ]%%
%%[ status: busy ]%%
%%[ status: busy ]%%
%%[ status: busy ]%%
%%[ status: busy; source: AppleTalk ]%%
%%[ status: busy; source: AppleTalk ]%%
%%[ status: busy; source: AppleTalk ]%%
network pap://Biosrhythm/HP%20LaserJet%204000%20Series/LaserWriter "HP LaserJet 4000 Series" "HP LaserJet 4000 Series@Biosrhythm (pap)"
network pap://Biosrhythm/Itchy%20%26%20Scratchy/ImageWriter "Unknown" "Itchy & Scratchy@Biosrhythm (pap)"
In this example, there are two AppleTalk printers responding. The format of the URI is:
pap://Zone/PrinterName/PrinterTypeIf you don’t have an AppleTalk zone, the zone is an asterisk (*). The printer name is what you’ve named the printer. The printer type is one of “ImageWriter”, “LQ”, “LaserWriter”, “DeskWriter”, and possibly others. All three names should be URL encoded.
This is the URI you’ll enter when adding an AppleTalk printer (PAP) in CUPS.
Note: You can change the name of an ImageWriter II or ImageWriter LQ (with LocalTalk option card) using Namer. Similarly, you can change the name of a LaserWriter II with the LaserWriter Utility or a HP LaserJet with the LaserJet Utility.
Fixing LaserWriter IIg prints
For some reason, prints from CUPS to a LaserWriter IIg don’t work out of the box. There’s an issue where GhostScript isn’t sending the fonts needed to the printer (it passes the -noembtt command when it shouldn’t). You’ll either get weird font substitution or a print that won’t work at all, especially when using AirPrint on iOS. I worked around this by doing the following.
First, add the LaserWriter IIg (in my case one with a IIg card so it has EtherTalk) in CUPS and choose Other for the PPD. I used a PPD from MacOS 9 labeled LaserWriter IIg v2010.130.ppd. The last few lines contain this:
*% For "LaserWriter IIg" version 2010.130
*% Last Edit Date: Aug 3, 1994 (sns@sqa)
*% end of PPD file for Apple LaserWriter IIg"
Stop CUPS and edit the CUPS printer config file.
sudo systemctl stop cups
sudo nano /etc/cups/printers.conf
Add an option for that printer you just added. This enables PostScript Level 2.
Option pdftops-renderer pdftopsSave and exit. Next, we need to remove the -noembtt command being passed to pdftops. I did this by renaming the old pdftops and creating a new one as a script to remove the -noembtt option (like a man-in-the-middle).
cd /usr/bin/
sudo mv pdftops pdftops-orig
sudo nano pdftops
Paste in the following:
#!/usr/bin/bash

/usr/bin/pdftops-orig `echo "$@" | sed 's/-noembtt//g'`
Set permissions:
sudo chwon root:root pdftops
sudo chmod 755 pdftops
Start CUPS.
sudo systemctl start cupsImproving ImageWriter II prints
The default settings for ImageWriter II results in printouts that are way to dark. It may have something to do with the dithering or halftone routines– I’m not quite sure why.
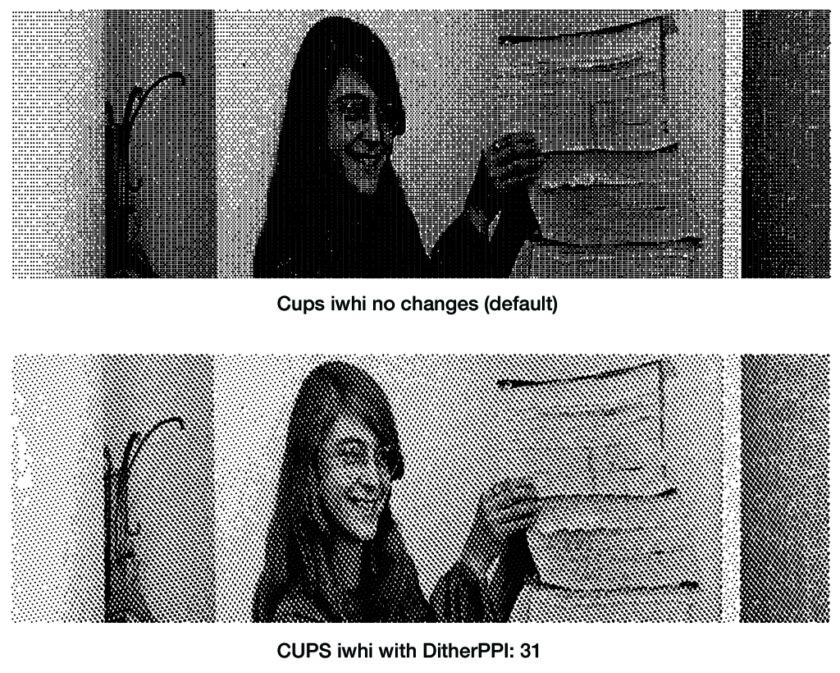
After much trial and error, I figured out a way to improve the printouts. It looks almost as good as the MacPalette II driver (which is also much better than the built-in Apple drivers). Download the “iwhi” PPD and edit it, adding the following block after the resolution section. I changed the defaults to 31 as that looked best in my testing.
*FoomaticRIPOption DitherPPI: int CmdLine A
*FoomaticRIPOptionPrototype DitherPPI: " -dDITHERPPI=%s"
*FoomaticRIPOptionRange DitherPPI: 25 600
*OrderDependency: 300 AnySetup *DitherPPI
*DefaultDitherPPI: 31
*FoomaticRIPDefaultDitherPPI: 31
Add the printer in CUPS, choose other for the PPD, and browse to the PPD you just edited. Set the default paper size, the default resolution to 160×144.
CUPS admin web interface
To add or delete printers in CUPS, use a browser and go to http://raspberrypi.local:631/ (or the name of your Raspberry Pi if you’ve changed it).
To add an AppleTalk printer, choose “AppleTalk Devices via pap” and enter the pap URI as mentioned above.
Starting and stopping services
You’re finally done configuring everything– congratulations! Now it’s time to start everything up.
I found that allowing the netatalk services to start up freely at boot with systemctl wasn’t always working. I think some dependencies get messed up so it wasn’t always reliable on start up. So I diabled netatalk from auto starting with the line below.
sudo systemctl disable atalkd.service afpd.service cnid.service papd.service timelord.service a2boot.serviceI then made the following two commands that start and stop each service. They also load in some other things like the iptables file.
You can place the netatalk-start command to startup in the /etc/rc.local file. I’d give it a significant sleep delay (like 120 seconds or more) to let the machine settle before starting it. You can also run these manually if you’d like. Don’t forget to set these scripts executable.
You’ll need to change the directories below to what you’ve chosen to place things. I used “Downloads” because I’m lazy!
netatalk-start
#!/bin/bash

echo -n "Starting"

# Setup tap0 for Netatalk immediately
if [[ $(ifconfig -a |grep tap0) ]]; then
  echo -n " (tap0)"
else
  sudo ip tuntap add mode tap tap0
  sudo ip link set dev tap0 up
  echo -n " tap0"
  sleep 1
fi

echo -n " print2pdf"
sudo /usr/sbin/ippeveprinter -v -c /AppleShare/Print/pdfsave -f application/pdf "Print to PDF" >/home/rickards/Downloads/print2pdf.log 2>&1 &
sleep 1
echo -n " atalkd"
sudo systemctl start atalkd.service
sleep 1
echo -n " afpd"
sudo systemctl start afpd.service
sleep 1
echo -n " cnid"
sudo systemctl start cnid.service
sleep 1
echo -n " papd"
sudo systemctl start papd.service
sleep 1
echo -n " timelord"
sudo systemctl start timelord.service
sleep 1
echo -n " a2boot"
sudo systemctl start a2boot.service
sleep 1
echo -n " tashrouter"
sudo python3 /home/rickards/Downloads/tashrouter/router.py >/home/rickards/Downloads/tashrouter/tashrouter.log 2>&1 &
sleep 1
echo -n " iptables"
sudo iptables-restore -c < /home/rickards/Downloads/macipgw/iptables-save
sleep 1
echo -n " macipgw"
sudo sysctl -w net.ipv4.ip_forward=1
sudo macipgw -d0x111 -n 8.8.8.8 172.16.2.0 255.255.255.0 >/home/rickards/Downloads/macipgw/macipgw.log 2>&1 &
sleep 1

echo " started"
echo "Pausing.."
sleep 5
echo "Scanning AppleTalk Zones"

getzones | while read line ; do echo "$line zone:" ; nbplkup "@$line" ;done
netatalk-stop
#!/bin/bash

echo -n "Stopping"

PID=$(pgrep -f -u root "ippeveprinter" |tail -1)
if [[ $PID ]]; then
  sudo kill -15 $PID
  echo -n " print2pdf"
else
  echo -n " (print2pdf)"
fi

PID=$(pgrep -f -u root "macipgw" |tail -1)
if [[ $PID ]]; then
  sudo kill -15 $PID
  echo -n " macipgw"
else
  echo -n " (macipgw)"
fi

PID=$(pgrep -f -u root "router.py" |tail -1)
if [[ $PID ]]; then
  sudo kill -15 $PID
  echo -n " tashrouter"
else
  echo -n " (tashrouter)"
fi

sudo systemctl stop afpd.service
echo -n " afpd"
sudo systemctl stop cnid.service
echo -n " cnid"
sudo systemctl stop papd.service
echo -n " papd"
sudo systemctl stop timelord.service
echo -n " timelord"
sudo systemctl stop a2boot.service
echo -n " a2boot"
sudo systemctl stop atalkd.service
echo -n " atalkd"

echo " stopped"
Useful Troubleshooting Tips
Scan for AppleTalk
To get a list of all AppleTalk devices, add the following line to your .bash_aliases file:
alias lookupall='getzones | while read line ; do echo "$line zone:" ; nbplkup "@$line" ;done'Logout and login again (or use rehash) and after your netatalk services have started, type lookupall. It will get a list of all zones and find all devices and services.
Monitor AppleTalk traffic
sudo tcpdump -i eth0 atalkView debug logs in real time
If you’re running into trouble, viewing log files in real time can be very useful.
# netatalk
sudo tail -f /var/log/syslog

# afpd
tail -f /var/log/afpd.log

# TashRouter
tail -f ~/Downloads/tashrouter/tashrouter.log

# CUPS
sudo tail -f /var/log/cups/error_log
CUPS verbose logging
# Enable CUPS debug logging:
cupsctl --debug-logging

# Disable CUPS debug logging
cupsctl --no-debug-logging

# Restart after making changes
sudo systemctl restart cups
Turn WiFi off and on
# Turn off:
rfkill block wifi

# Turn on:
rfkill unblock wifi

# Get status
rfkill
Install a CUPS print-to-PDF driver
sudo apt install cups-pdfUpdate: It turns out the CUPS print to PDF driver isn’t that great so I’ve turned to a different method that uses ippeveprinter. I followed this post as a guide and will list my steps below. Adjust path names as needed for your system.
Make new folder in my AppleTalk share directory called “Print” to save the PDFs in i.e. mkdir /AppleShare/Print
Add a new startup item to our netatalk-start script:
echo -n " print2pdf"
sudo /usr/sbin/ippeveprinter -v -c /AppleShare/Print/pdfsave -f application/pdf "Print to PDF" >/home/rickards/Downloads/print2pdf.log 2>&1 &
sleep 1
And a new item in netatalk-stop script:
PID=$(pgrep -f -u root "ippeveprinter" |tail -1)
if [[ $PID ]]; then
  sudo kill -15 $PID
  echo -n " print2pdf"
else
  echo -n " (print2pdf)"
fi
Note: These new items have been added to the scripts listed above.
Crerate a new shell script called pdfsave that will process the print file and save it as a PDF. Set it executable with chmod 775 pdfsave
#!/bin/bash

A=$(pdfinfo "$1" | grep texttopdf)
if [ ! -z "$A" ]
then
   /usr/bin/pdftocairo -pdf "$1" /AppleShare/Print/$(basename $1)
else
   cp $1 /AppleShare/Print
fi
Restart and you should see the new printer called “Print to PDF” in your CUPS administration page (see CUPS admin web interface section).
Next, let’s share it over AppleTalk using netatalk’s papd. Edit the papd config file with sudo nano /etc/netatalk/papd.conf and add the following lines to the end.
Print to PDF:\
:pr=|lp -d "Print_to_PDF":\
:pd=/home/rickards/Downloads/LaserWriter_IIg.ppd:
The “PD” directive is the location to a printer’s PPD file. Here, I’ve used one for a LaserWriter IIg but you could use any that you’d like that speak PostScript. Restart papd with sudo systemctl restart papd and you should now see the printer in the Chooser with the LaserWriter driver.
Get the status of the netatalk services
sudo systemctl status atalkd.service afpd.service cnid.service papd.service timelord.service a2boot.serviceSet clocks on classic Macs automatically
Install the Tardis control panel on your classic Mac. Open the Chooser, select Tardis, and select Timelord that shows up on the right. Your Mac will now set the date and time automatically at startup!
Current classic Mac zone
Open the Network control panel (or in later MacOS versions, the AppleTalk control panel). The current zone should be listed at the bottom. If it’s an asterisk (*) that means there’s no seed router found. Check your atalkd config file.
Configure classsic Mac for Internet
MacIPGW provides IP services tunneled over Appletalk giving your classic Mac access to the Internet.
In the MacTCP control panel, LocalTalk should be selected and it should have your zone name. Enter an IP address of 172.16.2.2. Then click More. Enter a gateway address of 172.16.2.1. Choose obtain an address manually. Choose a class B address. In the DNS section, enter a single period for the domain, an IP address of 8.8.8.8, and check the box for default. Click OK and verify the IP address is correct. If not, change it here. For your next classic Mac, give it the next available IP address (i.e. 172.16.2.3, you’re the DHCP server now).
Test your Mac with MacTCP Ping or use Netscape and visit http://frogfind.com/ or http://68k.news/
Use CUPS/GhostScript to convert PS/PDF to ImageWriter II out file
The one-liner below will use CUPS/GhostScript to create a file that contains the data that would be sent to an ImageWriter II. This is useful if you’d like to render it yourself (with something like this ImageWriter II Simulator script in Python).
gs -dShowAcroForm -q -dBATCH -dPARANOIDSAFER -dQUIET -dNOPAUSE -dNOMEDIAATTRS -dNOINTERPOLATE -sDEVICE=iwhi -dDEVICEWIDTHPOINTS=612 -dDEVICEHEIGHTPOINTS=792 -dDITHERPPI=31 -sOutputFile=outfile.iw infile.pdfPrint plain text to an AppleTalk ImageWriter II
Printing a textfile from the Raspberry Pi to an ImageWriter with a LocalTalk option card is easy. See example below and remember to change the printer name and zone to match the format name:ImageWriter@zone.
pap -p "Itchy & Scratchy:ImageWriter@Biosrhythm" <file.txt>Don’t use NetworkManager
Make sure you’re using “dhcpd” and not “NetworkManager” as the network configuration on your Raspberry Pi. This settings are typically changed in “Advanced Options -> Network Config” using the raspi-config tool. Symptoms include weird one-way communication issues between different mediums (i.e. LToUDP can see Ethertalk printers, but can’t actually communicate with it).
Printer drivers stop working?
I’ve encountered a strange issue where a network printer driver (AppleTalk ImageWriter, LaserWriter 8, MacPalette II AppleTalk, etc) suddenly is unable to locate your printers? It usually coincides with your Mac having previously joined a different zone, especially one that’s no longer available. If you use the Chooser extension “Who’s There” does it report looking for the printer in the wrong zone?
It seems the driver itself can somehow remember previous zone names and seems to look for devices there instead of your current zone.
The only way I’ve found around this is to completely replace the driver in the extensions folder with a fresh copy. You don’t even need to reboot your machine, just replace it and open the Chooser and it should now work.
Thanks for the help!
I’d like to thank mactjaap for creating the MacIPRpi distribution as it showed what was actually possible and was invaluable in configuring my own server. I’d also like to thank the folks on the 68KMLA forum, especially tashtari and NJRoadfan for their assistance in troubleshooting and debugging to get this far!
Chris M.
May 14, 2024 at 8:36pmNote that the “in progress” version of A2SERVER includes a proper systemd service file for macipgw and has been updated to use nftables instead of iptables. Debian has switched to using nftables by default. Old iptables scripts will not work out of the box in bookworm unless you install the “iptables” package.
https://github.com/NJRoadfan/a2server/tree/new-netatalk-test
Also, there is a color ImageWriter driver coming for GhostScript by Josh Moyer. Its on his github but hasn’t been integrated into GhostScript yet.
https://github.com/JoshWM1977/ghostpdl-current/blob/gdevadmp-2.0/contrib/gdevadmp.c
» Using AppleTalk with QEMU 9 on Raspberry Pi 5
August 10, 2024 at 12:23pm[…] you have setup a support server with another Raspberry Pi using a TashTalk hat and TashRouter, you can see LocalTalk printers such as ImageWriter II or ImageWriter […]
MacTjaap
January 8, 2025 at 8:06pmI have made an update of the MacIPRpi. You can test it now in beta:
https://www.macip.net/beta.html