Seasoned Apple Macintosh pros have likely experienced the joy (and sadness) of using a large AppleTalk network. You know, the kind where the Chooser suddenly shows a Zone menu at the bottom left where there used to be none? When you first see it, it’s a shock– like you’ve suddenly unlocked a secret power up that your Mac has had all along.

The Zone menu shows when there’s an AppleTalk Router on your network. If you have just a couple of Macs linked together over LocalTalk cabling or Ethernet, you’ve likely not seen it. It’s how AppleTalk segments networks into smaller chunks. I’m by no means an AppleTalk network expert and there are likely others that know much more than me. I know just enough to be dangerous.
Fast forward to #MARCHintosh, the yearly event that celebrates the classic Macintosh, and Dan ???? on Mastodon mentions the idea of using some software to print to someone else’s remote ImageWriter II, in their home, over the network. I immediately volunteered as tribute and we began trying various things. We first tried using an AppleTalk VPN but couldn’t get it to compile. Maybe you can?
Next, we have Apple’s own Apple Internet Router 3.0 (AIR) from 1993 a try. It can bridge LocalTalk and EtherTalk on your local network (which is handy all by itself) plus, with the appropriate extension, tunnel it over IP to another machine running the same.
Prepare your Mac
Here’s the steps we used to create a working AIR installation. We are using LC form factor machines with Ethernet cards installed in the PDS slot. Other machines may also work but have not been tried. H/t to Dan ???? for figuring out the order of operations!
- Start with a fresh install of System 7.1.
- Install System Update 3.0.
- Install Apple Internet Router 3.0.
- Install Router IP extension.
- Install Network Software Installer 1.4.5.
Configure your Mac
Let’s configure your Mac.
- Open the Sharing Setup Control Panel. Turn on File Sharing if you want to share your computer’s files with others. Turn on Program Linking if you want to use applications like HyperCard across networks.
- If you want to allow Guests to your machine, open Users & Groups, double click on Guest and select the permissions you wish. Close and save.
Note: Enabling Guest access will give anyone access to your machine and the ability to make changes. Choose wisely! - Open the MacTCP Control Panel. Set your Mac to a static IP address on your network. Make sure the router and subnet mask are set correctly. Close the window to save.
- Open the Network Control Panel. Make sure “Ethernet” is selected (not EtherTalk!). Close the window to save.
Configure Apple Internet Router
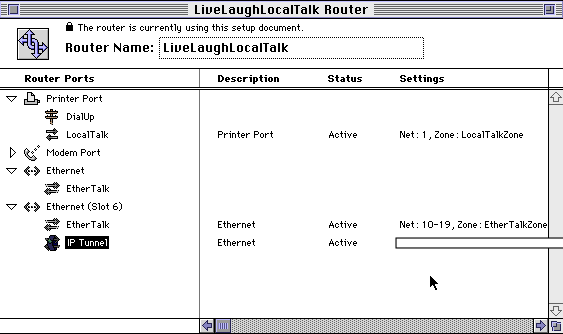
Next, start the Router Manager (part of Apple Internet Router). Follow these steps to configure the router:
- Double click on EtherTalk under Ethernet (Slot 6). Set Port status: Active, Port: Seed, Network Range: X-Y, Add a new Zone Name (can be anything), click add. Click Define.
Note: the X-Y Network Range is important! It must be a unique range for your network and cannot be the same as anyone else you connect to. This may take some coordination.If you are participating in the #GlobalTalk network, refer to the coordination spreadsheet for a free network number. A range of about 1 is more than sufficient for most folks (i.e. 100-100) running a small network in emulation. - Double click IP Tunnel: Port status: Active, Host ID: (insert the IP address of the remote Apple Internet Router hosts.)
Note: Uncheck the box for “Use only the host IDs listed” if you want to accept connections from any other server, not just the ones you have listed. - If you have a LocalTalk network, connect it to your Printer Port. Double click Printer Port LocalTalk. Set Port status: Active, Port: Seed, Network Number: x, Enter a new Zone name, click Define.
Note: again, make sure the network number is not used amongst other routers you connect to. - You should not configure the Ethernet/EtherTalk option as this is likely the BlueSCSI DaynaPORT emulation. I’ve yet to get this to work.
Update: Vlado Vince was able to get BlueSCSI DaynaPORT emulation working with Apple Internet Router! - Save your Router document to your drive and give it a name. Next, choose the Control menu and select Set Startup. Chose the document you just saved.
Configure your network
Next, if your Internet connection is behind a NAT, you need to map a port on your home/work Internet router to allow the other folks using AIR to route traffic to you. They’ll also do the same on their router. Map UDP 387 outside to UDP port 387 inside to the IP address of your Mac running AIR.
If you’re unlucky and are behind carrier grade NAT (CGNAT), there’s still hope! We tried a Oracle Cloud VPN instance and then TailScale VPN service but were all unsuccessful in the correct incantation to make it work. I then wrote a Python script that allows one behind a CGNAT to connect to someone that has port mapping ability to tunnel the UDP data over a single TCP connection. I’ll be releasing this shortly.
Start it up
Finally, in the Router Manager, start the router by choosing Control menu -> Start, save the doc, it should start up! You can monitor the network by choosing Windows -> Network Information. If you have other devices on your LocalTalk or EtherTalk network, they will be re-assigned new network numbers by your router.
Open the Chooser and you should now see additional Zones (your own and anyone else you’ve connected with). Note: the Chooser will refresh the zone list periodically. To force a refresh, close and reopen.
Connect all the things
If you have an ImageWriter II with a LocalTalk card, connect it to your LocalTalk network.
If you have a EtherTalk capable HP printer, connect it to your Ethernet network.
If you have other Macs on your network, turn then on and enable File Sharing if you want to share with others.
Print to other folk’s printers! Share files over AppleShare!
But most importantly, have fun!
Joining the #GlobalTalk network
I’ve created a Google Sheet to track everyone who is participating in the #GlobalTalk network experiment. To keep information private and to limited view, Mac84 is now adding people as editors to the document. Please visit the GlobalTalk page for more information on how to join.
KJ
March 14, 2024 at 2:56pmWe used Cisco routers back in the day to do Appletalk. You could pick up an old 2500 series on ebay for a couple of bucks and go to town.
[1] https://www.cisco.com/en/US/docs/ios/11_0/access/configuration/guide/acat.html
Finding GlobalTalk, Just 4 Months Late | think simple, live simple
July 27, 2024 at 11:54am[…] through TCP/IP. The original AIR installation instructions for the GlobalTalk community is found here, and others have provided additional documentation. What follows are additional notes from my […]