 I recently obtained an old Polycom PTZ-1 camera. This camera went to an old video conferencing system, long past it’s usefulness in today’s era of instant desktop video conferencing ala Skype. The camera was inside a large plastic housing to keep it secure– I removed it from the housing to get a closer look.
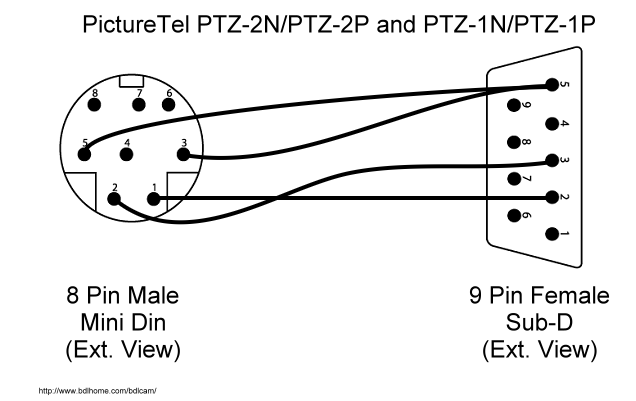
I know most cameras are controlled via RS-232 so I searched around and found a site that listed the control codes necessary to talk with this camera. I also found how to build the cable to go from a serial DB-9 to a mini-din 8 here. That’s where the Arduino comes in.
Previously, I figured out how to interface an NES joy-pad to the Arduino (even purchasing the proper female jacks so I wouldn’t need to cut the original cables). So I thought about marrying the camera with the controller. Behold, the the Picture PTZ-1 being controlled by the Arduino via an NES joypad.
The first problem I encountered was that the PTel PTZ-1 liked to talk serial using ODD parity. Yikes, I didn’t think the Arduino could do that. Well, it can actually. I found a forum posting that listed an extension to the serial protocol of the Arduino.
Although the Arduino has on board serial, it needs help to speak RS-232 serial (because of voltage differences). That’s where the MAX232 chip comes in and it’s cast of supporting capacitors.
Below is the Arduino sketch that I’m using. The code will pan and tilt the camera using the plus-pad. The A and B buttons control zoom in and out. Select and Start are for presets. The camera has 8 hardware presets. Press select the number of times equal to the preset you want and press start. To set a preset, press select the number of times equal to the preset, holding on the last preset and press start.
#include <SerialExtension.h>
# NES Controller Pin Setup
int latch = 8; // set the latch pin
int clock = 9; // set the clock pin
int datin = 10; // set the data in pin
# A Status LED To Light When Receiving input from NES
int ledpin = 13; // set the led status pin
# Zero Counters
int selects = 0;
int starts = 0;
unsigned char report[6];
unsigned char prev_report[6];
void setup() {
// Setup NES controller
pinMode(latch, OUTPUT);
pinMode(clock, OUTPUT);
pinMode(datin, INPUT);
pinMode(ledpin, OUTPUT);
digitalWrite(latch, HIGH);
digitalWrite(clock, HIGH);
Serial.begin(9600);
SetSerial(9600,’O’, 8, 1);
delay(500);
init_camera();
report[0]=0x80;
report[1]=0x80;
report[2] = report[3] = report[4] = report[5] = 0;
prev_report[0]=0x80;
prev_report[1]=0x80;
prev_report[2] = prev_report[3] = prev_report[4] = prev_report[5] = 0;
}
void loop () {
NEScontrollerRead();
// Tilt up begin
if ((report[1] == 0) && (prev_report[1] == 0x80)) { motion_begin(‘t’, ‘u’); }
// Tilt up stop
if ((report[1] == 0x80) && (prev_report[1] == 0)) { motion_stop(‘t’, ‘u’); }
// Tilt up cont
if ((report[1] == 0) && (prev_report[1] == 0)) { motion_cont(‘t’, ‘u’); }
// Tilt down begin
if ((report[1] == 0xFF) && (prev_report[1] == 0x80)) { motion_begin(‘t’, ‘d’); }
// Tilt down stop
if ((report[1] == 0x80) && (prev_report[1] == 0xFF)) { motion_stop(‘t’, ‘d’); }
// Titlt down cont
if ((report[1] == 0xFF) && (prev_report[1] == 0xFF)) { motion_cont(‘t’, ‘d’); }
// Pan left begin
if ((report[0] == 0) && (prev_report[0] == 0x80)) { motion_begin(‘p’, ‘l’); }
// Pan left stop
if ((report[0] == 0x80) && (prev_report[0] == 0)) { motion_stop(‘p’, ‘l’); }
// Pan left cont
if ((report[0] == 0) && (prev_report[0] == 0)) { motion_cont(‘p’, ‘l’); }
// Pan right begin
if ((report[0] == 0xFF) && (prev_report[0] == 0x80)) { motion_begin(‘p’, ‘r’); }
// Pan right stop
if ((report[0] == 0x80) && (prev_report[0] == 0xFF)) { motion_stop(‘p’, ‘r’); }
// Pan right cont
if ((report[0] == 0xFF) && (prev_report[0] == 0xFF)) { motion_cont(‘p’, ‘r’); }
// Zoom in begin
if ((report[2] == 1) && (prev_report[2] == 0)) { motion_begin(‘z’, ‘i’); }
// Zoom in stop
if ((report[2] == 0) && (prev_report[2] == 1)) { motion_stop(‘z’, ‘i’); }
// Zoom in cont
if ((report[2] == 1) && (prev_report[2] == 1)) { motion_cont(‘z’, ‘i’); }
// Zoom out begin
if ((report[3] == 1) && (prev_report[3] == 0)) { motion_begin(‘z’, ‘o’); }
// Zoom out stop
if ((report[3] == 0) && (prev_report[3] == 1)) { motion_stop(‘z’, ‘o’); }
// Zoom out cont
if ((report[3] == 1) && (prev_report[3] == 1)) { motion_cont(‘z’, ‘o’); }
// Select button function
if ((report[4] == 1) && (prev_report[4] == 0)) {
selects++;
if (selects > 8) { selects = 0; }
}
// Select and Start functions
// Goto preset
// Press “Select” times to equal the number of the preset
// then press “Start” to go to that preset.
if ((report[5] == 1) && (prev_report[5] == 0) && (report[4] == 0)) {
if (selects > 0) {
command_begin();
Serial.print(“g0”);
selects–;
Serial.print(selects);
Serial.print(“n”);
command_end();
selects = 0;
}
}
// Store preset
// Press “Select” times MINUS 1 equal to the numer of the preset to SET
// Press and HOLD “Select” on the last number and press “Start” to set the preset
if ((report[4] == 1) && (report[5] == 1) && (prev_report[5] == 0)) {
if (selects > 0) {
command_begin();
Serial.print(“s00”);
selects–;
Serial.print(selects);
command_end();
selects = 0;
}
}
prev_report[0] = report[0];
prev_report[1] = report[1];
prev_report[2] = report[2];
prev_report[3] = report[3];
prev_report[4] = report[4];
prev_report[5] = report[5];
delay(100);
}
void NEScontrollerRead() {
int x = 0x80, y = 0x80; // 0x80 = 128 = axis centered (nothing pressed)
int a, b, select, start, led = 0;
report[0] = report[1] = report[2] = report[3] = report[4] = report[5] = 0;
unsigned char tmp = 0;
digitalWrite(latch, LOW);
digitalWrite(clock, LOW);
digitalWrite(latch, HIGH);
delayMicroseconds(2);
digitalWrite(latch, LOW);
// button A
a = !digitalRead(datin);
NESCycleClock();
// button B
b = !digitalRead(datin);
NESCycleClock();
// button Select
select = !digitalRead(datin);
NESCycleClock();
// button Start
start = !digitalRead(datin);
NESCycleClock();
// button Up
if (!digitalRead(datin)) { y = 0; led = 1;}
NESCycleClock();
// button Down
if (!digitalRead(datin)) { y = 0xff; led = 1; }
NESCycleClock();
// button Left
if (!digitalRead(datin)) { x = 0; led = 1; }
NESCycleClock();
// button Right
if (!digitalRead(datin)) { x = 0xff; led = 1; }
NESCycleClock();
report[0] = x;
report[1] = y;
report[2] = a;
report[3] = b;
report[4] = select;
report[5] = start;
//report[2] = (a << 0) + (b << 1) + (select << 2) + (start << 3);
if (a || b || select || start || led) { digitalWrite(ledpin, 1); }
else { digitalWrite(ledpin, 0); }
}
void NESCycleClock() {
delayMicroseconds(4);
digitalWrite(clock, LOW);
digitalWrite(clock, HIGH);
delayMicroseconds(2);
}
void command_begin() {
Serial.print(0x02, BYTE);
Serial.print(“ck”);
}
void command_end() {
Serial.print(0x04, BYTE);
}
void init_camera() {
command_begin();
Serial.print(“k”);
command_end();
command_begin();
Serial.print(“i0n”);
command_end();
// Wait for an ACK from camera
while(Serial.read() != 0x04) {}
command_begin();
Serial.print(“d0”);
Serial.print(0xF2, BYTE);
command_end();
delay(100);
// Wait for an ACK from camera
while(Serial.read() != 0x04) {}
command_begin();
Serial.print(“z0m”);
command_end();
// Wait for an ACK from camera
while(Serial.read() != 0x04) {}
}
void motion_begin(char axis, char dir) {
command_begin();
Serial.print(“r0k”);
Serial.print(axis, BYTE);
Serial.print(dir, BYTE);
if (dir == ‘u’) { Serial.print(“099”); }
if (dir == ‘d’) { Serial.print(“097”); }
if (dir == ‘l’) { Serial.print(“100”); }
if (dir == ‘r’) { Serial.print(“101”); }
command_end();
}
void motion_cont(char axis, char dir) {
command_begin();
Serial.print(“c0k”);
Serial.print(axis, BYTE);
Serial.print(dir, BYTE);
command_end();
}
void motion_stop(char axis, char dir) {
command_begin();
Serial.print(“p0k”);
Serial.print(axis, BYTE);
Serial.print(dir, BYTE);
command_end();
}
Humby
March 9, 2012 at 1:14pmHey do you still have this sketch? I’ve recently gotten one of these cameras and would like to have my arduino uno talk to it. The code above references “SerialExtension.h” can you post the h and ccp files or point me to their source? I found this thread http://arduino.cc/forum/index.php/topic,15615.0.html but that code is not working for me.
admin
March 9, 2012 at 3:46pmThe SerialExtension you found on the link is the same one I used. It’s most likely the code no longer compiles on the later versions of the Arduino IDE (one my of biggest complaints). Try getting an older version.
Humby
March 10, 2012 at 7:57pmMy bad, I noticed 10 min. after I hit submit that the link you posted was the same one I looked at too.. I think I just found the one on the new forum. Any chance you remember which Ardunio IDE version you used? I went all the way back to 17 since that was release around the same time as your original post. If not that’s cool. I’ve got a feeling it’s a matter of either importing the correct library that sets those variables or maybe just setting them manually.
I think I will try:
UCSR2C = (UCSR2C & 0xCF) | (0b11 << 4);
Or maybe:
UCSR0C = (UCSR0C & 0xCF) | (0b11 << 4);
I got the above from http://arduino.cc/forum/index.php/topic,89271.msg669708.html#msg669708 …. If that doesn’t work, I’m going to have to do some more reading.
Thanks for replying!
Turner delacruz
December 27, 2015 at 4:43pmHi my name is Turner’s dela Cruz I have a Clinton electric PTZ camera model CCC 991 IR this camera did not come with rs485 wires the wiring harness it has was cut the only thing that was left was a BNC cable that says video on it also there is two more wires are red and black I open the PTZ dome camera and did a continuity test on them I don’t know much about PTZ cameras I don’t know if this camera is 12 volt or 24 volt but I look at the requirements online and it said either one I don’t know if it’s 12 volt just the camera or 24 volt a PTZ camera so what I’m asking is if you could help me get my PTZ camera running it does not have rs-485 wires I have a DVR made by night owl and it has a built in room remote on the DVR also I need to know the code to put on the DIP switches inside the camra for the Night Owl DVR
frNK
May 18, 2024 at 8:02amlooking for diagram rs232 t 8 pin for camera PICTURETEL PTZ 2
thanks cotecorsaire@gmail.com