I’ve wanted to create my own cartridges for the C64 for a while now. I have a few old Commodore cartridge games like Clowns and Kickman that would better serve me as, say, a diagnostic cartridge or Cynthcart. These boards are ASSY 326173-01 and seem to be common so you should be able to pick one up cheap.

The first hurdle was burning EPROMs. I took a chance on eBay and bought a TOP 853 universal programmer. It was shipped from China and arrived in about 3-4 weeks. I was struggling to get it working over USB on my Mac to Virtual Box to a Windows XP VM but I figured it out (hint: disable USB 2.0 (EHCI) Controller for the VM).
I erased the chips using a Pocket Purifier battery operated hand held UV light that I picked up from Amazon. It took anywhere between 30 minutes to 2 hours (most 1 hour) to completely erase the EPROMs. I’m using 27c256 (32 kilobyte) chips which are 28 pins. Cynthcart is an 8 kilobyte ROM so I copied the ROM four times on the chip– only one of the copies will be used. You could add four different 8k ROMs and select one with dip switches on the higher address lines (A13 and A14 I believe).
The C64 cartridges I’m going to use have 24 pin chips on them. This presents a problem. Luckily the pinout is almost the same that it’s rather easy to reroute the pins. I followed the C64 ROM guide on Symlink.dk which had the pinout from the board to the new socket.
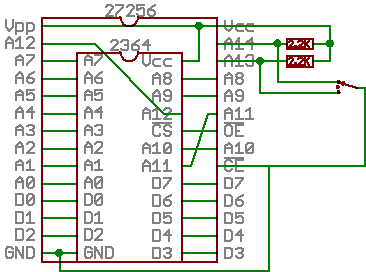
You’ll need to desolder the old chip at U1. I used a 28 pin socket, bent out pins 1, 2, 20, 23, 26, 27, 28 on the socket. I soldered in small wires (from an 80 pin IDE cable) into the board on pins 18, 21, 24. See the schematic above to know which pins connect to which wires. Pay attention to the pin numbering– it will get confusing with the socket on top with different pin numbers. Also, make sure you orient the socket and the chip in the right direction. Pin numbers start upper left of the chip notch, down to bottom left, then to bottom right, then up to upper right.
There are 5 “jumpers” (solder bridge pads) on the board. This forum post on Lemon 64 was a great help but turned out not to work for me 100%. I opened J2, J5 and closed J1, J3, J4. The EPROM is too tall for the case to close completely but the screw will hold it together enough.
There you have it. This should work for any 8 kilobyte game that maps to $8000. Best part is since you’ve used a socket, the software can be easily swapped with something else. Enjoy!
Reinier
February 1, 2012 at 6:17pmHi, very nice work.
I have also a top853.
But i have problems with makeing Jiffydos kernels for my C64/1541.
I have some 27c256,2764 from AMD.
admin
February 1, 2012 at 9:28pmYou might have good luck by trying some of the other chip types for the AMD. For example, one chip I have is AM27C256-205DC. I assumed the “205DC” part meant 20.5v DC for programming so I chose the “21V” type chip. This didn’t work. Instead using the lower voltage setting worked fine (and I didn’t need to erase the chip again, it just continued where it failed).
enrique
February 9, 2012 at 8:18amnice work here, also connecting the C64 to the ipad! xD
i’ve been trying to build a interface for connecting a old ibm Ps/2 keyboard to the ipad,
is there a way to contact you? maybe you have any tips for me… thanks!
admin
February 9, 2012 at 9:20pmYou might have luck trying a PS/2 to USB adapter with the Apple Camera Connection Kit.
enrique
February 12, 2012 at 5:23ami’ve done that, but this old keyboard need a lot of current, so… i’m thinking building a pack of batteries to power it
if you ask why then i am trying to use a very old keyb, :D, well, old ibm keybs are the best keyboards ever built!
thanks!
Florian
May 4, 2012 at 6:42pmI have made good experiences with active USB hubs (ones with their own power supply) for connecting USB devices to the iPad. In this way The iPad will not complain about the device’s excessive power demand. I managed to connect a midi keyboard to the iPad with this method.
e5rfrog
May 18, 2014 at 3:04pmNice instructions, saved the time to trace those jumpers.