 It’s a question that pops up from time to time on forums from Lemon64 to Reddit C64.
“Yes! I just got a Commodore 64!! Now how do I get disk images onto disk so I can do something?”
It’s not straight forward. Folks in the Apple II world have a fantastic program called ADTPro that can work over a simple audio cable connected to your laptop headphone and microphone jack (or serial). Doesn’t get any easier than that.
On the Commodore, disc images are stored in .D64 format which is an image of a standard 1541 floppy. Most software you find is available this way. You may also find .D71 and .D81 which are for 1571 and 1581 formats but these are less common. A great place to find C64 software is the CBM8BIT.com Search. Once you have your disk images, you’re ready to make some floppies. Below are some of the options to “burn” disk images for your Commodore 64.
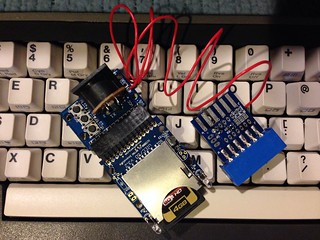 uIEC/SD2IEC ($50-60) is probably the easiest overall solution. With this small device, you can load .D64 images from your Mac or PC onto a SD card. Inserting into the uIEC, it will show up to the C64 as an extremely large volume. But merely having a .D64 image doesn’t get you very far– you need to “burn” the image to a real floppy. Fortunately, there’s D64it which can do just that. It’s a little slow as the author admits, but it gets the job done. Things are sped up considerably if you have the JiffyDOS ROM ($20) installed in your C64 since the uIEC is JD compatible. Don’t forget a 6-pin IEC cable!
 64NIC+ ($50-59) adds Ethernet capability to your Commodore 64 as well as a ROM socket that can accommodate up to 256kB ROMs. With networking capability, now you’re able to use WarpCopy64 which can upload and download entire disc images to your PC. There’s a bit of a chicken and egg problem here since you’re going to need WarpCopy64 on disk first before you can create new disks.
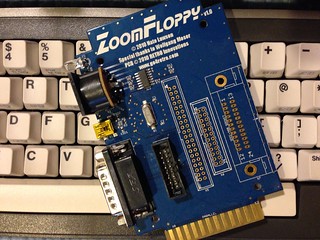 ZoomFloppy ($35) is a great solution to connect your Commodore 1541 to your Mac or PC via USB. ZoomFloppy is a modern version of the “X” series cables which required an old PC with a parallel port plus knowledge of IRQ and ports (see below). After installing OpenCBM software on your Mac or PC, you can read and write D64 images quickly and easily– no fuss. Hands down, this is my preferred way to read and write floppies.
If you’re lucky to have a terminal program already on floppy on your C64, you can do the serial route. Of course, you’ll also need an adapter that plugs into the C64 user port to give you standard RS-232 signals. These can be difficult to come by if you don’t have one, like the Commodore made VIC-1011a. One could also build this USB to RS-232 interface for your C64 for $15.
If you have a PC that’s old enough to have a parallel port on the motherboard, you might have good luck with “X” series parallel cables. These cables connect your parallel port to the IEC port of a 1541. From there, you can run Star Commander in DOS mode to read and write files and images. I started using this method years ago but abandoned it for the ZoomFloppy.
So there you have it. There’s no shortage of solutions and every solution is most likely going to cost you something. But each is a great investment and keeps the scene going with folks creating new methods. This list isn’t exhaustive– if you know of one or have experience with any of these, leave a comment!
Tony Lyon
March 18, 2014 at 10:44amHi, some very useful information
» Getting Programs For The C64 CP/M Cartridge
August 2, 2015 at 4:56pm[…] done, simply write your new D64 disc image to a real disc. Boot up C64 CP/M, swap the disc, and type DIR to see the contents. Just like on MS-DOS, […]